


EDI 204/990 — Load Tender / Response
Decide which internal users should receive load tender notifications and send that list to the technical team. Engineers set those users up for email alerts when a load is tendered.
Important: A user must have an active Transport Pro account to receive tender email notifications.
Access and Review Tendered Loads
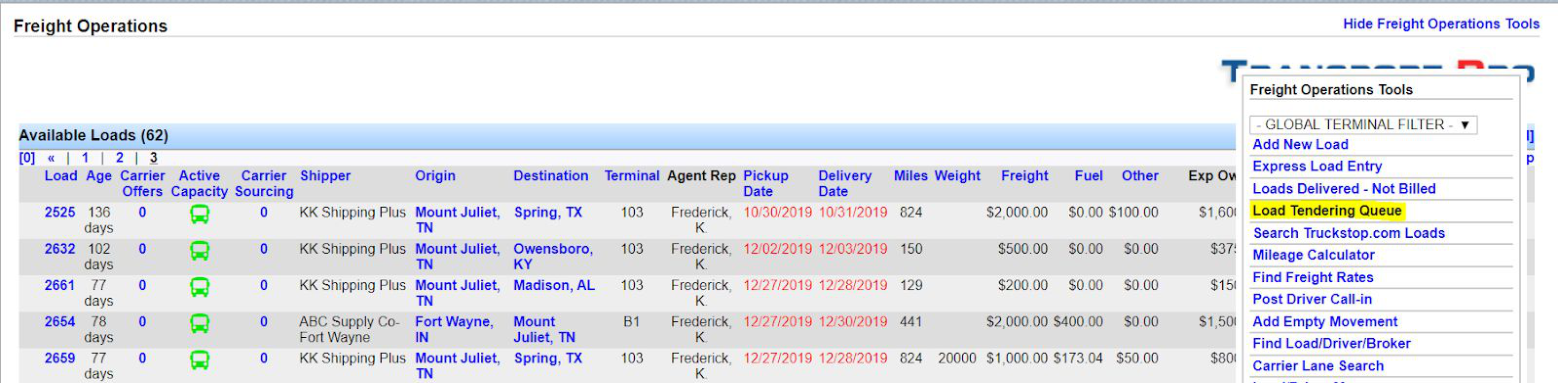
On the Freight Operations Dashboard, click Show Freight Operations Tools in the upper right, then open Load Tendering Queue. See also Freight Operations Dashboard.

The queue lists general information for each tendered load. Click Details for stops, pickup and delivery dates, references, and notes.
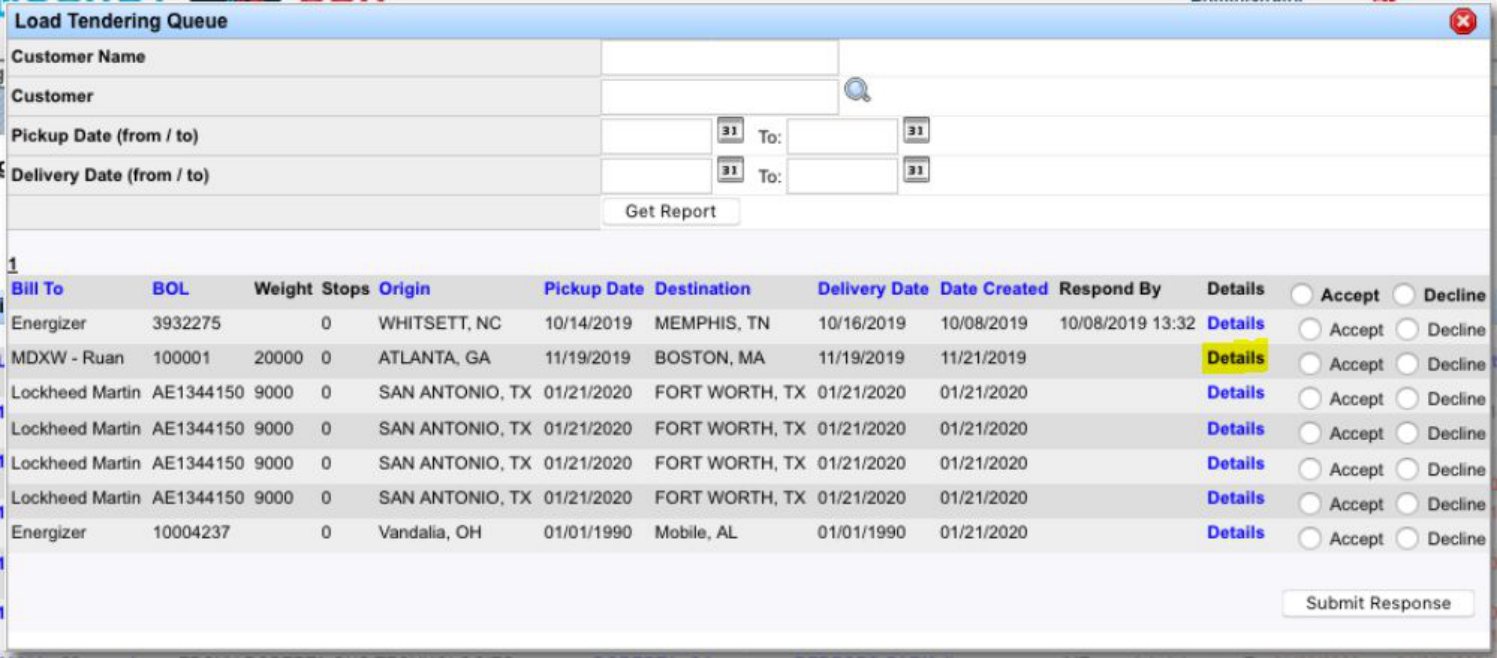
Note: Rates typically do not come over with the tender.
Accept or Decline Tendered Loads
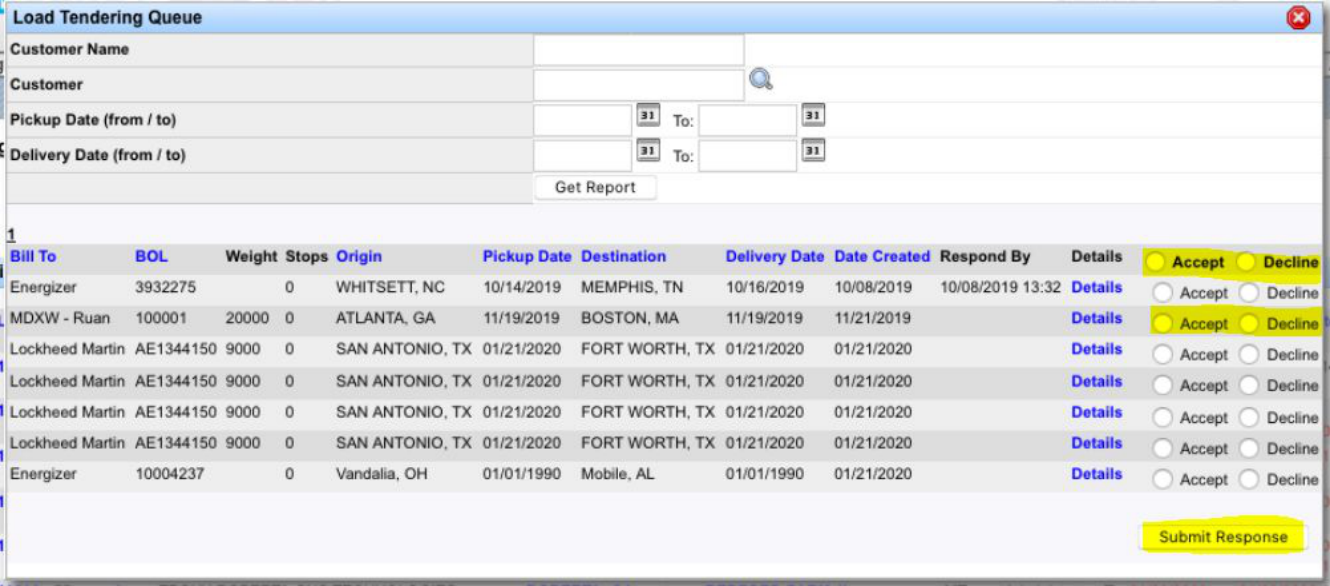
After you review a load, accept or reject it and submit the response. In the Load Tendering Queue, select the appropriate option next to each load. To accept or decline everything in the queue, use the option at the top of the column to select all, then click Submit Response.
Accepted loads are added as available loads and appear under Available Loads on the Freight Operations Dashboard.
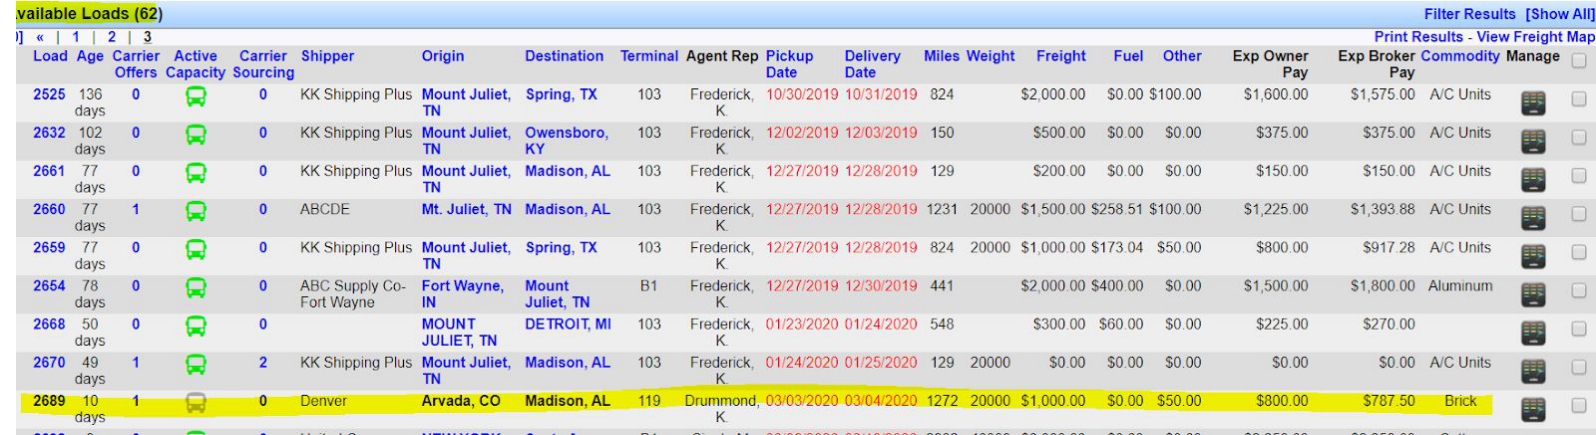
Note: Because rates usually do not come over, edit the load later and add the rate. Adding the rate does not send an EDI update to the trading partner.
Updates After Accepting a Load
Only two changes auto-update after you accept a load: (1) dates, and (2) if the load is canceled.
Sending Load Appointments
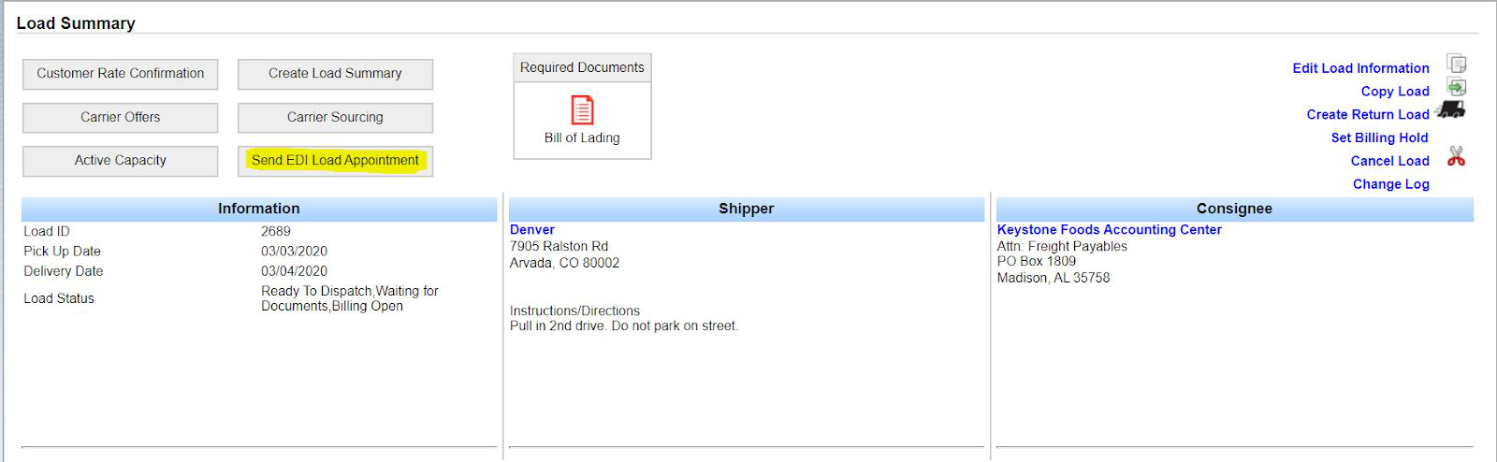
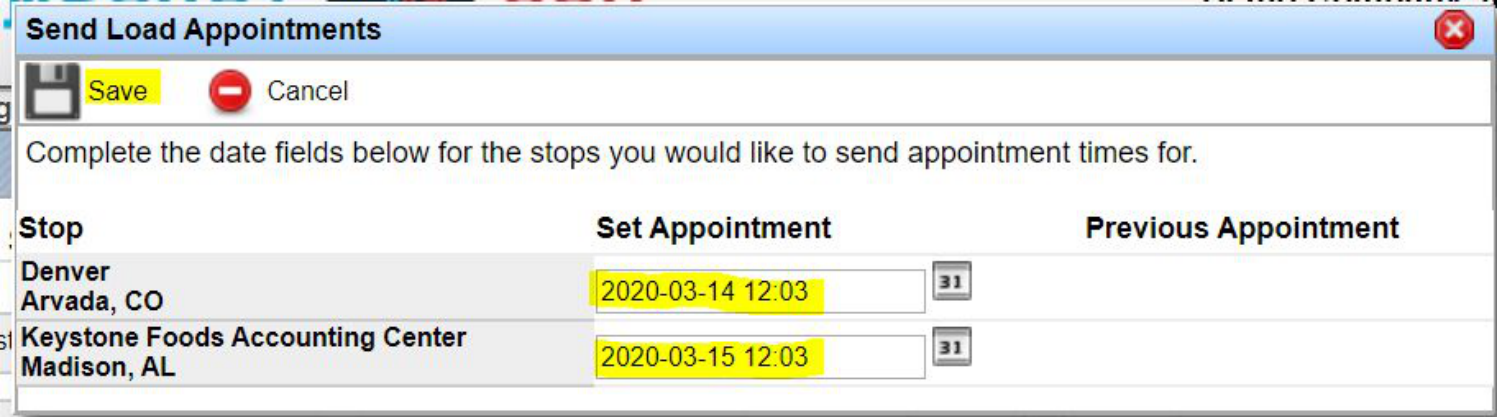
Send appointments from the Load Summary screen. Click the Send EDI Load Appointment tab in the upper left, set the dates and times, and click Save Record. Previous appointment times still appear when you reopen the window.
EDI 214 — Customer Updates
Customers may require different update frequencies (for example, every 15 minutes vs. every 2 hours). Those settings live on the customer record and drive how updates are sent.
Load Status Updates
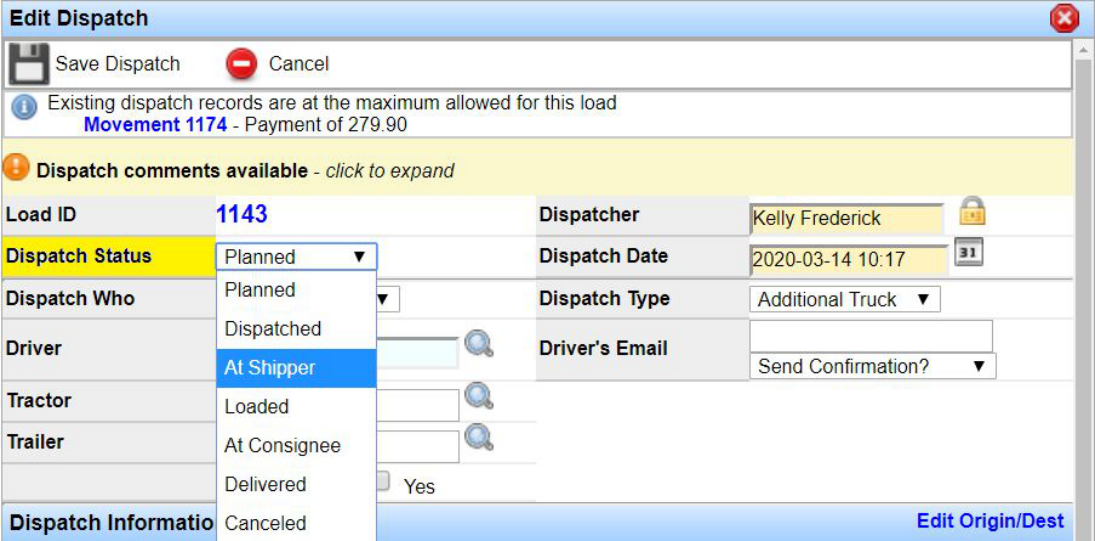
In addition to location updates, dispatchers monitor status (At Shipper, Loaded, Delivered, and so on). Transport Pro automatically sends status updates to EDI customers when the status changes on the dispatch record.
Location Updates
With ELD or Tracking Services Enabled
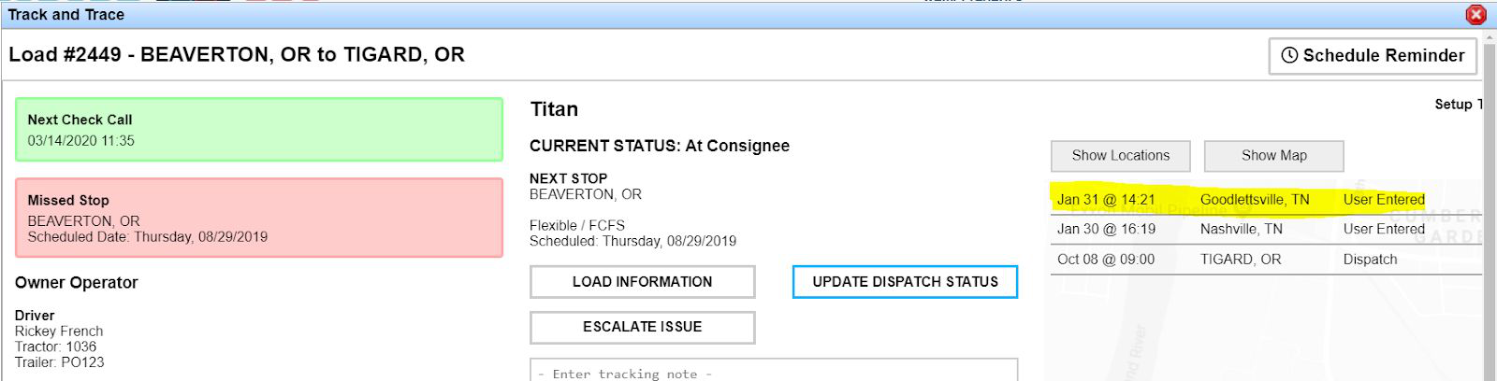
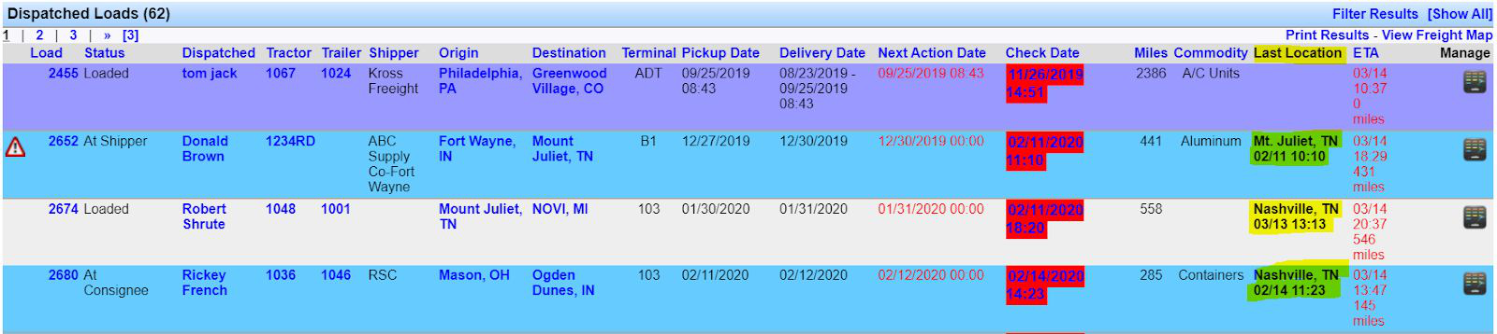
For trading partners that need shipment location updates, Transport Pro sends 214 updates based on the Load Notification Frequency on the customer record. Locations come from Omnitracs, MacroPoint, or other subscribed providers, and include manual check calls entered in Transport Pro.
Note: Location data shows on the Freight Operations Dashboard and in Track & Trace. Pings display in your office time zone (set at installation). The customer's EDI system handles time zone conversion when it receives the updates.
Entering Dates and Times Correctly
Dispatchers must keep in and out times on the dispatch accurate. Enter dates and times local to the load (local to the pick or drop). The check-call system uses your installation time zone.
Important: In/out times on the dispatch should fall within the load's pickup and delivery window. Tracking can stop if dispatch times fall outside the load dates/times.
Without ELD or Tracking Services
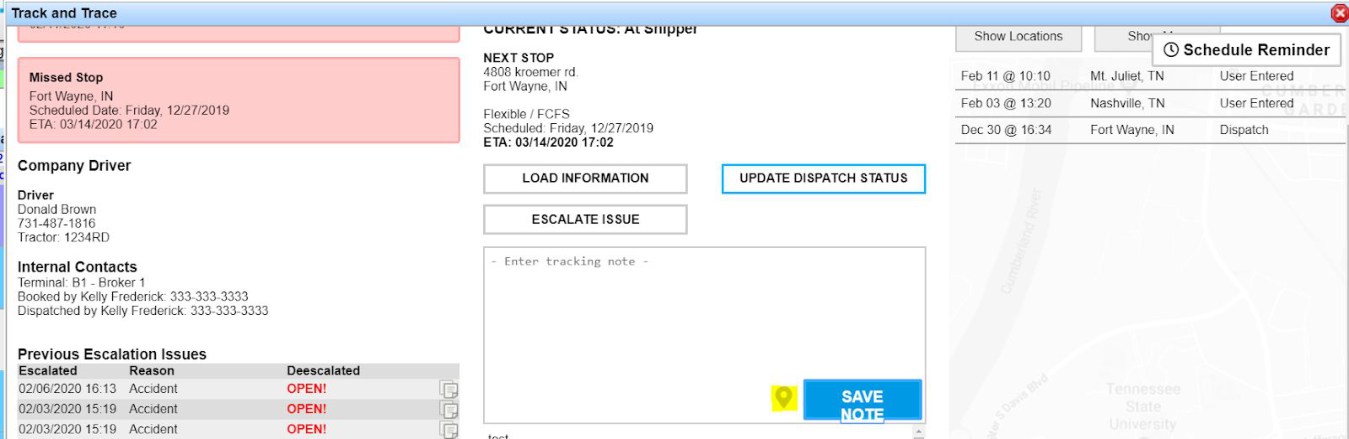
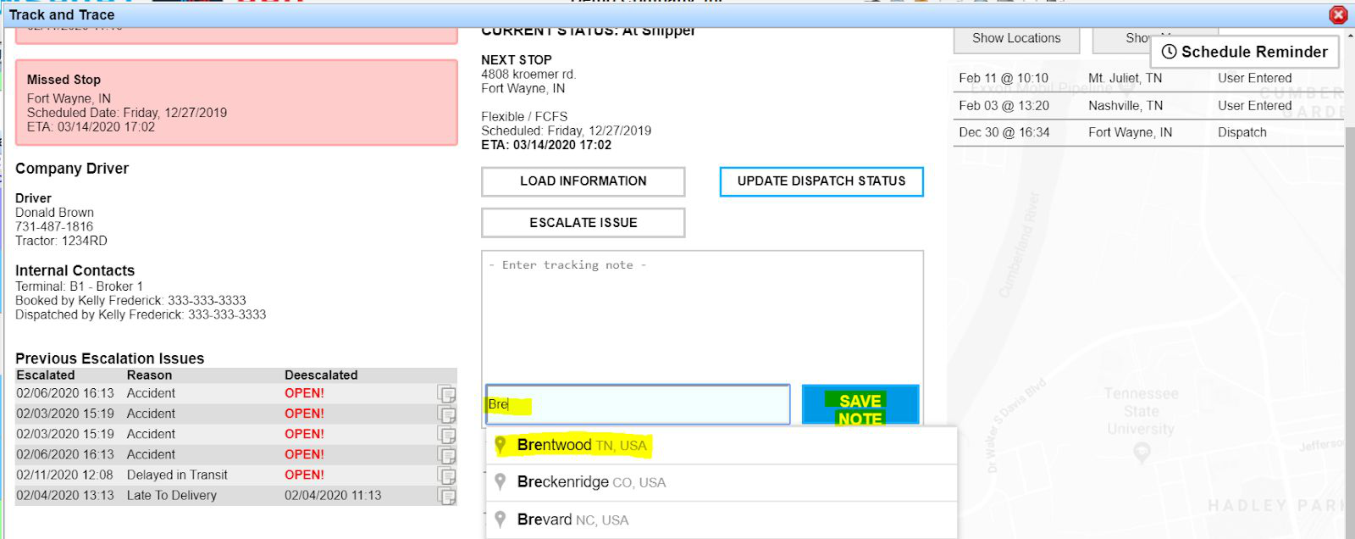
Enter location updates manually from Track & Trace. Click the gray pinpoint at the bottom of the tracking notes box, type a location (Google suggestions appear), select or free-type the place, then click Save Note.
Changing Location Update Frequency
Edit the customer record and find Load Notification Frequency near the bottom of the first column. Several defaults are available; ask the technical team if you need other intervals. See Add a Customer.
EDI 210 — Billing
EDI billing adds a step after the normal billing process. When the technical team programs an EDI billing map for a customer, that setup lives on the customer record—you do not add EDI fields yourself. Related guides: Bill a Load and Billing a Load.
Bill a Load via EDI
Mark the load ready to bill and process it in the Freight Bill Processing queue as usual. EDI loads then move to the EDI Billing Queue: Billing > Load Queues > Submit EDI > EDI Queue. Check the loads to approve and click Approve EDI.

Important: Approve EDI only marks files ready for transmission—you have not transmitted them yet.
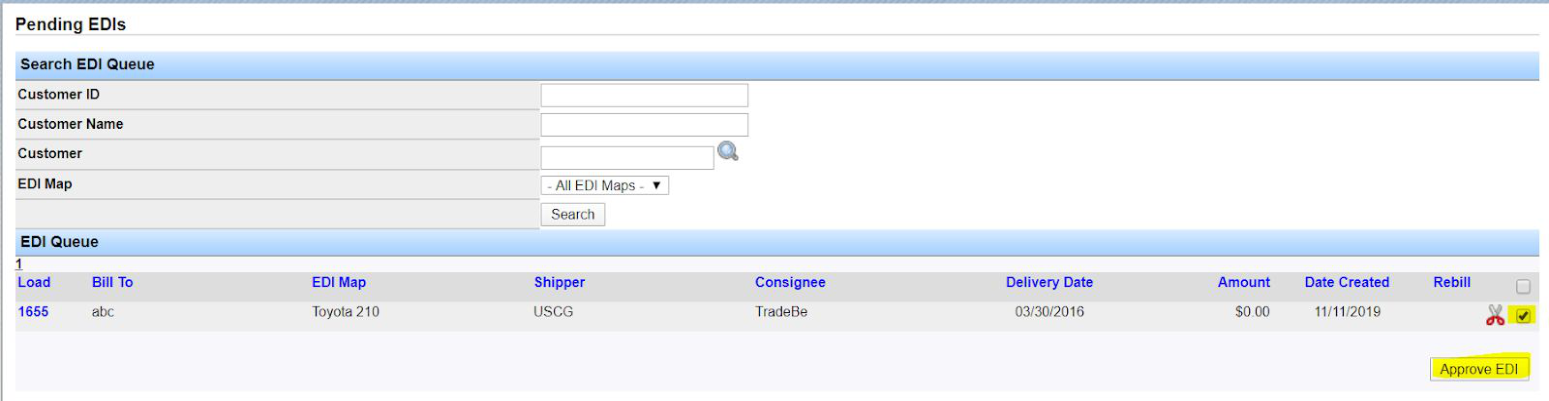
Approved loads go to the Batch Queue. Open it from the hyperlink that appears after approval, or go to Billing > Load Queues > Submit EDI > Search EDI Batch. Click the file ID to open the EDI Transmission Summary.
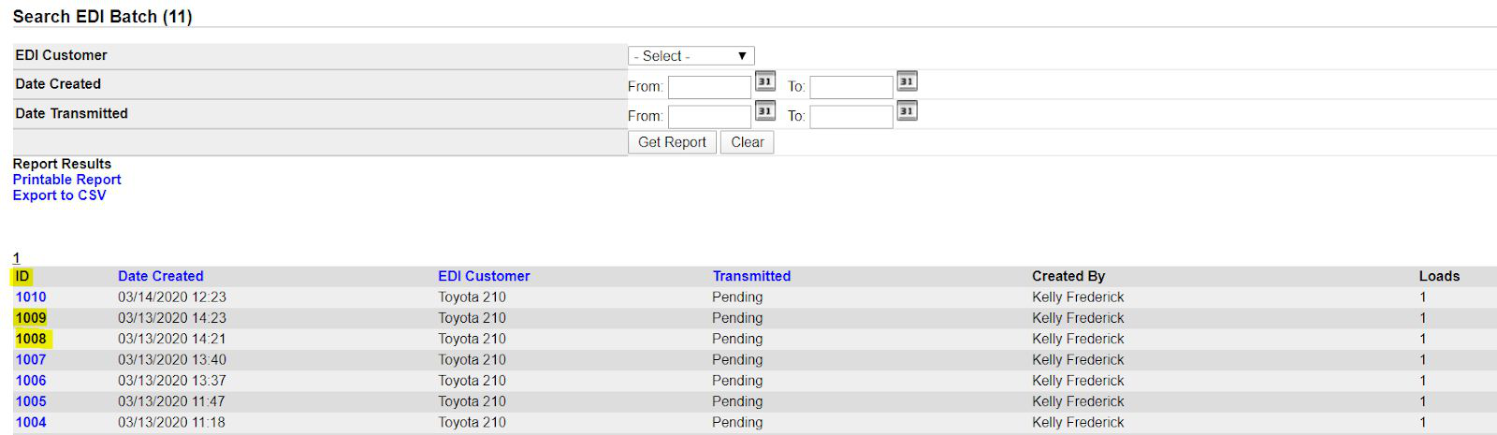
On the Transmission Summary, click Upload Data File to transmit. The system confirms submission—you do not need to click Confirm Submission.
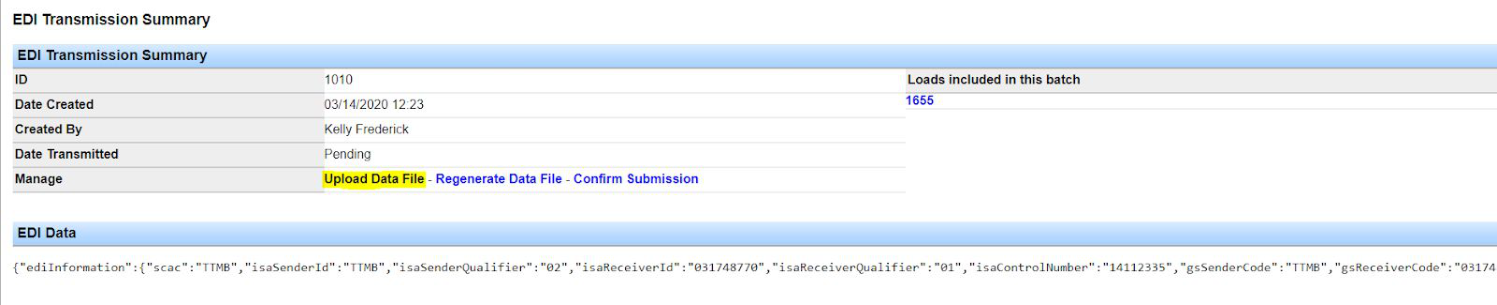
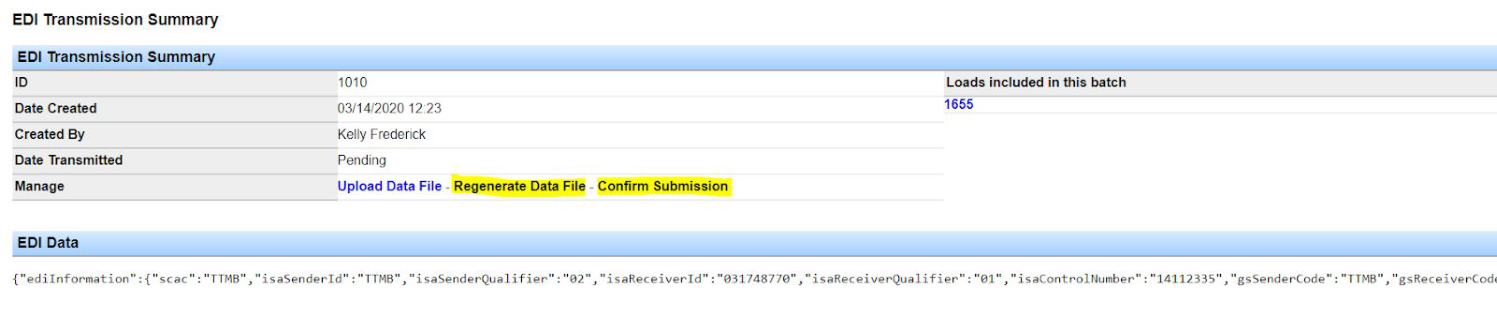
Other Options on the Transmission Summary
- Regenerate Data File: Sends the file back to the batch queue so you can open the file ID and re-submit.
- Confirm Submission: Use only if you clicked Regenerate Data File by mistake and the file was already transmitted—confirm it instead of re-sending.
Note: EDI bills send as raw text with no images. If a trading partner needs images or special billing handling, contact support@transportpro.net.
Re-Bills
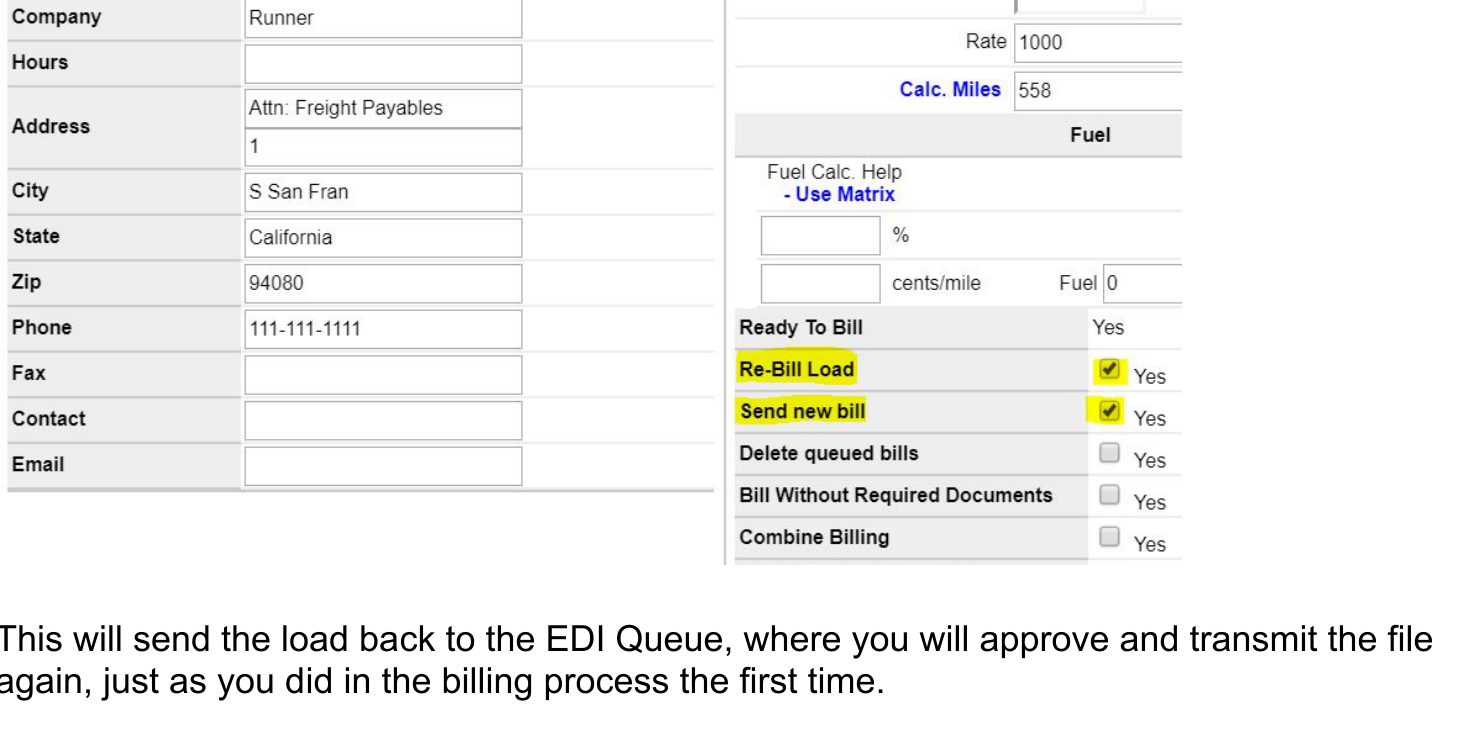
EDI re-bills follow the normal re-bill process, then you transmit again through the EDI billing queue. After you change the load, check both Re-Bill Load and Send New Bill. That returns the load to the EDI Queue for approve and transmit. See Rebill a Load.
Important: Transport Pro does not notify you of bill rejections. Arrange rejection notices separately with your trading partner (for example, a daily email list).
Search Pending and Transmitted Files
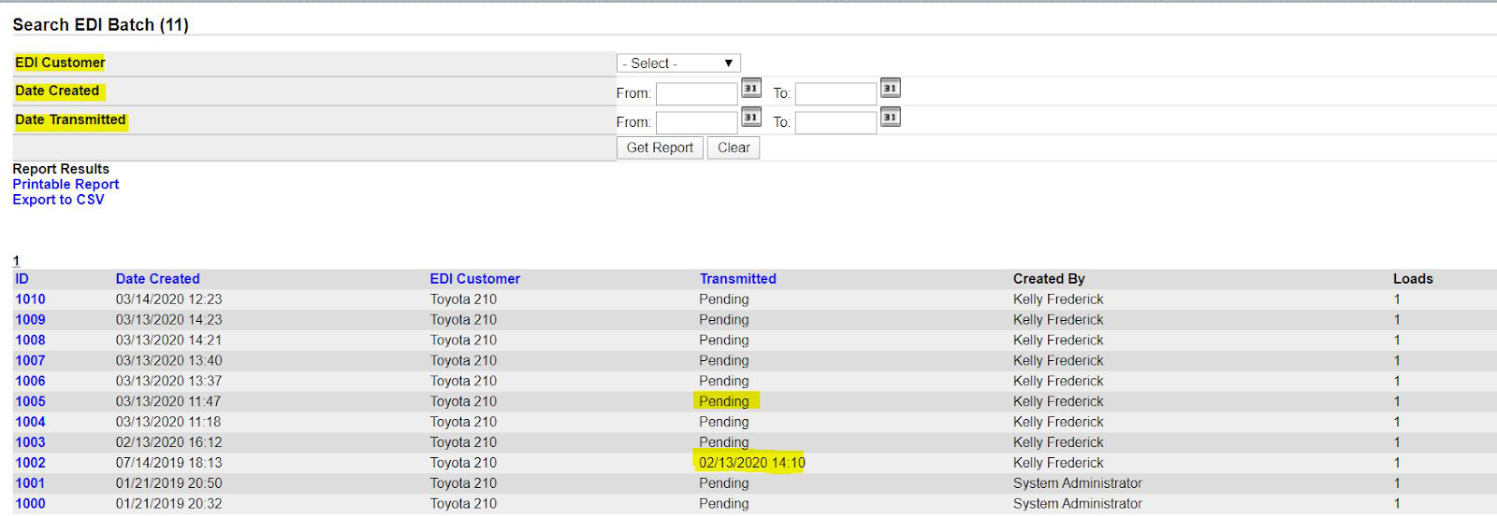
To see pending files for a customer or what you transmitted in a date range, go to Billing > Load Queues > Submit EDI > Search EDI Batch. Use the filters on that screen. Successfully transmitted files show a date and time stamp.
Questions about EDI or trading partner requirements? Contact support@transportpro.net.