Billing Dashboard
Introduction This guide shows you how to bill a load in Transport Pro, and explains the “billing queues” that you see under the “Billing” tab in Transport Pro.
The system allows you to easily bill customers, whether you bill directly, or need to send schedules to a factoring company.
We will cover each scenario in the guide.
Billing Dashboard Billing users will likely log into Transport Pro and start their day on the “Billing Dashboard.” This dashboard shows several general billing statistics as well as what the action items arefrom a billing perspective.For example, billing users will be able to see how many loads in the system have been delivered, are waiting for documents, and need to be billed.Below is a screenshot of the Billing/Collections Dashboard.
Let’s define the pending billing stats that the dashboard displays.
To get to the billing dashboard, go to Billing > Billing Dashboard.
Note: Although this is technically a billing AND collections dashboard, this guide will only cover billing, as not all customers may be using Transport Pro’s accounts receivable (AR) module to record payment against loads.
If you want to learn more about collections/AR,please see our AR guide.
Explanation of Pending Billing Stats:*The blue text represents hyperlinks, so you can click on this number to be redirected to thelist or queue.*
- Loads Delivered - Not Billed: This is the number ofloads in the system that have been delivered, but not all of the required documents have been indexed yet, and the load has notbeen billed.
You can click on this stat to get redirected to this list of loads.
From here, a billing user will go into each load, upload the required documentation and then approve the load for billing [i.e. mark the load ready to bill (RTB)].
- Loads Delivered, Docs Received - Not Billed (RTB): This is the number of loads that have been delivered, all of the required documentation has been indexed, but the loads have notbeen approved for billing yet.
A billing user can click on the number to be redirected to this listof loads.
From there, the user can go into each load, review it for accuracy, and approve theload for billing [i.e. mark the load ready to bill (RTB)].
- Loads Delivered, Docs Received - Not Billed (Locked): This is the number of loads that have been delivered, all of the required documentation has been indexed, the loads have notyet been approved for billing, and there is a billing hold on these loads for some reason.
A billing user can click on the number to be redirected to this list, and then go into each loadand review the reason that the load was placed on a billing hold.
From there, the billing usercan determine if the billing lock should be removed, and approve the load for billing.
Or,perhaps, the load needs to remain locked for now.
For example, maybe you’re waiting to billthe customer for detention.
- Loads w/ Billing Lock: This is the number of loads that have been locked for billing, or inother words, someone has put a billing hold on these loads, regardless of status.
A billing user can click on the number to be redirected to this list, and then go into each load and review the reason that the load was placed on a billing hold.
From there, the billing user can determine if the billing lock should be removed, and approve the load for billing.
- Waiting for Documents: This is the number of loads that have been approved for billing, orin other words, have been marked ready to bill (RTB) without all of the required documentation being on file.
You can click on this number to be redirected to the “Waiting for Documents” queue.
You can also find this queue by going to Billing > Load Queues > Waiting for Documents.
You can think of this billing queue as a safeguard that the system has in place to ensure that users aren’t sending off billing packets to customers with missing documents.
If you navigate to the “waiting for documents” queue and hit “search” you will see the loads that have been approved for billing without the required documentation indexed.
Here, youwill see which documents are missing, and you will also see a green arrow out to the right.
At
this point, you can go into the load and index the missing documentation, or you can click the green arrow to push the load through to be processed without the missing documents.
- Pending Freight Bills: This is the number of loads that have been approved for billing, or inother words have been marked ready to bill (RTB), but have not actually been billed/sent offto the customer or factoring company yet.
These loads are sitting in the “Pending Freight Bills” billing queue.
You can also navigate to this queue by going to Billing > Load Queues > Freight Bill Processing Queue.
It is from this queue where the billing occurs.
- Queued for Print: This is the number of loads that have been processed for billing, meaning that the billing packet has been generated for these loads, but the billing packet is sitting inthis print queue, waiting to be printed from your local printer.
Loads will only fall into this queue if you have customers set up to receive hard copies of their billing deliverable s.
You can also get to this queue by going to Billing > Load Queues > Freight Bill Print Queue.Assuming you’re doing everything electronically, you probably won’t ever need to visit this queue.
- Loads Queued for Rebill: This is the number of loads that are “unlocked for rebill,” meaning that a user “unlocked” a load that has already been approved for billing, likely to make achange/edit to the load.
However, the load was never actually re billed, or finished out.
A billing user would want to work through any of these loads, make sure any necessary changes were made, and then push the load through a rebill.
Re billing loads will be covered in a separate guide.
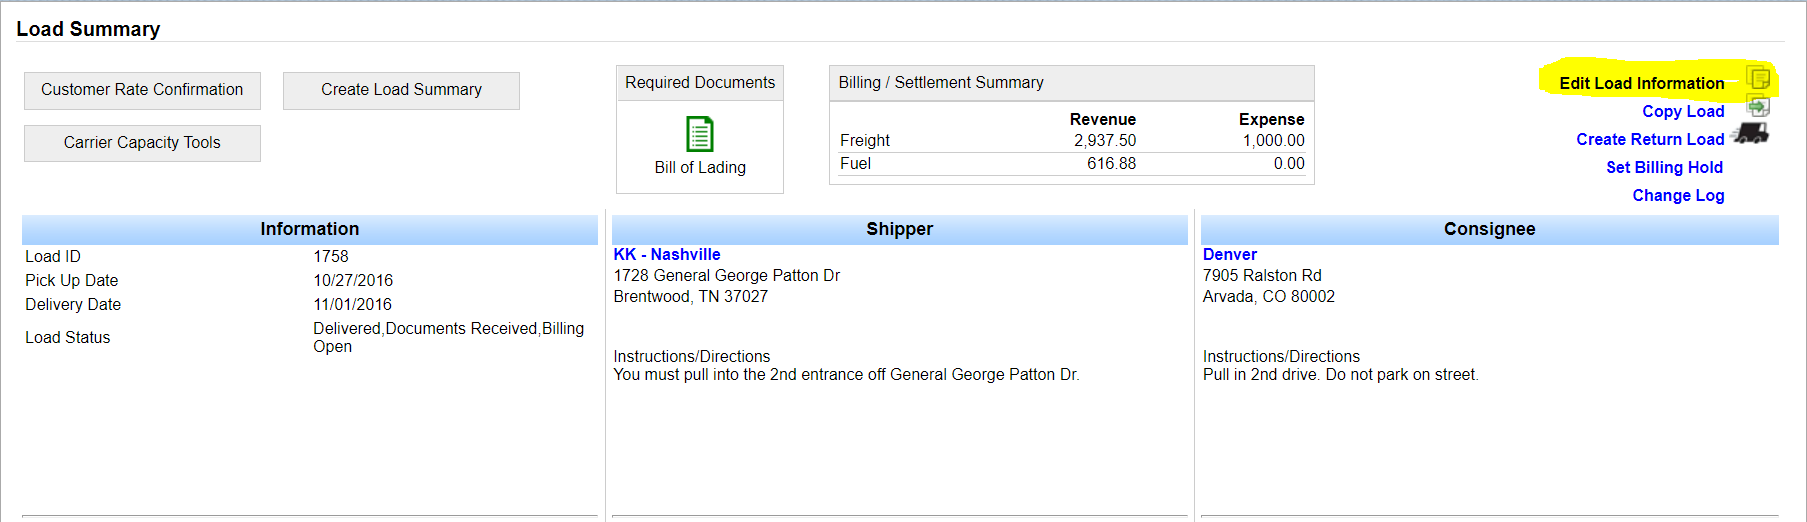
- HELPFUL TIP: You can see a load’s billing status directly from the Load Summary screen.Below is a screenshot of where you can see this status.
You can see the load’s dispatch,document, and billing status here.
Bill a Load
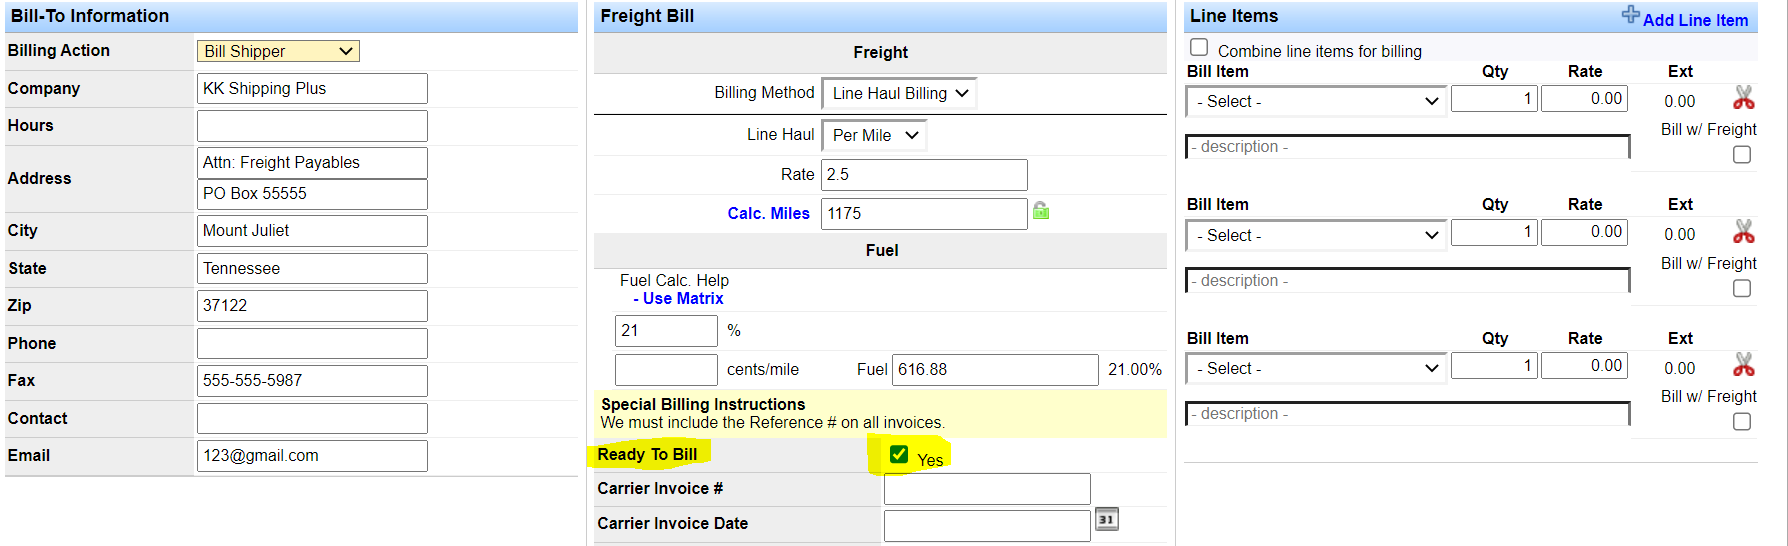
Once a load has been delivered, and all of the required documentation has been indexed,then it’s time to process the load for billing.To bill a load you will need to be on the Load Summary screen.
Then click “Edit Load Information.” Next, scroll down to the bottom of the load information page, and check the “Ready to Bill” box.
This “approves” the load for billing.
Note: There are a couple fields on the load that become required at the time of billing: the“Bill of Lading” and the “Weight.” So, before approving the load for billing, make sure youhave values entered in these fields.
Otherwise, you’ll get an error telling you to enter this required information.Also note, that if you are a brokerage company billing a load with a broker carrier dispatched,then you will see two fields become available below the “Ready to Bill” check box, where youcan enter the carrier invoice number and date.
If you don’t have that information, or you forget to enter it here, don’t worry.
You will have the opportunity to enter this information at the timeof settlement.
Once you check the “Ready to Bill” box, save the record.
Note: Approving the load for billing does three things: 1) The system generates the freight bill and places it in the “File History” section on the load with the rest of the required documentation that has been indexed, 2) The system generates the pending settlement entries, and 3) The system creates the open load balance against the customer, or in other words, the aging begins.
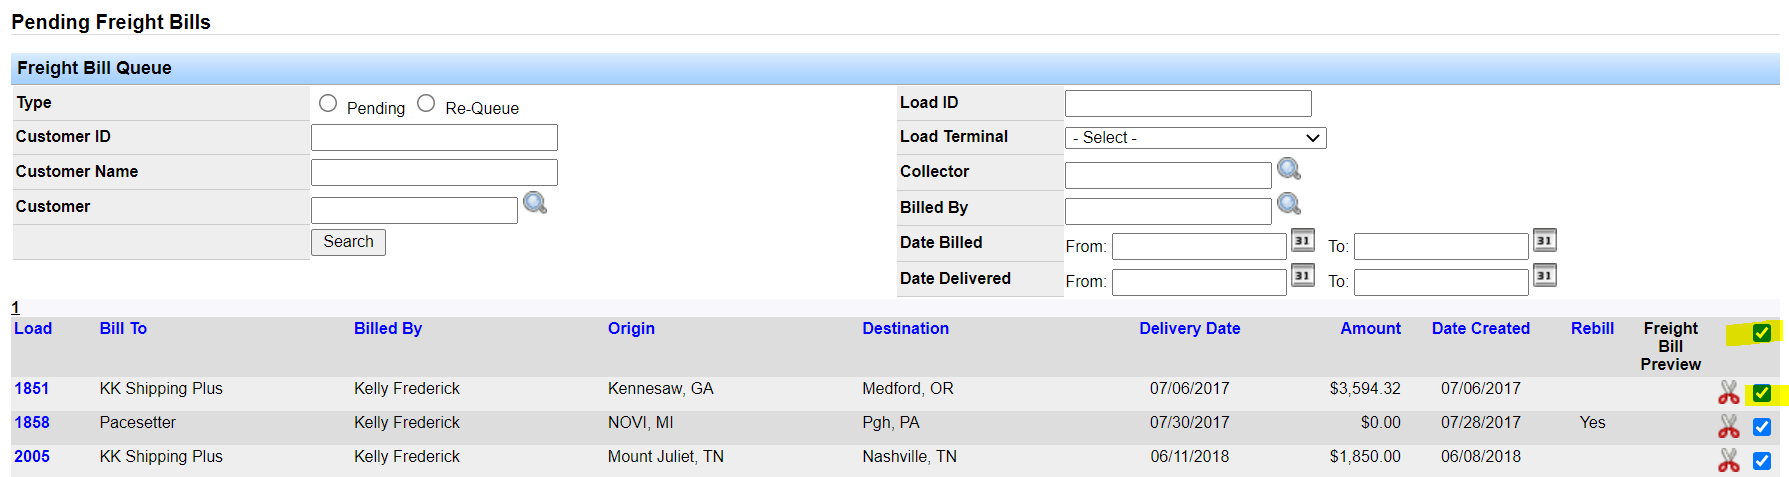
Transport Pro is an accrual based accounting system, not a cash based accounting system.Once the load has been approved for billing, the load gets sent over to the “Freight Bill Processing Queue.” So once all of the necessary loads have been approved for billing,navigate to the freight bill processing queue to process all of the billing at one time.Go to Billing > Load Queues > Freight Bill Processing Queue.
Here, you will see all of the loads that have been approved.
You can check the box at the top to select all of the loads in the queue, or check the box out to the right of the individual loads you want to process.There are several filter options in this queue, which may be helpful if you have a lot of loads tobe processed, but perhaps you only want to process a specific customer’s loads, for example.
Once you have selected the loads you want to process, click the “Send to Customer” button at the bottom of the page to bill the load(s).
Note: There are two things that occur when you click the “Send to Customer” button: 1) The system combines the freight bill with the indexed supporting documentation and creates the billing packet for the load(s) in a PDF format.
A copy of the billing packet gets saved in the“File History” section of the load, and 2) The system sends the billing packet to the customer.So, if you are billing your customers directly, you have now completed the billing process.This is, of course, assuming that you bill your customers electronically, and therefore the packet gets emailed to the customer.
If you use a factoring company, then there is one more step to the billing process.
You’ll go to Billing > Load Queues > Freight Bill Processing Queue.
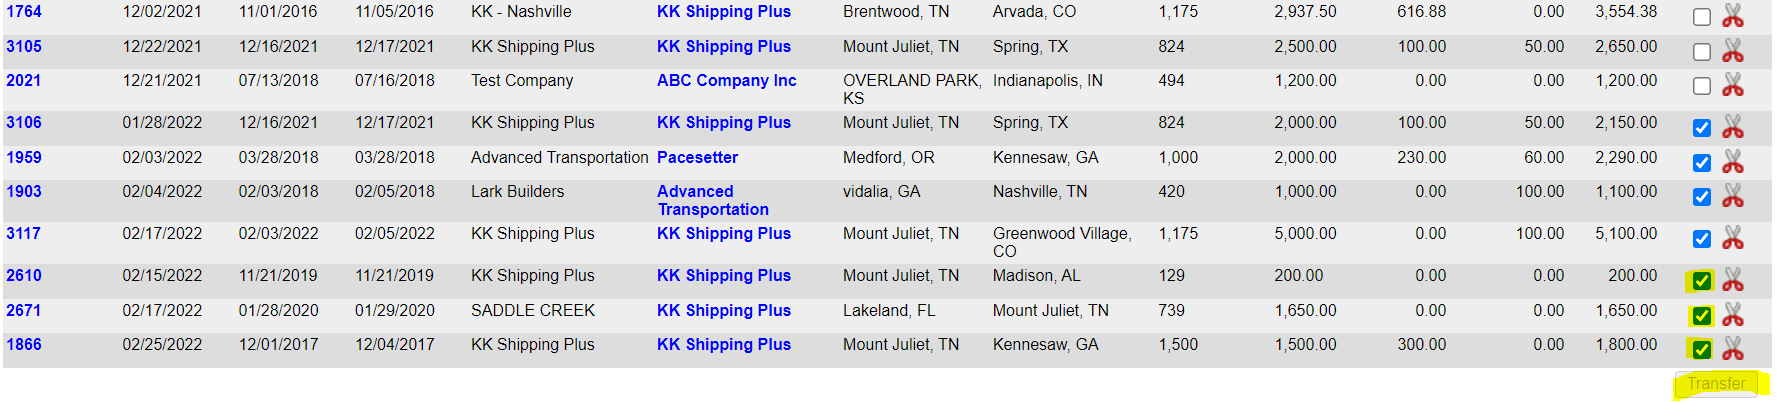
Check everything you wish to send toyour factoring company, and click the “Transfer” button at the bottom of the page.
You havenow transferred your schedules from Transport Pro to your factoring company.
Note: Getting your installation set up with your factoring company is typically part of your setup process, but can be implemented at any time.
If you need to get the integration set up,please contact our tech support team at support@transportpro.net.The factoring transfer queue in Transport Pro looks like this: Once you click “Transfer” your schedules go over.
Please note, this is where the factoring integration ends.When the customer pays the invoice, it will not talk back to Transport Pro to record the collections, or show the load as “paid.” You will either enter a cash receipt in Transport Pro (ifyou’re recording this info in the TMS), or you will record it in Quick Books, or any other outside accounting system you may be using.

How to Set Billing Preferences for Customers
There are a few key pieces of billing information that you will need to check before you start billing loads out of Transport Pro.
To do this, navigate to the customers profile in Transport Pro by going to Customers > Search Customers.
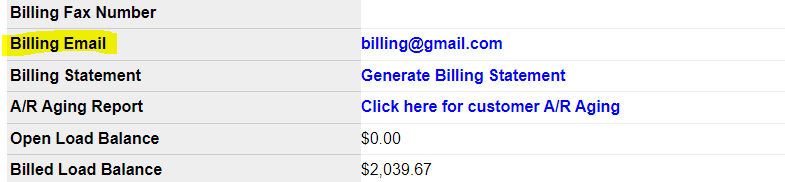
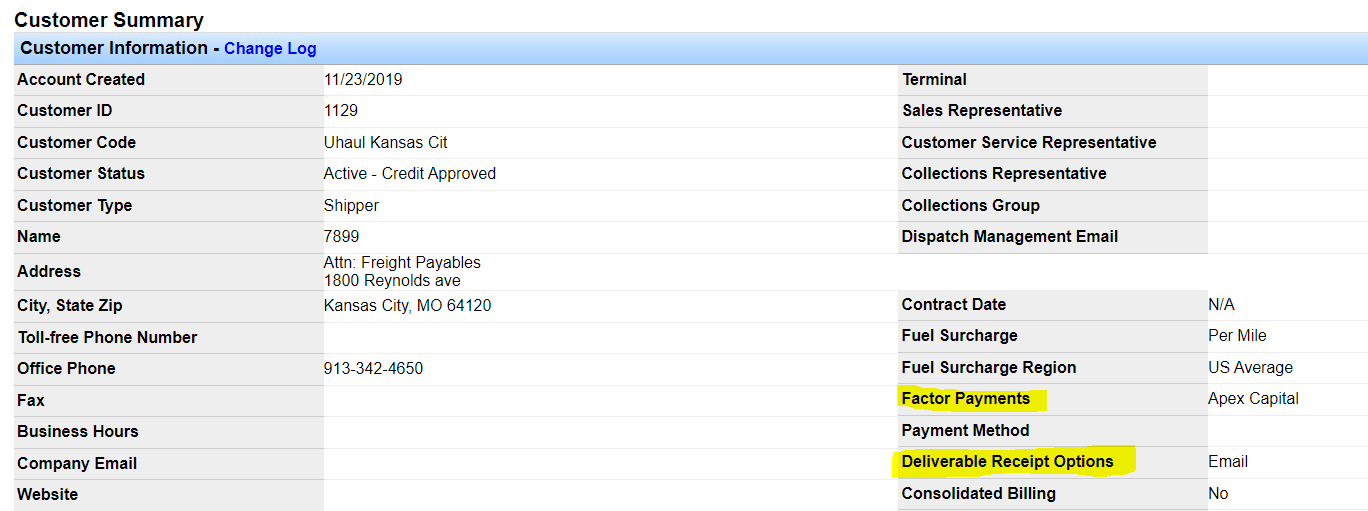
- Open the profile.The main fields you need to review are: Factor Payments, Deliverable Receipt Options, and Billing Email.
Below is a screenshot and an explanation of each field.
- Explanation of Highlighted Billing Fields: Factor Payments: If you are using a factoring company, and this customer’s invoices need togo to factoring, then you should have your factoring company selected from this drop-downon the customer profile.
This setting will tell the system to send the billing packet to the factoring transfer queue so you can send it to factoring.
If you do not factor, leave it as“non-factored.”
Note: Again, note, if you don’t see your factoring company listed in this drop-down, please email support@transportpro.netso we can help youset up the integration.
Also note that wecan only transfer schedules to a single factoring company.
If you happen to use more thanone factoring company, you’ll have to pick one in Transport Pro.
- Deliverable Receipt Options: How does this customer need to receive their billing deliverable s (i.e. the billing packet)?
If you’re using a factoring company, then you don’t needto check anything here.
If this is a direct bill, and you bill the customer electronically, then youwill check “Email.” If you bill this customer directly, and the customer requires a hard copy (i.e.snail mail) then you will check “Hard Copy.”
- Billing Email: If you directly bill this customer via email, then you MUST enter a valid billing email as well.
This tells the system at the time of billing to send the packet to the customer tothis email.
You can enter multiple emails separated by a comma if needed.
You will also see some other billing-related fields on the customer records in Transport Pro.Depending on the customer’s billing preferences, these additional fields may be helpful.
Let’sbreak down what each one does.
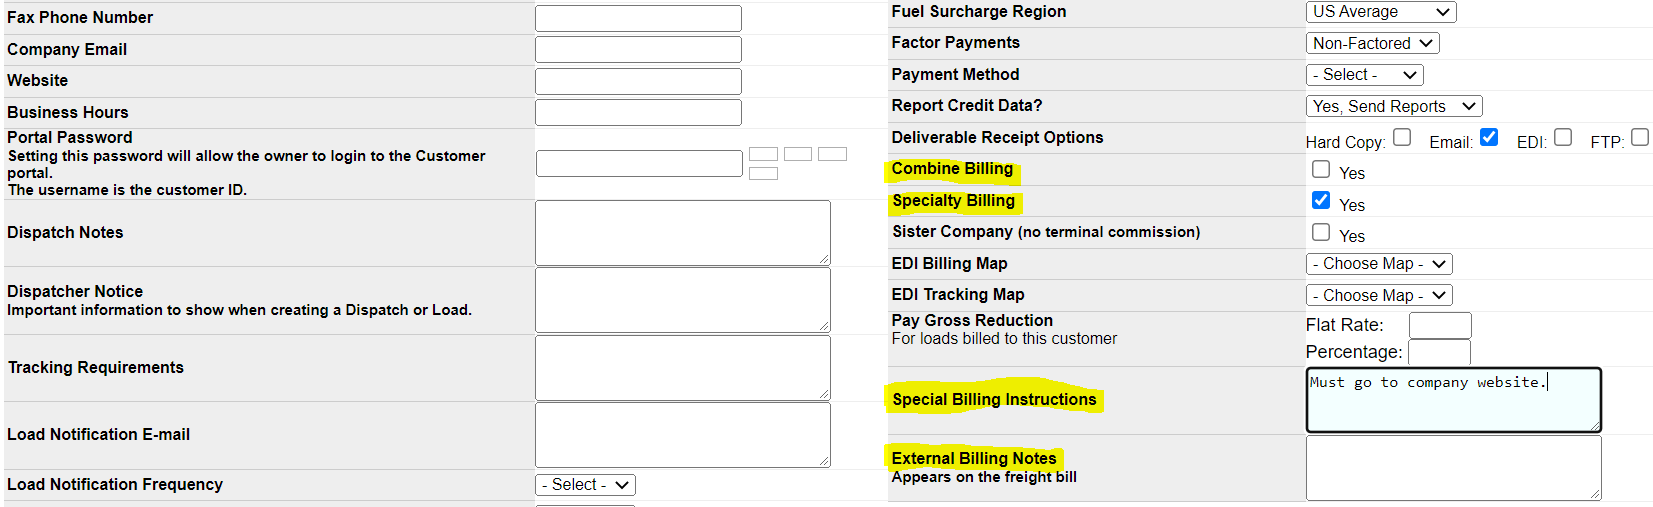
Your billing team can determine whether or not to use them.Below is a screenshot of the other billing fields, and an explanation of fields.
- Explanation of Highlighted Billing Fields: Combine Billing: This box should only be checked ifyou do not need to break out the line items/access o rials on the invoice to this customer.
In other words, the customer prefers to see their bill as one lump sum.
This is rare, but it’s here if you need it.
- Specialty Billing: You can check this box if thereis something special about billing this customer.
If you check this box, the system will show you a notification at the time of marking a load ready to bill to remind you that there’s something special about billing this customer.
- Specialty Billing Notes: If you checked the box for specialty billing, then you may wish tomake a note, or document what that entails.
For example, maybe you have to go to their website.
This note will show to you at the time of billing.
Think about the “specialty billing” options as the ability to set a reminder for yourself for that customer.
- External Billing Notes: If there is a specific note or comment that needs to display on all invoices for this customer, then you can enter a note here.
When the system generates the in voice, it will pull this note onto their invoice.
That covers how to bill a load in Transport Pro, and how to set a customer’s billing preferences.
We will cover the re-bill process in a separate guide.
If you have any questions,or need assistance, please contact tech support by emailing support@transportpro.net.