


Managing Sales Accounts
Sales System Management Managing Sales Accounts accounts or add a new account, follow the path in the menu Sales > Manage Settings > Manage Sales Entities.
Follow the steps below.
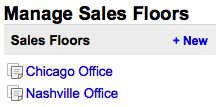
Add a Sales Floor
- Click “+ New”
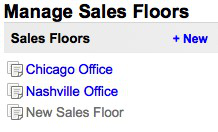
- Click the edit icon next to “New Sales Floor”
- Change the name of the sales floor.
- Click out of the box and your new sales floor has been created.
Add a Sales Team
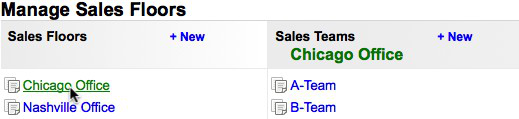
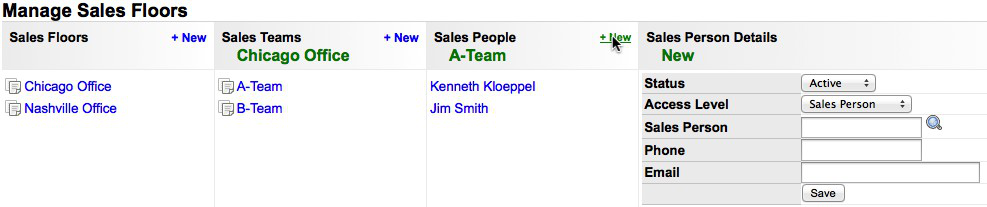
- Once you have added at least one sales floor, you can add a sales team by clicking on the sales floor you would like to add the team under.
- This will show a list of any/all teams under that sales floor.
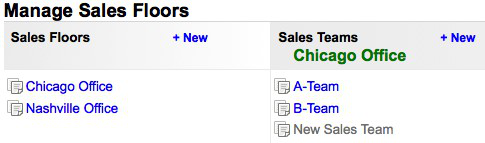
Click “+ New” to add a new sales team.
Add a Sales Floor
Sales System Management Managing Sales Accounts accounts or add a new account, follow the path in the menu Sales > Manage Settings > Manage Sales Entities.
Follow the steps below.
Add a Sales Floor
- Click “+ New”
- Click the edit icon next to “New Sales Floor”
- Change the name of the sales floor.
- Click out of the box and your new sales floor has been created.
Add a Sales Team
- Once you have added at least one sales floor, you can add a sales team by clicking on the sales floor you would like to add the team under.
- This will show a list of any/all teams under that sales floor.
Click “+ New” to add a new sales team.
Add a Sales Team
Sales System Management Managing Sales Accounts accounts or add a new account, follow the path in the menu Sales > Manage Settings > Manage Sales Entities.
Follow the steps below.
Add a Sales Floor
- Click “+ New”
- Click the edit icon next to “New Sales Floor”
- Change the name of the sales floor.
- Click out of the box and your new sales floor has been created.
Add a Sales Team
- Once you have added at least one sales floor, you can add a sales team by clicking on the sales floor you would like to add the team under.
- This will show a list of any/all teams under that sales floor.
Click “+ New” to add a new sales team.
Add a Sales Person
- Click the edit icon next to “New Sales Team”
- Change the name of the sales team.
- Click out of the box and your new sales team has been created.
Add a Sales Person Before you can add a sales person, you must have at least one sales floor and one sales team set up.
The sales person must have an active account in Transport Pro before they can be given access to the sales system.
- Click on the Sales Floor that contains the Sales Team that will contain the Sales
Person.
- Click on the appropriate Sales Team.
- Click “+ New” (or click on the sales person's name to edit)
- Once you select the user from the “Sales Person” auto-suggest box, the phone and email boxes will auto populate.
- To determine the user's access level, see the “Access Levels” section to see what permissions each level has.
- Click “Save”
Access Levels
- Sales Person ◦ Claim Leads
- Team Leader ◦ Same permissions as a “Sales Person” ◦ Can reassign leads to other sales people
Access Levels
- Click the edit icon next to “New Sales Team”
- Change the name of the sales team.
- Click out of the box and your new sales team has been created.
Add a Sales Person Before you can add a sales person, you must have at least one sales floor and one sales team set up.
The sales person must have an active account in Transport Pro before they can be given access to the sales system.
- Click on the Sales Floor that contains the Sales Team that will contain the Sales
Person.
- Click on the appropriate Sales Team.
- Click “+ New” (or click on the sales person's name to edit)
- Once you select the user from the “Sales Person” auto-suggest box, the phone and email boxes will auto populate.
- To determine the user's access level, see the “Access Levels” section to see what permissions each level has.
- Click “Save”
Access Levels
- Sales Person ◦ Claim Leads
- Team Leader ◦ Same permissions as a “Sales Person” ◦ Can reassign leads to other sales people
- Floor Manager ◦ Same permissions as a “Team Leader” ◦ Can reassign leads to other Sales Teams under their sales floor
- Sales Admin ◦ Same permissions as a “Floor Manager” ◦ Manages user accounts ◦ Unrestricted access to the sales system.
Manage Dispositions Transport Pro allows users to manage dispositions, which are used to set up the next default actions for each activity.
Once an activity is completed, a next activity pop-up box will appear.
The box is pre-populated with the suggested next activity.
It is at the sales person's discretion to change the next activity.
To manage dispositions, follow the path in the menu Sales > Manage Settings > Manage Dispositions.
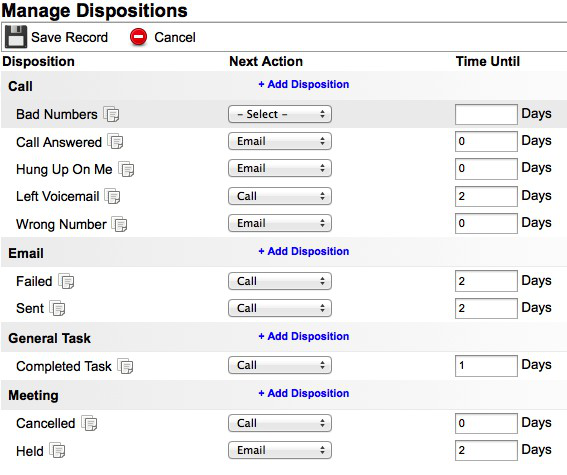
- Example: a “Call” has 5 dispositions.
When a call is disposition ed as “Left Voice mail,” the default next action is to make another call in 2 days.
Setting Past Due Thresholds
Add Disposition
- Click “+ Add Disposition” next to the activity type.
- Assign a name for the new disposition.
- Select a next action.
- Enter a numerical value for the number of days until the next activity is to be performed.
- Click “Save Record” at the top of the page.
Setting Past Due Thresholds To set a past due threshold, follow the path in the menu Sales > Manage Settings > Manage Inactivity.
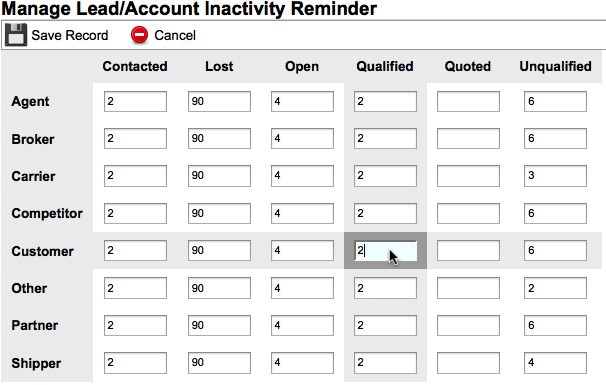
The left most column corresponds to the type of lead/account, and the top row corresponds to the current status of the lead/account.
Where these two intersect is the number of days that are allowed to pass until the lead/account is flagged as past due for an activity.
If a cell is left blank it will never be considered past due.
- Example: As seen below, a " Customer" has a " Qualified" status that is past due after 2 days of inactivity.
To update these values:
- Click in the appropriate box
- Set the number of days that is allowed to pass
- Click “Save Record” at the top of the page.
Leads & Accounts
Adding Leads/Accounts There are two ways to add leads.
- Method 1: Uploading Leads
To upload a lead, follow the path in the menu, Sales > Leads & Accounts > Upload Leads.
This option allows you to import leads from other sources directly into Transport Pro.
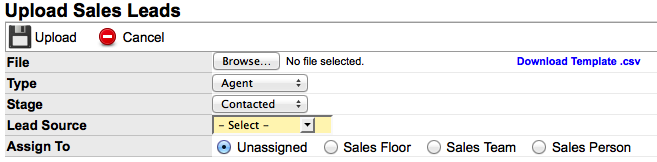
It is recommended that you download a template spreadsheet using the link “Download Template .csv” found on the upload page.
- Browse to your spreadsheet that you would like to upload.
- Select the Type, Stage, and Lead Source.
- “Assign To” will assign the leads to the appropriate entity.
- None: These leads will be available to any sales person
- Sales Floor: This will add a drop down of sales floors that you have access to.
Any sales person within the selected sales floor will have access to these leads.
- Sales Team: This will add a drop down of sales teams that you have access to.
Any sales person within the selected sales team will have access to these leads.
- Sales Person: This will add an auto-suggest box of sales people that you have access to
Note: Depending on user permissions, not all of these options are available.
Method 1: Uploading Leads
Leads & Accounts Adding Leads/Accounts There are two ways to add leads.
- Method 1: Uploading Leads
To upload a lead, follow the path in the menu, Sales > Leads & Accounts > Upload Leads.
This option allows you to import leads from other sources directly into Transport Pro.
It is recommended that you download a template spreadsheet using the link “Download Template .csv” found on the upload page.
- Browse to your spreadsheet that you would like to upload.
- Select the Type, Stage, and Lead Source.
- “Assign To” will assign the leads to the appropriate entity.
- None: These leads will be available to any sales person
- Sales Floor: This will add a drop down of sales floors that you have access to.
Any sales person within the selected sales floor will have access to these leads.
- Sales Team: This will add a drop down of sales teams that you have access to.
Any sales person within the selected sales team will have access to these leads.
- Sales Person: This will add an auto-suggest box of sales people that you have access to
Note: Depending on user permissions, not all of these options are available.
Method 2: Manually Adding Leads
Valid Columns A header column must be present in the spreadsheet and contain the following columns:
- Company Name
- Initial Contact
- Contact
- Title
- Phone
- Website
- Address
- Address 2
- City
- State
- Zip
- Customer ID
- Broker ID
- Location ID
- Description
- Method 2: Manually Adding Leads
To manually add a lead, follow the path in the menu Sales > Leads & Accounts > Add Lead.
- Fill out the appropriate information.
The fields in yellow are required.
- Click “Save Record.”
A Lead Profile Summary page will appear.
Promote a Lead to an Account To promote a lead:
- Navigate to the Lead Profile Summary page.
- From the summary page click on the “Promote to Account” button in the top right corner

Promote a Lead to an Account
Valid Columns A header column must be present in the spreadsheet and contain the following columns:
- Company Name
- Initial Contact
- Contact
- Title
- Phone
- Website
- Address
- Address 2
- City
- State
- Zip
- Customer ID
- Broker ID
- Location ID
- Description
- Method 2: Manually Adding Leads
To manually add a lead, follow the path in the menu Sales > Leads & Accounts > Add Lead.
- Fill out the appropriate information.
The fields in yellow are required.
- Click “Save Record.”
A Lead Profile Summary page will appear.
Promote a Lead to an Account To promote a lead:
- Navigate to the Lead Profile Summary page.
- From the summary page click on the “Promote to Account” button in the top right corner
Claim a Lead/Account When you first access a lead, it is locked for ten (10) minutes while you determine if you want to claim the lead.
During this time, no one else can access the lead until you claim or exit the lead.
Once you claim the lead, other sales people cannot access the lead (only team leaders, floor managers and sales admins can access the lead).
To claim a lead:
- Navigate to the Lead Profile Summary page.
- From the summary page click on the “Claim Lead” button in the top right.
Create an Opportunity Before an opportunity can be added, the lead must first be promoted to an account.
Once this has been done a section labeled “Opportunities” will appear on the summary screen for the account.
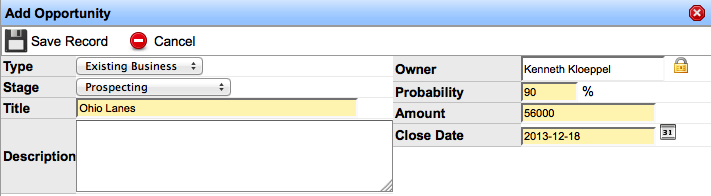
- Click “+ Add Opportunity” in the top right to open a window that will allow you to enter the opportunity details.
Note: Probability and Amount will only accept numbers and decimals.
Schedule an Activity
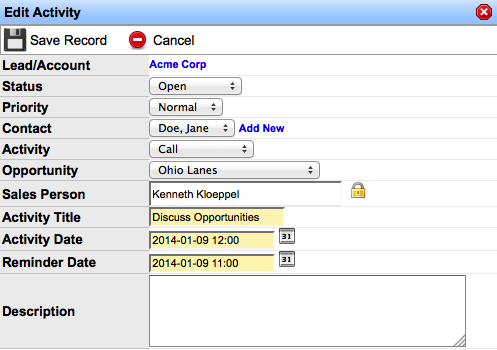
- From the lead/account summary page, click on the “+ Add Activity” link in the “Current
Activities” section.
- The “Contact” and “Opportunity” drop down menus will only be populated if you have created at least one contact and/or one opportunity.
Lead Ticker The lead ticker is located at the bottom of the screen and contains a scrolling list of random available leads.
- The leads that are displayed are: 1) unassigned, 2) assigned to your sales floor, or 3) assigned to your sales team.
When you click on a lead it becomes locked for ten (10) minutes while you decide if you are going to claim the lead (see “Claim a Lead/Account”).
Lead Ticker
Schedule an Activity
- From the lead/account summary page, click on the “+ Add Activity” link in the “Current
Activities” section.
- The “Contact” and “Opportunity” drop down menus will only be populated if you have created at least one contact and/or one opportunity.
Lead Ticker The lead ticker is located at the bottom of the screen and contains a scrolling list of random available leads.
- The leads that are displayed are: 1) unassigned, 2) assigned to your sales floor, or 3) assigned to your sales team.
When you click on a lead it becomes locked for ten (10) minutes while you decide if you are going to claim the lead (see “Claim a Lead/Account”).