



Add Preventative Maintenance Schedules
Start by adding your PM schedules to the system. Go to Drivers/Equip > Equipment Maintenance > PM Schedules > Add Preventative Maintenance.
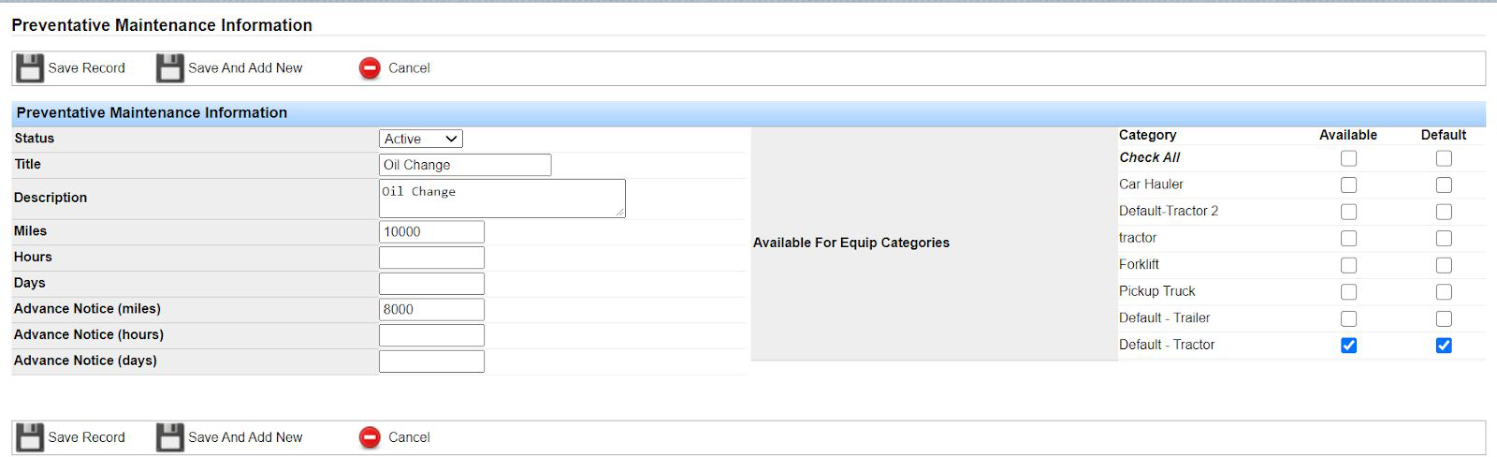
Explanation of Fields
- Status: Active or inactive. The schedule must be Active to assign it to equipment. You can mark it inactive later if you no longer need it.
- Title: Name the schedule. This title appears in the dropdown when you assign the PM to equipment.
- Description: Optional. Lives only on this PM record for your reference.
- Miles / Hours / Days: Choose one interval type and enter the value. For an oil change every 10,000 miles, enter 10000 in Miles.
- Advanced Notice (miles/hours/days): Optional early warning based on the same interval type. For a 10,000-mile oil change with notice at 8,000 miles, enter 8000 in Advance Notice (miles).
- Available For Equip Categories: Check Default - Tractor, Default - Trailer, or both. The system ships with these two categories.
Note: Advanced and past-due PM notices trigger at dispatch. To manage other equipment types (for example a forklift), go to Drivers/Equip > Equipment Maintenance > Equipment Records > Equipment Categories > Add Equipment Category—new categories then appear when you add a PM schedule.
Assign Preventative Maintenance Schedules to Equipment
After you add PM schedules, assign them to each piece of equipment. When you add tractors and trailers to Transport Pro, the system automatically creates separate equipment records under the maintenance module.
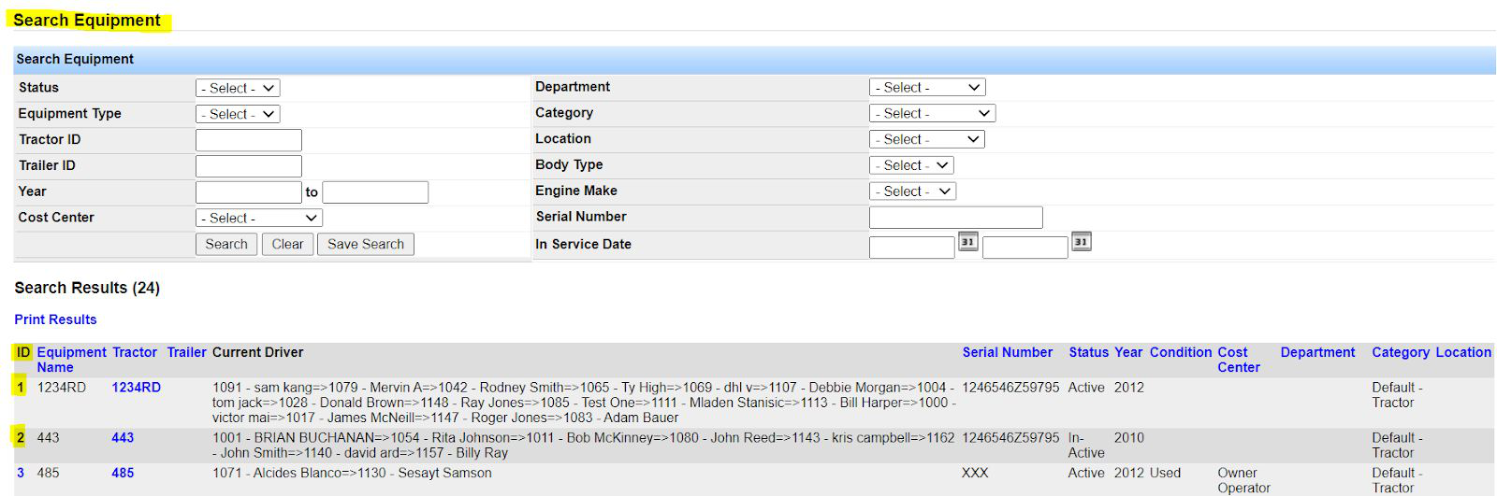
Go to Drivers/Equip > Equipment Maintenance > Equipment Records > Search Equipment. Filter as needed, or click Search for all records. Click the ID of the equipment you want.
On the Equipment Summary screen, scroll to Preventative Maintenance Schedule and click Add PM.
In the window that opens, keep the PM Active if you want to monitor it, select the PM Type (from schedules you already added), optionally give it a title, confirm the interval, and save.

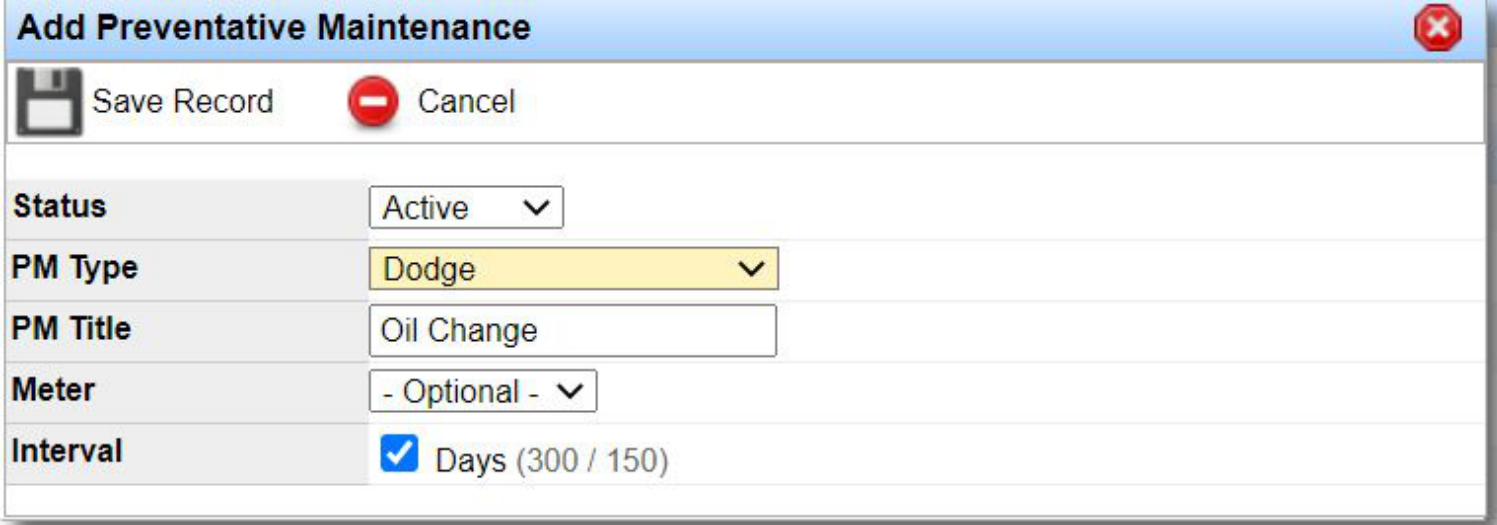
Note: New PM schedules may flag as past due immediately because the system has no completion history. Record the last repair order and odometer reading to catch the schedule up (covered below).
Record Odometer Readings
Odometer readings and repair orders drive PM schedule resets. If you use a supported ELD provider (such as Omnitracs IVG, KeepTruckin, or Samsara), Transport Pro can import readings for you. You can also add and edit readings manually.
On the Equipment Summary screen, use the Meters section. Imported readings appear here. Click Add Meter to add a reading, or use the edit icon to manage an existing one.

Manage Part Warranties
Use Warranty History on the Equipment Summary screen to track part warranties. Click Add Warranty, enter the details, and save.
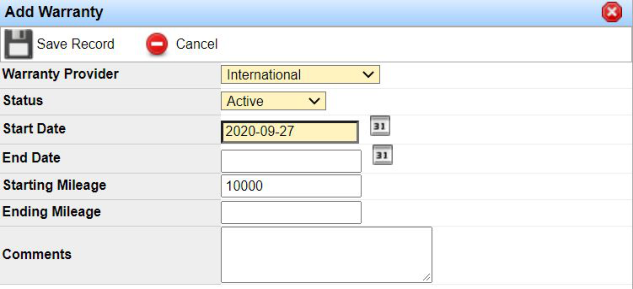

Note: When you record a work order, the system checks warranties and can alert you if the work appears covered. If you mark a part under warranty on the work order, that work order ID is tagged in Warranty History.
Record Repair Orders
Repair orders hold key data that drive PM schedules and reports. On the Equipment Summary screen, open Repair Orders and click Add Repair Order.

Note: Saved repair orders list in this section. From there you can edit or delete them.
The repair order form opens with basic equipment information filled in. Yellow fields are required.
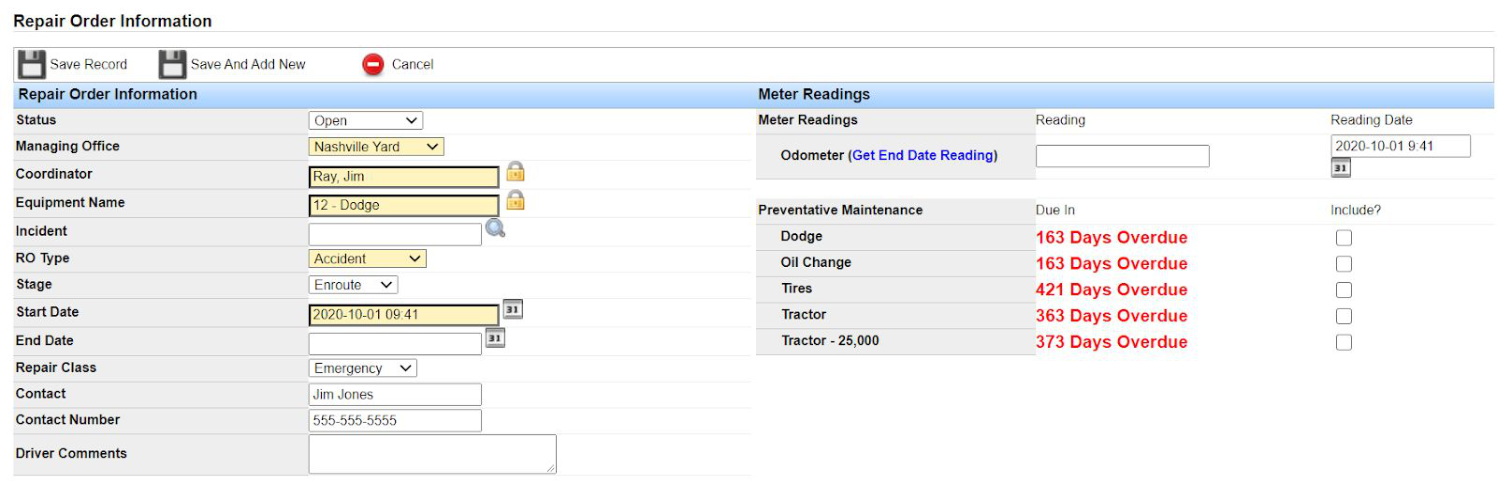
Explanation of Fields
- Status: When work is done, set status to COMPLETED. Completing the order is one of the drivers that resets PM schedules.
- Managing Office: Informational tag. Default is pre-installed. Add options under Administration > Manage Site Settings > Manage Lookup Tables (Equipment Locations table).
- Coordinator: Auto-filled with the user adding the order. Click the lock icon to change it.
- Equipment Name: Auto-filled with the equipment ID/name.
- Incident: Optional link if you use Claims for incidents.
- RO Type: Reason for the order (accident, breakdown, preventative maintenance, and so on).
- Stage: Roadside, at vendor, or enroute.
- Start Date: Defaults to today; change if needed.
- End Date: Required when status is Completed. Start and end dates drive downtime reporting.
- Repair Class: Optional (unscheduled, warranty, scheduled maintenance, and so on).
- Contact / Contact Number: Owner auto-fills when assigned; otherwise enter owner or driver contact info.
- Driver Comments: Optional.
- Odometer: Current reading. Reading date auto-fills and can be changed.
- Preventative Maintenance: Check any assigned PMs addressed on this visit. Checking PMs here also helps reset those schedules.
When the form is complete, click Save Record.
Record Work Orders
Work orders capture the vendor, cost, and parts/labor detail. You must add a repair order first—workflow is: (1) add the repair order, then (2) add the work order.
On the Repair Order Summary screen, click Add Work Order.

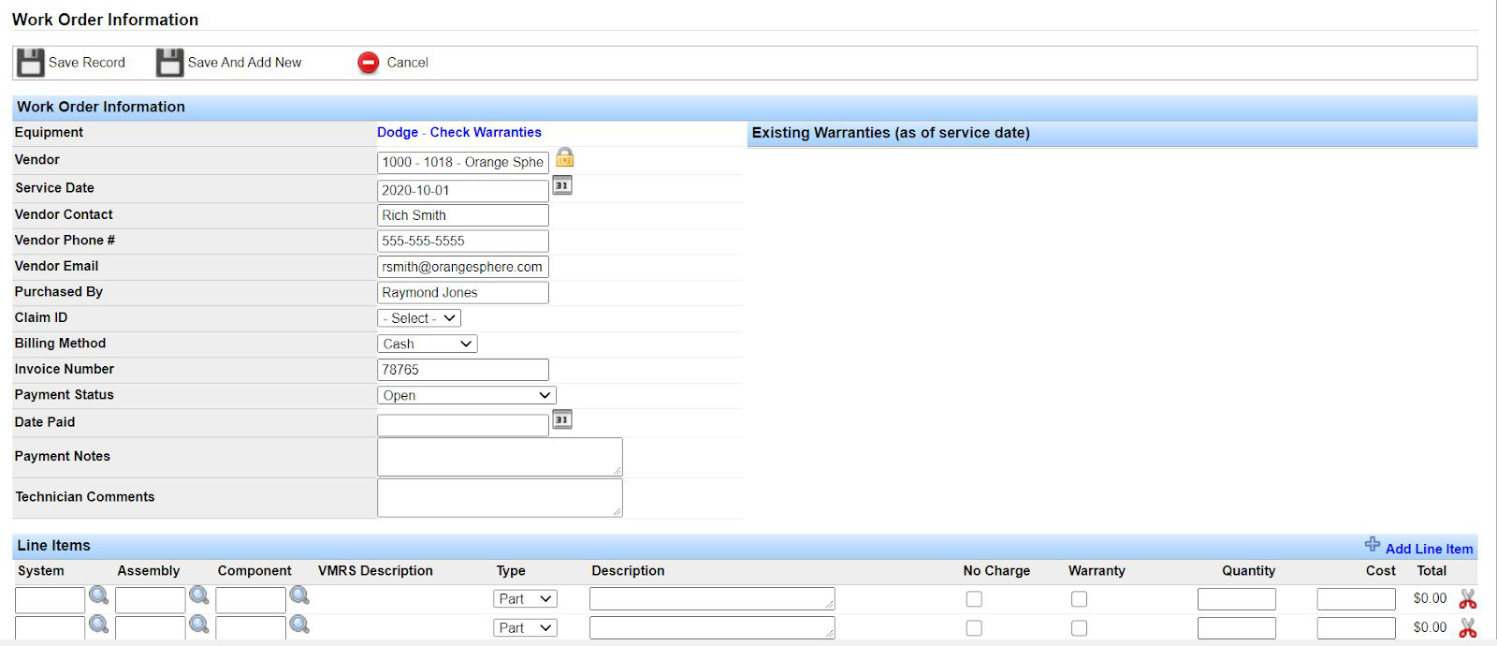
Explanation of Fields
- Vendor: Tag an existing vendor (shop doing the work). Add vendors under Accounting > Accounts Payable > Vendors > Add Vendor and check Available to Equipment Module.
- Service Date: Date the equipment went into the shop.
- Vendor Contact / Phone / Email: Shop contact details.
- Purchased By: Internal employee responsible for paying the vendor.
- Claim ID: Optional informational link if you use Claims.
- Billing Method: How you pay (cash, credit card, and so on).
- Invoice Number: Vendor invoice number.
- Payment Status: Paid, open, and so on—update this if you report on payment status.
- Date Paid: Required when payment status is Paid.
- Payment Notes / Technician Comments: Optional documentation.
Fill out Line Items next—tag VMRS codes, quantity, and cost for parts and labor (usually from the vendor invoice).

Tag system, assembly, and component VMRS codes for the work performed. Transport Pro ships with the standard VMRS library (about 27,000 codes). Browse them under Drivers/Equip > Equipment Maintenance > VMRS Codes > Search VMRS Codes.
If tagged codes match a part warranty on the equipment, Existing Warranties notifies you and may show if the code is already on another work order. Use check warranties to review warranties on the equipment.

For each line, set Type (part or labor), optional description, no-charge or under-warranty flags, quantity, cost, and tax if applicable. Add as many lines as needed, then click Save Record.
Search for Repair Orders
Go to Drivers/Equip > Equipment Maintenance > Repair Orders > Search Repair Orders. Apply filters as needed and click Search.

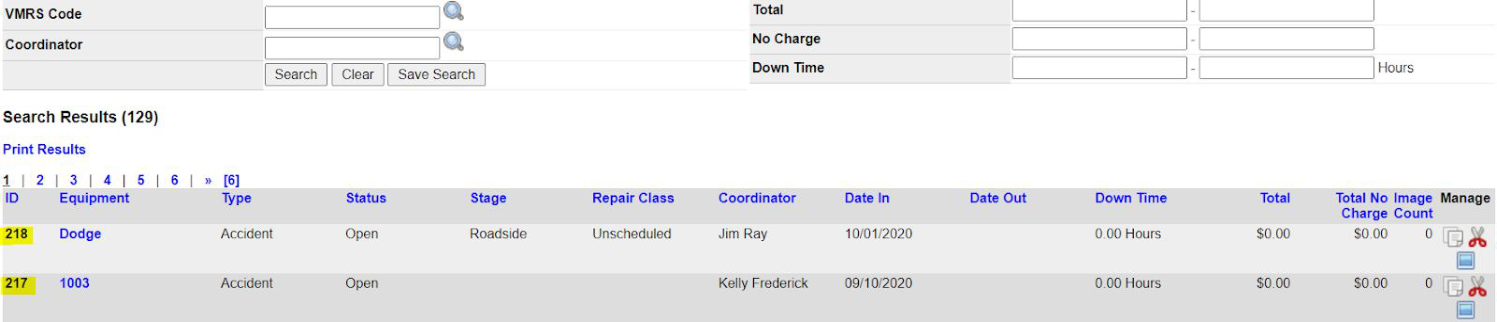
From the results you can review, delete, or edit. Click the ID to open full detail.
Search for Work Orders
Go to Drivers/Equip > Equipment Maintenance > Work Orders > Search Work Orders. Filter as needed, then click Search.
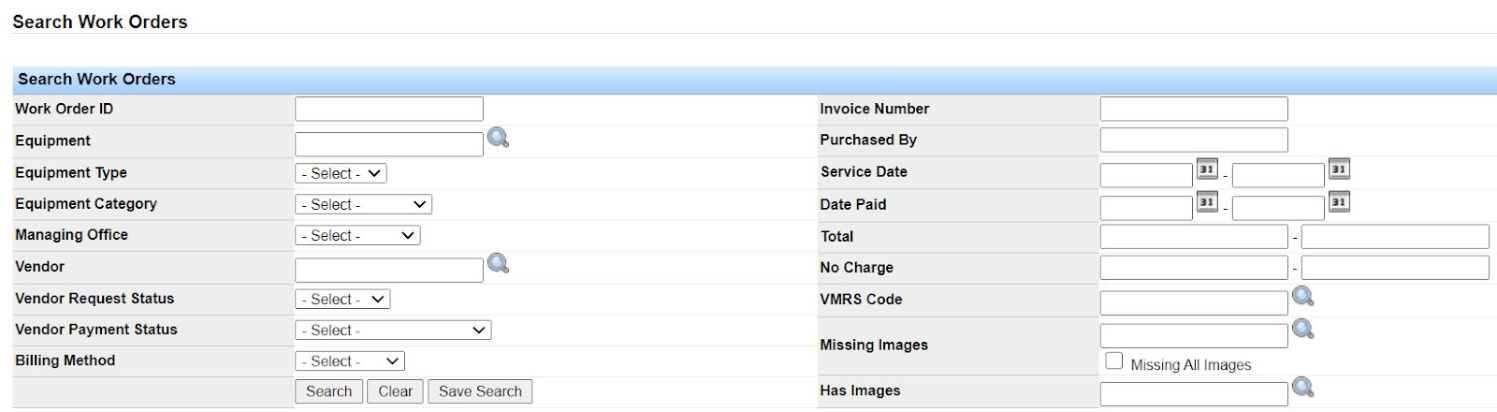

Review, delete, or edit from the results. Click the ID for full detail.
Reporting
Two main tools are available: the Repair Orders Report and the Equipment Dashboard.
For the Repair Orders Report, go to Drivers/Equip > Equipment Maintenance > Reports > Repair Orders. Set filters if needed, then click Get Report.

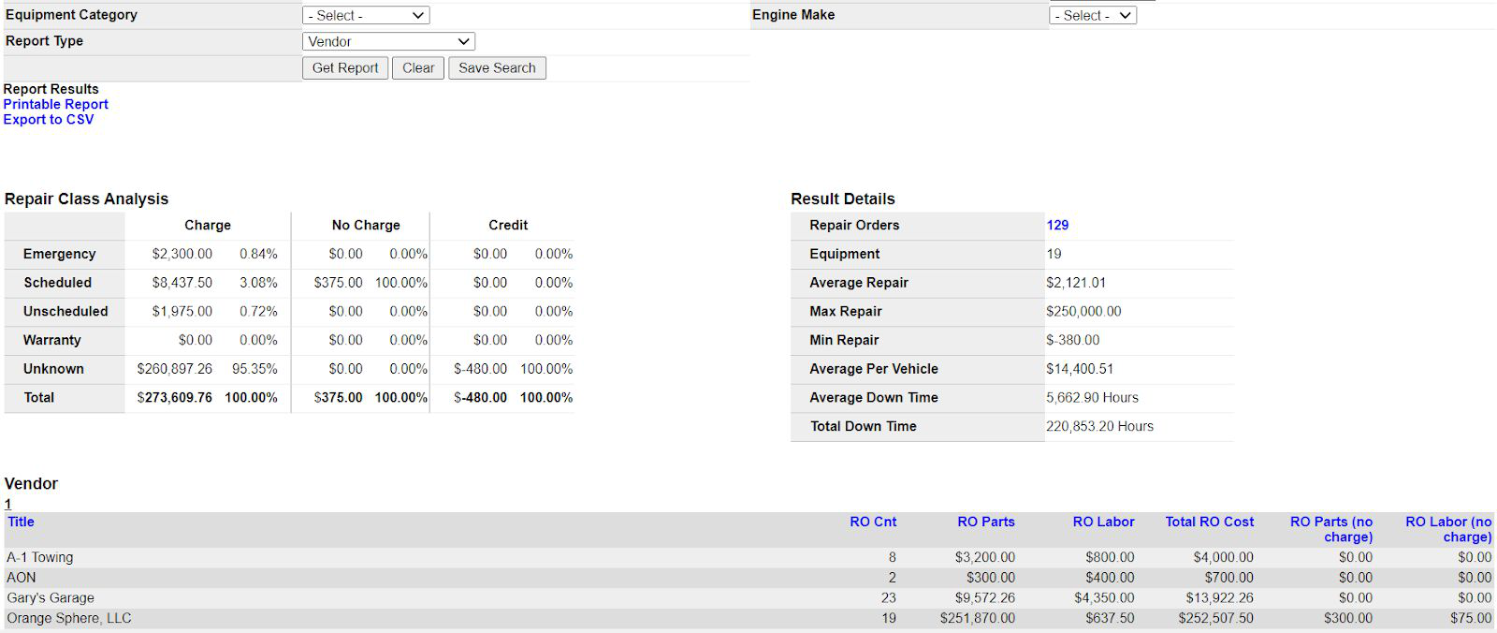
The report breaks down repair class analysis and average cost and downtime, driven by repair and work order data. Export to Excel or CSV as needed.
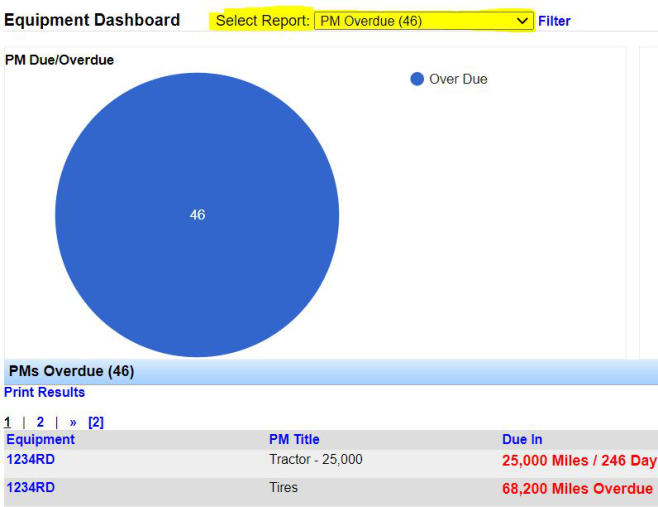
For the Equipment Dashboard, go to Drivers/Equip > Equipment Maintenance > Equipment Dashboard. Use it to review open repair orders and PMs that are coming due or past due. Choose the report view from the dropdown.
Questions about the maintenance module? Contact support@transportpro.net.