



Review Pre-Installed Settlement Codes
Introduction When you get started with Transport Pro, your system comes pre-installed with a few billing and settlement codes.
However, you will likely find that you need to add additional codes.Let’s define billing and settlement codes.Billing Codes: Anything that you need to bill a customer for (i.e. freight, detention, lumper,etc).
A billing code may also be referred to as a line item or access ori al.Settlement Codes: Anything that you need to pay outfor, or in other words, what you need topay your drivers and/or carriers (i.e. line haul, fuel surcharge, detention, etc).You may also have scenarios with certain items where you need the system to automatically pay out a certain amount of what is billed.
For example, you may have a company rule where you pay 100% of fuel surcharge to your owner operators.
You can set this up to automatically pass through.This guide will show you how to set up and manage these codes, and set up any of these pass-through rules, if applicable to your business.
Note, if you have any of these pass-through scenarios that you need to set up, then you will need to add the settlement code before you add the billing code.We do recommend that you review the pre-installed billing and settlement codes before adding a new one, just to ensure that a duplicate code doesn’t get added.
Reviewing thepre-installed codes also gives you a template for how the codes are set up.
Review Pre-Installed Settlement Codes Let’s start with our settlement codes.
Before adding a new code, let’s run a search, and review the pre-installed codes.Go to Administration > Manage Site Settings > Manage Settlement Codes > Search Settlement Codes.
Then, hit “Search” to bring up a list of all codes in the system.
Add a Settlement Code
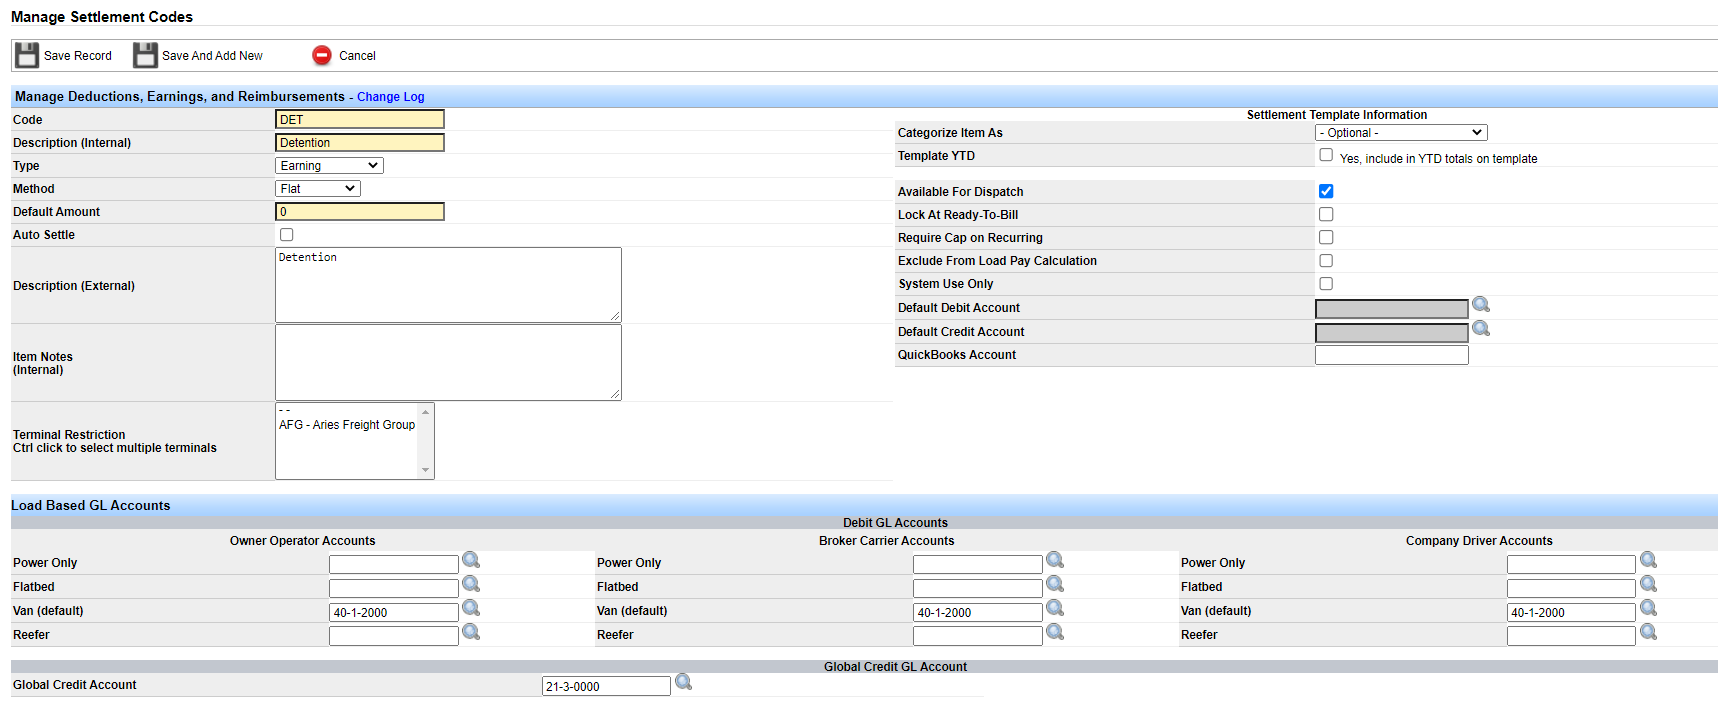
To add a new settlement code, go to Administration > Manage Site Settings > Manage Settlement Codes > Add Settlement Codes.Below is a screenshot of the entry screen: Let’s run through an explanation of fields (yellow fields are required): Code: Enter the code for this settlement code.
Itcan be whatever you want it to be, though we recommend keeping it to five characters or less.Description (Internal): Give the code a description.This can be whatever you want it to be.This is an internal description, meaning it will live here on this record for your reference.Type: Select from the drop-down whether this codeis used as a deduction, earning, or reimbursement.Method: This field defaults to “flat,” and you’ll likely use this option.
The other option you have here is “percentage.” If you select that option, then it calculates the percentage based on percentage of the line haul billing amount.Default Amount: If you typically always associate this code with a default amount, you can enter that here.
If the amount is always different whenever you use this code, you can enter“0.” A value is required.Description (External): This description is what showsup on the settlement when you usethis code.
Oftentimes, it will be the same as your internal description, but you can make it whatever you want.Item Notes (Internal): This option is here in thecase you need to take a note about this particular item for internal informational purposes.
It will live here on this record.
- Terminal Restrictions: If you wish to lock down this settlement code so that it can only beused by certain terminals, make your selection here.Categorize Item As: You don’t have to select anything here, but you can if you want to.
Whenthe system creates the settlement statements that go out to drivers and carriers, the system automatically breaks out earnings, deductions, and reimbursements into their own categories on the template to display the items in an organized fashion.
However, you may wish to place certain settlement codes into specific categories.
In short, think about how you want this item categorized on the settlement sheets, and then make a selection here, if desired.
If you don’tsee something you’re looking for, our technical team can add options.
Please contact support@transportpro.netto submit this request.Template YTD: When the system creates the settlement sheets, it will automatically show theyear to date (YTD) totals on the template.
Assuming you want to include this item in the Y TD totals whenever you use it, then check this box.
You will most likely check this box on all your codes, but perhaps you have a scenario where you don’t.Available for Dispatch: If you want a dispatch userto be able to add this settlement item fora carrier or driver at the time of dispatch so that it gets passed through to the settlement, then check this box.
If this box is checked, then it makes the settlement code available via the“manage” link on the dispatch record.If this is a settlement code that an operations user does not need access to, or in other words,this code will be used in the case of a one-time earning/deduction to be added at the time ofdoing settlements, or perhaps you’re setting up this item to be used on a recurrence, then you wouldn’t need to check this option.
Note: You will notice that if you check this box,the Load Based GL Accounts below become available, and the Default Debit/Credit Account fields in the top half of the form become grayed out.
This is because Transport Pro is an accrual based accounting system, so later onwhen the load gets marked “ready to bill” the system will need to know which accounts on the ledger to hit in order to accrue.Lock At Ready To Bill: When this box is checked, a general settlements user cannot delete or edit the item.
If this box is not checked, then when the item gets pushed to settlements, a general settlements user can alter the information on this code, if needed.
It really comes down to how you want permissions set.Require Cap on Recurring: If you are going to usethis code for a recurring settlement, andyou wish to require a cap amount on this recurring item, then check this box.
It will make it sothat the “Cap Amount” on the recurrence is a yellow (required) field whenever you set up a recurrence using this code.Exclude From Load Pay Calculation: When using this code, if you don’t want the amount to affect the commission calculation for an agent/terminal, then check this box.
In other words,any deduction against a carrier that you do not wish to include in the gross profit (GP) for calculating an agent’s commissions, check this box.
A common example is a com check code.
- System Use Only: You only need to check this box if you wish to in activate this code.Checking this box prevents this code from being available in the drop-down menus throughout the system.Default Debit Account/Default Credit Account: If youhave checked the “Available for Dispatch” box, then these fields will be grayed out, and you won’t enter the GL accounts here,but rather below.
If you don’t check the “Available For Dispatch” box, then you will enter the appropriate debit/credit accounts here, and you’ll notice that the Load Based GL accounts below become grayed out.This is because when a settlement code is used directly in settlements versus being added tothe dispatch on a load, we do not accrue that expense as a liability.
Only the items that hit atthe time of billing are accrued.
So when you do enter the GL codes here in the upper part ofthe form, they’re likely the same GL account.
This way, when you process a settlement, orvoid a settlement, it will push and pull from the same account.
Note: If you’re unsure of which GL accounts to taghere, you will need to consult with your accountant.
All GL accounts point to the system’s chart of accounts (COA), which can befound under Accounting > Chart of Accounts > Search Chart of accounts.
Review the GL accounts, and determine what needs to get tagged here.
Your accountant can add/edit accounts on the COA if needed.Also note that you must select an existing GL account.
Recall, anywhere in the system thatyou see a magnifying glass next to the field, that indicates that you have to select an existing account, and then click on it to insert the value when it comes up.Load Based GL Accounts: If this item is “Available for Dispatch” then again, you will need totag the appropriate GL accounts here, so that when the accrual process occurs, the system knows which accounts to debit and credit.
If you’re unsure of which accounts to tag here,please consult with your accountant.
Recall, all GL accounts point to the COA.
Note: You’ll notice that you can get granular withthe GL accounts if you want to.
For example, perhaps you wish for certain GL accounts to get hit based on the type of equipment used on a load as well as the type of dispatch (i.e. company driver versus broker carrier).
By default, we give you a few different equipment types here, but if you need additional options here, or you want your default option to be different, please let us know by emailing support@transportpro.net.If you do not need to get this granular, then at least the “default” line must have a value, andthis is the account on the ledger that will get hit regardless of equipment type on the load.If you are using Quick Books, or some other outside accounting system, and not our financial package, you still have to enter GL values here because the accounts still get hit in the background.Lastly, save the record.
Review Pre-Installed Billing Codes
Before adding a new billing code, let’s run a search, and review the pre-installed codes.Go to Administration > Manage Site Settings > Manage Billing Codes > Search Line Items.
Then,hit “Search” to bring up a list of all codes in the system.
Add a Billing Code Now, let’s review how to add a billing code.
It’s a very similar process to setting up your settlement codes.To add a new billing code go to Administration > Manage Site Settings > Manage Billing Codes > Add Line Item.
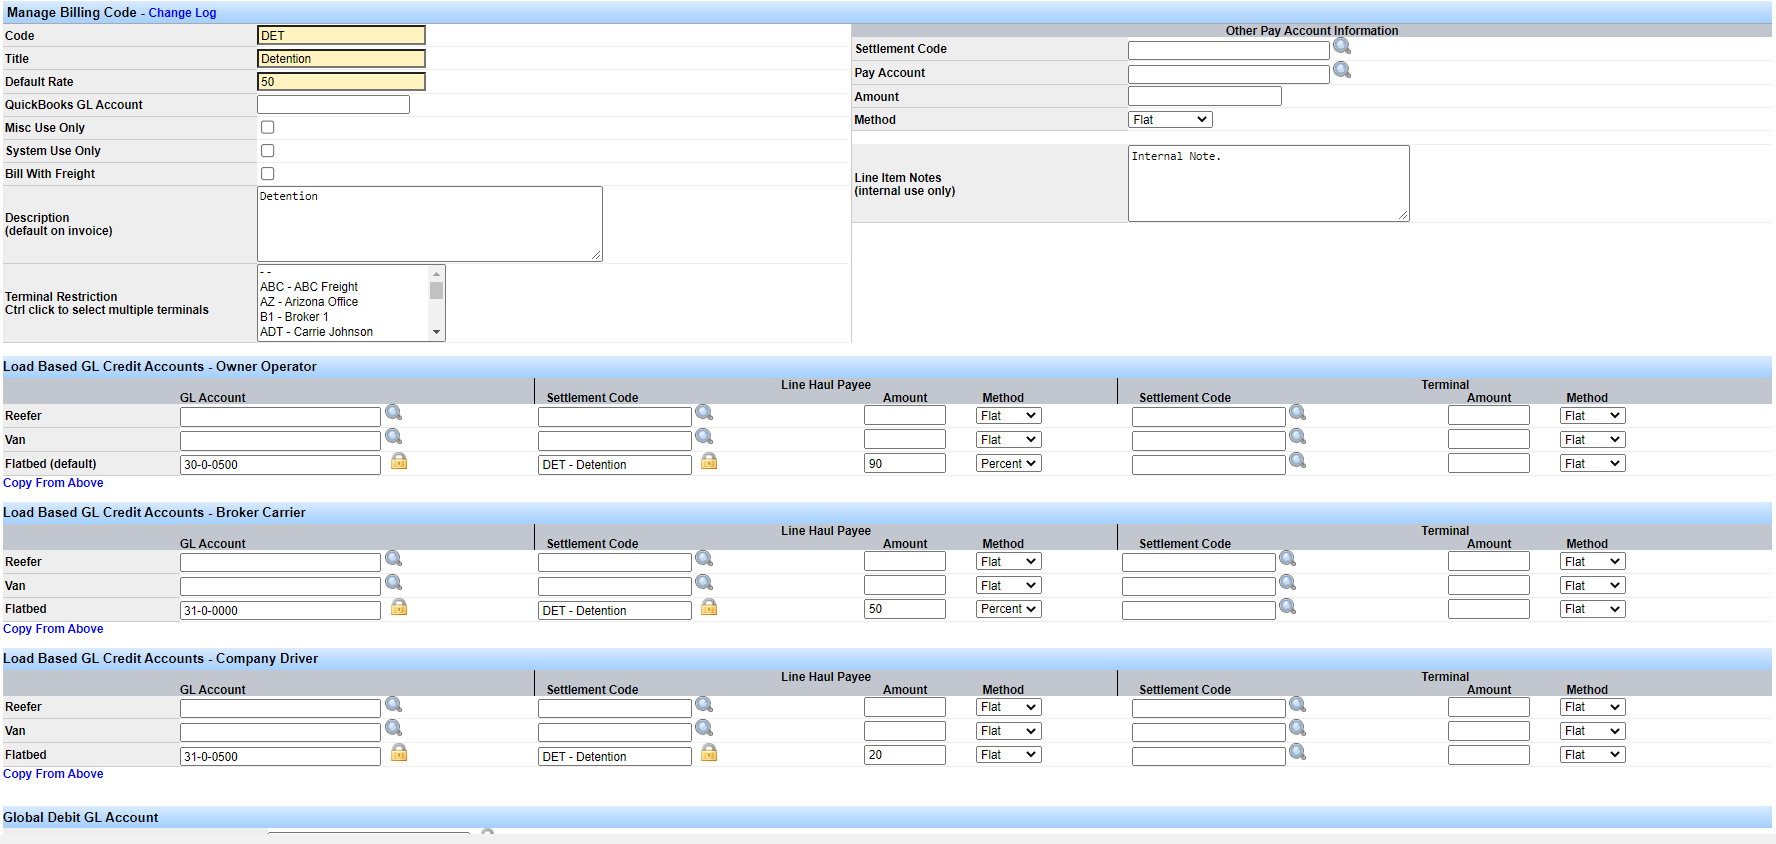
Note: A billing code is also referred to as a line item or access ori al.Below is a screenshot of the billing code entry screen:
Let’s run through an explanation of fields (yellow fields are required): Code: Enter the code for this billing code.
It canbe whatever you want it to be, though were commend keeping it to five characters or less.Title: Give this billing code a title.
This title will be displayed in the drop-down menus throughout the system.Default Rate: If you typically always associate this code with a default billing amount, you can enter that here.
If the amount is always different whenever you use this code, you can enter“0.” A value is required.
Add a Billing Code
Review Pre-Installed Billing Codes Before adding a new billing code, let’s run a search, and review the pre-installed codes.Go to Administration > Manage Site Settings > Manage Billing Codes > Search Line Items.
Then,hit “Search” to bring up a list of all codes in the system.
Add a Billing Code Now, let’s review how to add a billing code.
It’s a very similar process to setting up your settlement codes.To add a new billing code go to Administration > Manage Site Settings > Manage Billing Codes > Add Line Item.
Note: A billing code is also referred to as a line item or access ori al.Below is a screenshot of the billing code entry screen:
Let’s run through an explanation of fields (yellow fields are required): Code: Enter the code for this billing code.
It canbe whatever you want it to be, though were commend keeping it to five characters or less.Title: Give this billing code a title.
This title will be displayed in the drop-down menus throughout the system.Default Rate: If you typically always associate this code with a default billing amount, you can enter that here.
If the amount is always different whenever you use this code, you can enter“0.” A value is required.
- Misc Use Only: If you wish to use this code only in the miscellaneous billing section of the system, then check this box.
If you check this box, then this code will not be available to useon loads.
The miscellaneous billing system is meant to be used in the case that you need to create an invoice for something that isn’t load related (i.e. project management that isn’t tiedto a load).System Use Only: You only need to check this box ifyou wish to in activate this code.Checking this box prevents this code from being available in the drop-down menus throughout the system.Bill With Freight: If this line item needs to be lumped together with the billing line haul amount by default whenever this code is used, then check this box.
- Example: Say you’re billing a customer $1,000 for line haul, and then you add this line item to that load for, let’s say $200.The system would present the line haul amount to the customer on their invoice as “$1,200” instead of $1,000. In other words, it shows the amount as a lump sum versus having it broken out.You have the option to set that here on the code itself.
You also have this option on a per load basis for any line item you may need to use this way.Description (Default on Invoice): Enter an external description for this billing code.
In other words, this is the description that will show to the customer on their invoice when this code isused.Terminal Restriction: If you only want certain terminals to use this billing code, make the desired selection here.Other Pay Account Information This section is rarely used, but it’s here for some special/unique billing needs.
For example,whenever you use this billing code on a load, perhaps you need the system to automatically set up a settlement for something like project management to be paid out to a specific agent/terminal, or settlement vendor, such as pilot car services.
In most cases, you will probably leave this section blank.A more common example may be where you’re billing the customer for pilot car services, andthen also need to set up a payable/settlement to pay out that pilot car service.This section is not used for setting up automatic pass through s for broker carriers, company drivers, or owner ops.
- We’ll cover those examples a little later.Settlement Code: If you wish to automatically pass through a settlement item to payable s account whenever this code is used, you need to tag the settlement code here.
So, the settlement code needs to be set up first, then you can tag it here.Pay Account: This is the settlement account where the payable needs to go.
So you would first need to make sure that the payable account (i.e. the pilot car settlement vendor) is set upfirst, then you can tag it here.Amount: Enter the amount that needs to be paid out,whether that be a flat rate, or percentage of line haul.
How to Automatically Pay Out for What You Bill
- Method: Select flat or percentage (i.e. percentage of the line haul billing amount).Line Item Notes (Internal Use Only): If you need tomake an internal note about this particular line item, enter it here.
This note will only live here on the billing code record foryour internal informational purposes.Load Based GL Credit Accounts & Global Debit GL Account: Recall that Transport Pro is an accrual based accounting system.
When a load is marked“ready to bill” the transactions will hit the appropriate P&L accounts for the revenue and expense.
They will also set up the receivable and the liability on the balance sheet.
You needto tell the system here which accounts to debit and credit.Recall the general ledger (GL) accounts all point back to the system’s chart of accounts(COA), which can be reviewed by going to Accounting > Chart of Accounts > Search Chart of Accounts.
You or your accountant can add/edit the accounts as needed.
If you’re unsure ofwhich accounts to tag here, please consult with your accountant.
Note: You’ll notice that you can get granular withthe GL accounts if you want to.
For example, perhaps you wish for certain GL accounts to get hit based on the type of equipment used on a load as well as the type of dispatch (i.e. company driver versus broker carrier).
By default, we give you a few different equipment types here, but if you need additional options here, or you want your default option to be different, please let us know by emailing support@transportpro.net.If you do not need to get this granular, then at least the “default” line must have a value, andthis is the account on the ledger that will get hit regardless of equipment type on the load.If you are using Quick Books, or some other outside accounting system, and not our financial package, you still have to enter GL values here because the accounts still get hit in the background.Lastly, save the record.
How to Automatically Pay Out for What You Bill Lastly, let’s look at how to set up a pass through scenario, where you need to automatically pay out a driver or carrier for what you bill.One of the most common examples of this is fuel surcharge.
If you’re an asset-based company working with owner operators, then you probably have a company rule in place that says something to the effect of, “we need to pay out 100 percent of fuel surcharge to our owner ops.” You would set this up on your fuel surcharge billing code.
Note: It’s important to note that these scenarios can only be set up to be automated at aglobal level, and not an individual level.
For example, we can’t say “John gets 100 percent offuel surcharge, but Joe only gets 85 percent.” The access o rials are different from line haul inthis regard.
You can set up these global pass through s on any codes.To set up a pass through, you need to be in edit mode on the desired billing code.
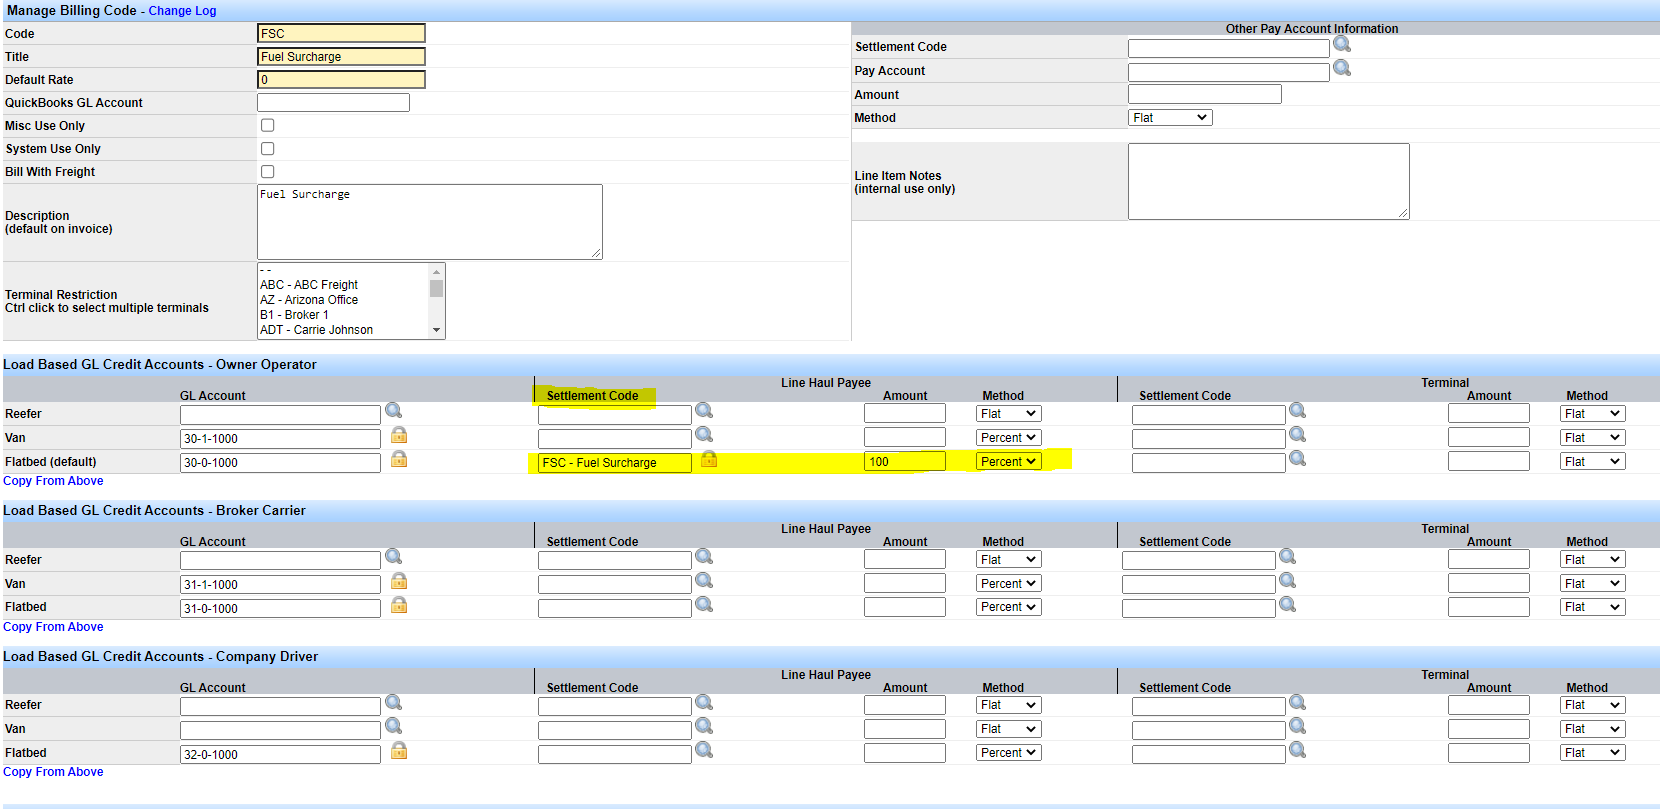
For this example, let’s look at the fuel surcharge billing code.Here’s a screenshot of the screen you should be on.
The screenshot below highlights how toset up a pass through of 100 percent for all owner ops.
When you’re on the edit billing code screen, you will see a section to enter a settlement code along with an amount and method under each GL credit account section.
Determine which accounts should receive the pass through.Does it go to owner ops, company drivers, broker carriers, or all three?In this example, we will just set up 100 percent of fuel surcharge to pass through to our owner ops.First tag your fuel surcharge settlement code here on the billing code.
Again, this is one ofthose fields with the magnifying glass, so you need to select and lock in an existing settlement code.
If you start typing, and nothing comes up, that’s an indication to you that the settlement code hasn’t been added yet.
You’ll need to pause, go and add the settlement code, and then come back and tag it here.Enter the amount you wish to pass through.
In this example, we would enter “100.” Do not enter a percentage sign - this should be a numeric value.Lastly, select the method for this pass through.
In this example, it would be percentage.
Flat isthe other option.
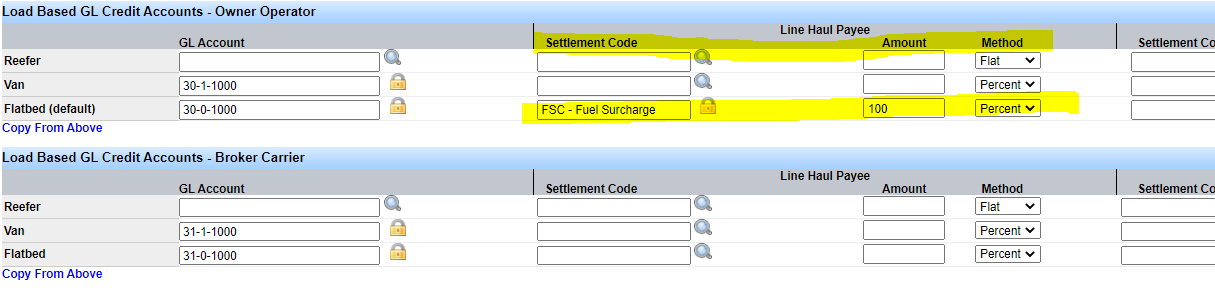
Here’s what this example looks like: Save the record.
Now, whenever you bill a customer for fuel surcharge, 100 percent will automatically pass through to the owner operators’ settlements.You can do the same thing for any code, for any type of account.
The option is also there for terminals.That completes the lesson on billing and settlement codes.If you have any questions, please contact our support team by emailing support@transportpro.net.