


Add a Checking Account
Note: Transport Pro does not support or offer direct bank integration. Checking account information in Transport Pro is solely for informational and reporting purposes.
When you get started with Transport Pro, one checking account is set up by default called Main Checking. You can edit that default account and overwrite it with your information, then add additional checking accounts as needed.
To add a new checking account, go to Accounting > Checking Accounts > Checking Accounts > Add Checking Account.
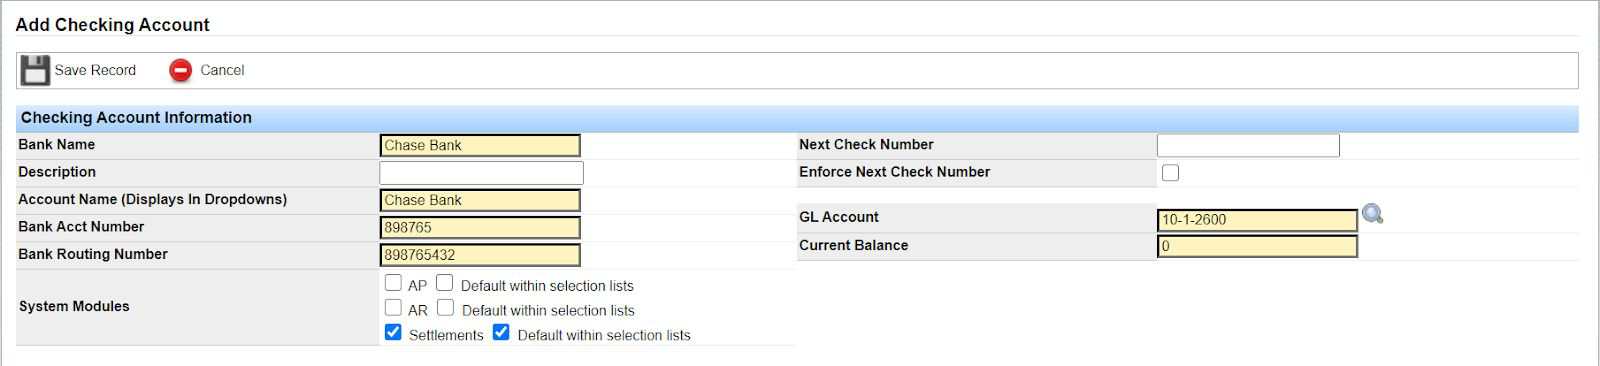
Explanation of Fields
Yellow fields are required.
- Bank Name: Enter the name of your bank (for example, Chase Bank or Bank of America).
- Description: Optional. Enter a description for this bank account if you like. It lives only on this record for informational purposes.
- Account Name: Typically the same as the bank name, but you can enter whatever you want. This is the name that displays in checking account dropdown menus throughout the system.
- Bank Acct Number: Enter your bank account number. The system does not integrate with your bank; this information lives on the record for informational purposes.
- Bank Routing Number: Enter your bank routing number. Like the account number, this is informational only.
- System Modules: Choose where this checking account can be tagged: Accounts Payable (AP), Accounts Receivable (AR), and Settlements. For example, tag the account you pay settlements from under Settlements, and the account you receive money into under AR for cash receipts. Check Default within selection lists if this should be the default account in that module’s dropdowns.
- Next Check Number: Optional. Enter the next check number you want the system to insert when you print a check from this account.
- Enforce Next Check Number: Optional. If you entered a next check number and want the system to prevent users from editing it when printing a check, check this box.
- GL Account: Tag the general ledger (GL) account for this checking account. If you are unsure which GL account to use, consult your accountant. GL accounts come from the chart of accounts under Accounting > Chart of Accounts > Search Chart of Accounts.
- Current Balance: Optional. Enter the current balance if you like. This field does not drive or affect anything in the system—it is informational only. Enter 0 if you do not want to track a balance here.
When all information is entered, click Save Record.
Search Checking Accounts
To find a checking account already set up in the system, go to Accounting > Checking Accounts > Checking Accounts > Search Checking Accounts.
The search results list all checking accounts in the system, including bank name, account name, masked account and routing numbers, GL account, and next check number.

To review an account in more detail or make an edit, click the ID for that row.

If you have questions about checking accounts, contact support at support@transportpro.net.