


Adding a Report
To create a custom accounting report, go to Accounting > Accounting Reports > Custom Accounting Reports, then click [Add New] and complete the report settings.
Report Settings
- Report Title: The name of the report.
- Report Comments: An internal description of what the report does. This does not appear on the report output.
- Report Layout: How the node structure displays. Tree indents each sub-node under its parent. Straight left-aligns all items.
- Date Type: Date options available when the report is run. Date Range asks for begin and end dates. As Of Date asks for a single date and shows activity leading up to that date.
- Reviewed: Include or exclude GL transactions that have been reviewed under Accounting > General Ledger > GL Review. This can also be set per node, but the report-level setting overrides node settings when selected.
- Negative Number Designator: How negative numbers display (for example, (300) or -300).
- Zero Number Designator: How zero values display (common options are
0and-). - Percent Decimal Spaces: Decimal places for percentages.
- Dollar Decimal Spaces: Decimal places for dollar amounts.
- Use Existing Nodes From: Copy the node structure from an existing report. Available only when adding a new report.
Note: Reviewed options at the report level are All, Reviewed, Not Reviewed (each ignores node settings), or Use Node Settings.
Click Save when the report settings are complete.
Adding Nodes
After you save the report for the first time, the Use Existing Nodes From option is replaced by a Nodes section where you build the report structure.

Click Add New Node, then complete the node fields.
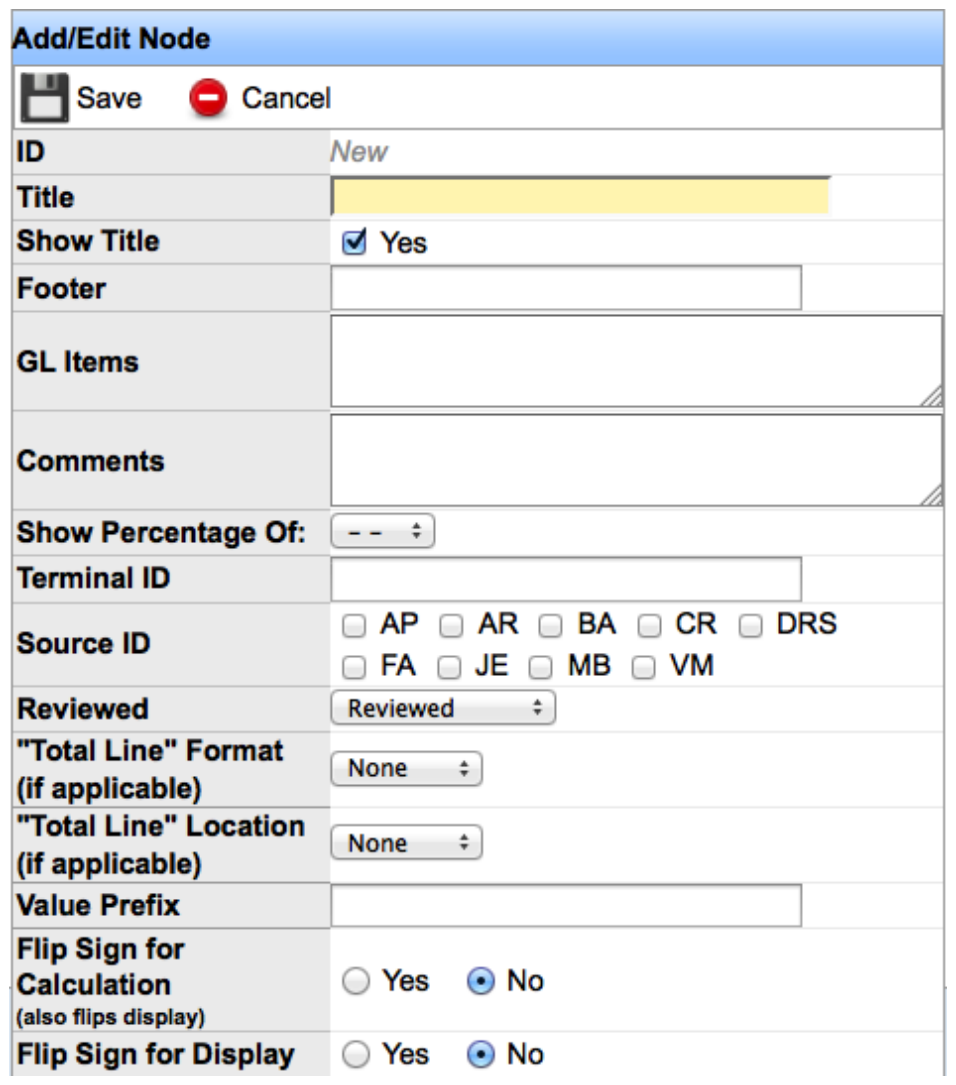
Node Fields
- Title: The title of the node.
- Show Title: If checked, the title appears at the top of the section. Uncheck it when you want a total of sub-nodes at the bottom without displaying the section as a titled block.
- Footer: By default the footer is “Total <Title>.” Enter different text here if you want another label.
- GL Items: Enter the GL accounts for this node, one account per line.
- Wildcard (*): Include a set of accounts—for example,
22-1-*for all accounts under 22-1. - Exclude (!): Exclude a specific account—for example,
!22-1-100-111. You can mix wildcards and excludes (for example,!22-1-*). Comments on GL lines are for internal clarification only and do not appear on the report. - Show Percentage Of: Adds a percentage next to the value based on another node. Set this after your nodes are created.
- Terminal ID: Numeric terminal ID(s). Separate multiple IDs with commas (for example, 1000, 1001, 1005).
- Source ID: Limit included GL transactions by source module (AP, AR, BA, CR, DRS, FA, JE, MB, VM, and so on).
- Reviewed: Include or exclude reviewed GL transactions for this node. Ignored if the report Reviewed setting is anything other than Use Node Settings.
- Total Line Format: Optional single or double line on the Total row.
- Total Line Location: Where the total line appears relative to the Total row.
- Value Prefix: Characters before the value (commonly
$). - Flip Sign for Calculation (also flips display): Switch how the number is calculated and shown when negatives should act as positives (or the reverse).
- Flip Sign for Display: Keep the calculation as-is but display the opposite sign—common for liabilities on a balance sheet.
Click Save when the node is complete.
Moving / Nesting Nodes
Once you have multiple nodes in the Nodes list, drag them to build the report hierarchy. Drag a node to the right to nest it under another node.
Before nesting, nodes sit at the same level:

Drag Sub-Parent Node to the right under Parent Node:

After nesting, Sub-Parent Node appears indented under Parent Node:

Note: Use the manage (paper) icon to load a node in the Add/Edit box. Use the scissors icon to delete a node. Drag nodes to reorder the menu.
Tips & Tricks
- Add all top-level nodes first.
- The Total row for any node is the total of all child nodes nested under it.
Example
In this example, nodes use basic values and selected accounts, with other fields left at defaults.
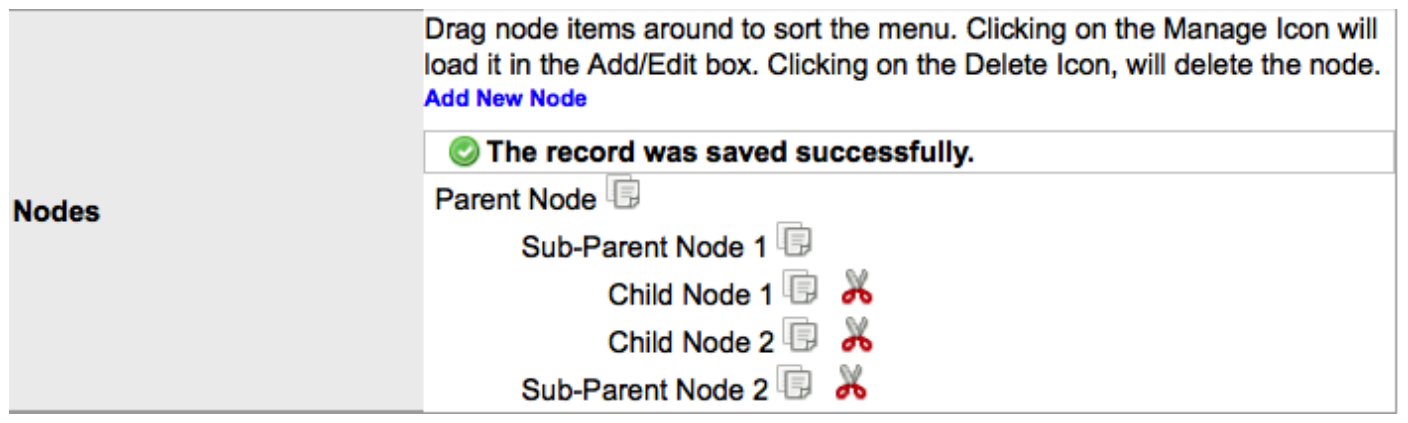
That setup produces output like this when you run the report:
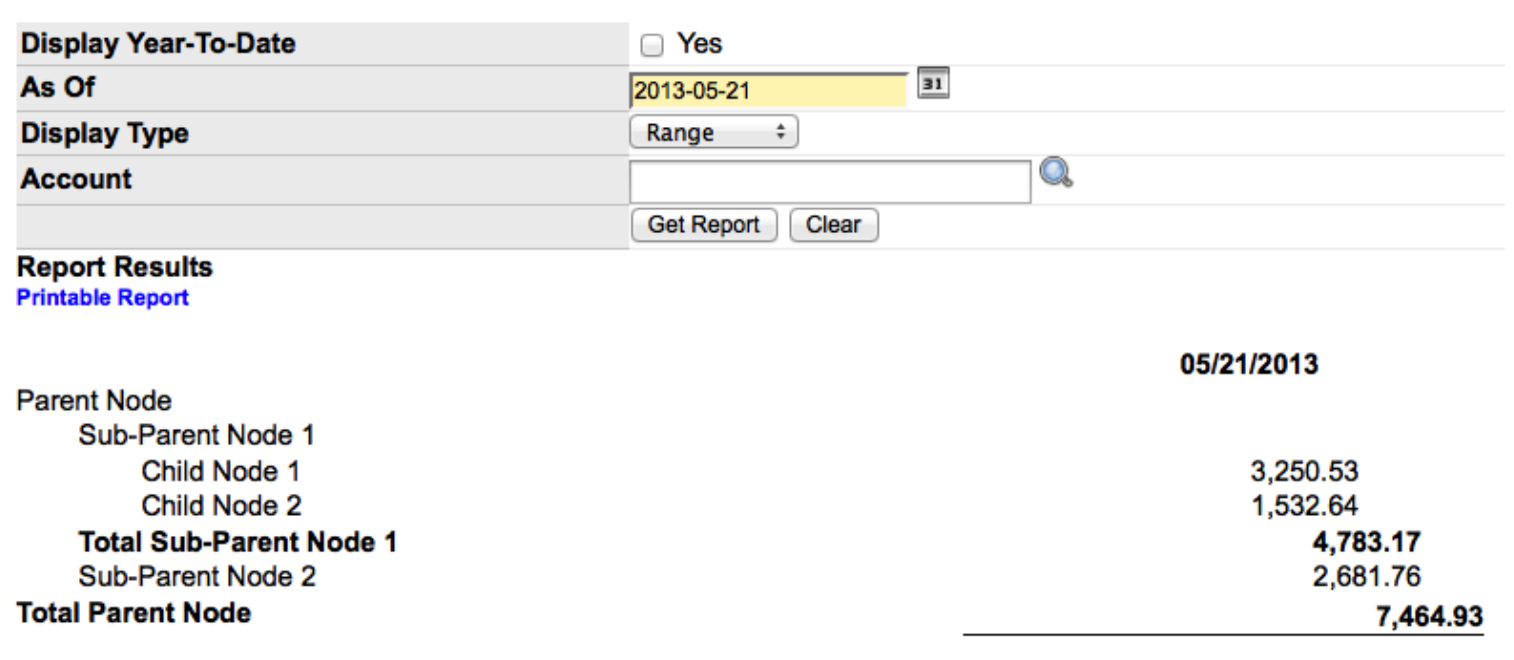
Explanation: Each node that has children gets a Total row below it (Parent Node and Sub-Parent Node 1 in this example).
If you have questions about custom accounting reports, contact support at support@transportpro.net.