



Add Cash Receipts
To record payment against loads or open invoices, add a cash receipt. Go to AR > Cash Receipts > Add Cash Receipt.
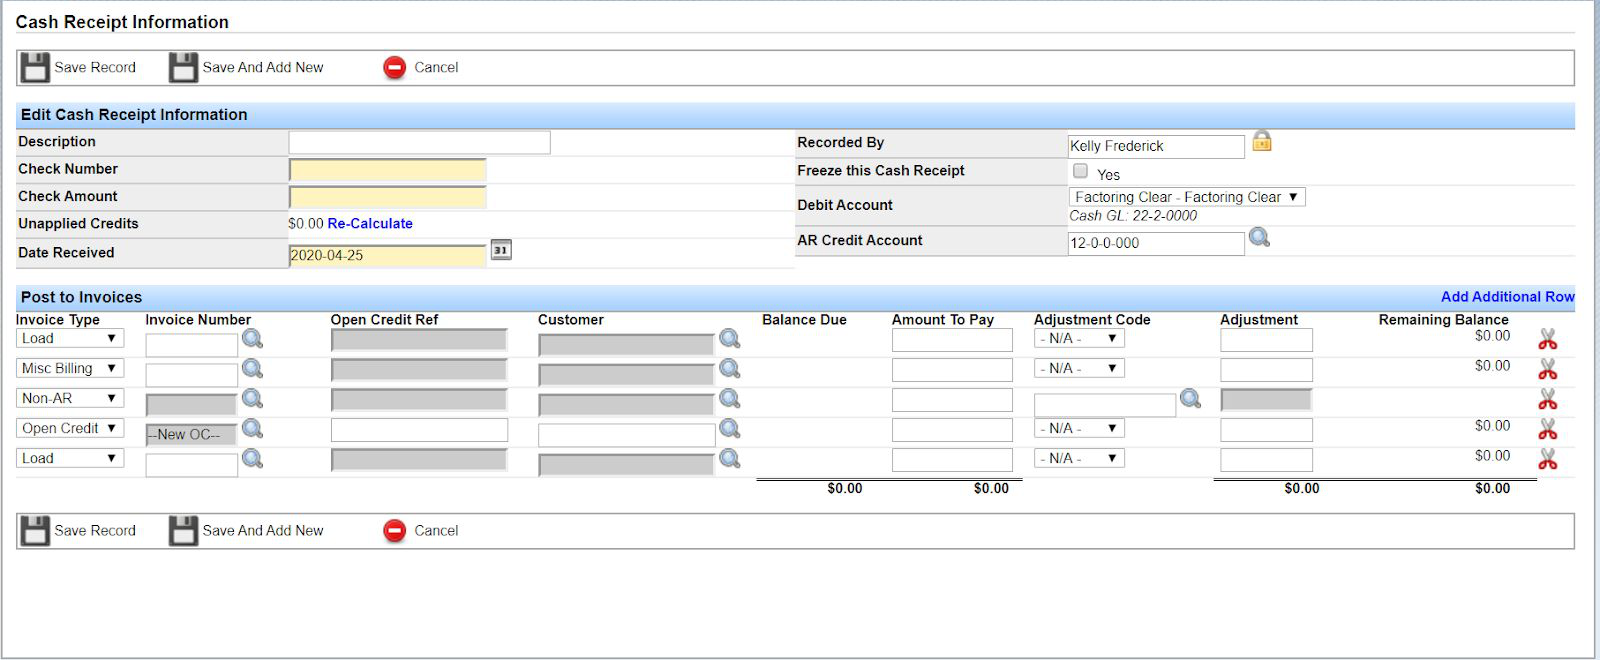
Explanation of Fields
Yellow fields are required.
- Description: Optional. Give the cash receipt a description if you like.
- Check Number: Enter the check number for the payment received. If it is a wire transfer, enter “1.”
- Check Amount: Enter the check amount / amount received.
- Unapplied Credits: Reflects the check amount. After you enter the check amount and leave that field, unapplied credits calculate automatically.
- Date Received: The date you received payment. Defaults to the current date; change it if needed.
- Recorded By: Who recorded the cash receipt. The current user is auto-inserted; click the lock icon to change the user if needed.
- Freeze this Cash Receipt: If checked, prevents you from posting the cash receipt.
- Debit Account: The account to debit when the cash receipt is posted. This list comes from checking accounts set up in the system and can be defaulted at setup.
- AR Credit Account: The account to credit when the cash receipt is posted. By default this hits the AR Trade GL account. To default a different GL account, consult your accountant.
Note: If you are unsure which debit/credit accounts to use, consult your accountant. Checking accounts are managed under Accounting > Checking Accounts > Checking Accounts > Add/Search Checking Accounts. GL accounts are tied to the chart of accounts under Accounting > Chart of Accounts > Search Chart of Accounts.
Post to Invoices: The bottom half of the form is where you apply the payment (unapplied credits).
Invoice Type
The Invoice Type dropdown has four options:
- Load: Apply the payment against a load.
- Misc Billing: Apply the payment against a misc invoice.
- Non-AR: Apply the payment directly to a general ledger (GL) account.
- Open Credit: If an overpayment is made, apply the balance to an open credit.

Apply a Cash Receipt Against a Load
After you enter the required information in the top half of the form, select which load(s) to apply the payment against. Invoice Type defaults to Load—keep that selected.
Enter the invoice number (the Transport Pro load ID). If you know the Load ID, type it in the Invoice Number field and the system auto-inserts the customer, balance due, and amount to pay. If you are unsure of the load ID, or need to apply payment against several loads, click the magnifying glass next to Invoice Number.
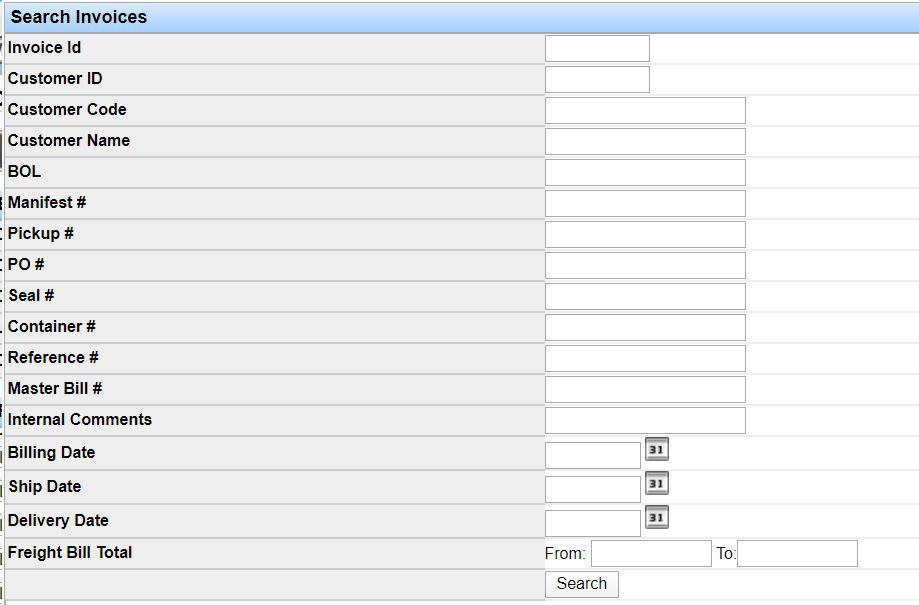
In the Search Invoices window, use filters for specific open invoices, or click Search to list all open invoices.
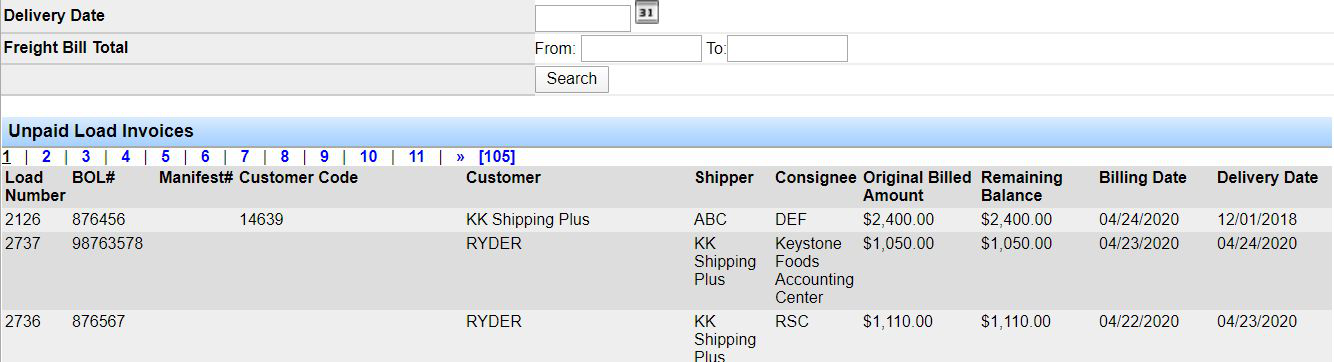
Click anywhere on the row of the invoice you want to insert. To apply against several loads, select all applicable rows.
Note: There is a limit of applying payment to 100 loads per cash receipt. For more than 100 loads, process the payment in batches.
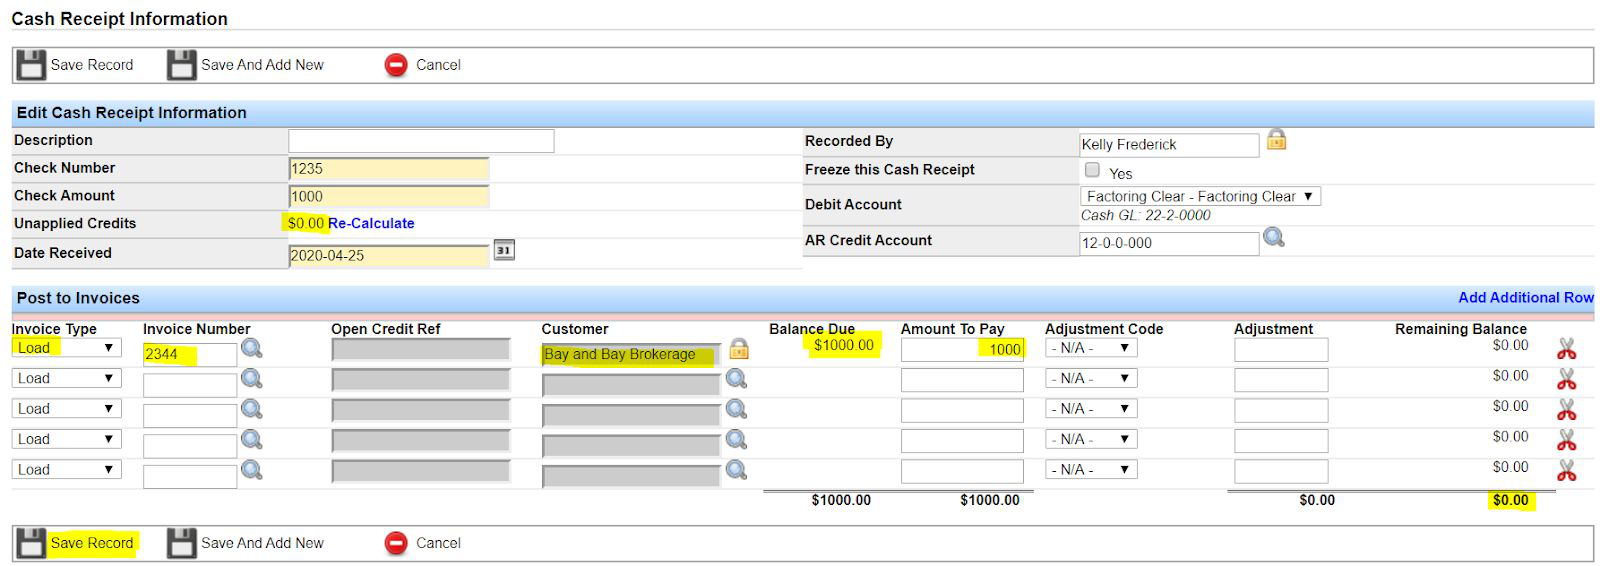
Once you select open invoices, the system inserts the customer, balance due, and amount to pay, and calculates the remaining balance. When the remaining balance is $0 and all unapplied credits are applied, save the cash receipt.
Overpayments / Applying Balances to an Open Credit
If an overpayment is made, apply the balance to an open credit. After you save the overpayment as an open credit, the next time you add a cash receipt for that customer the system can alert you that an open credit is available.

First apply the payment against the load(s) as usual. The overpayment amount remains as unapplied credits. If you try to save without applying all credits, the system returns an error.
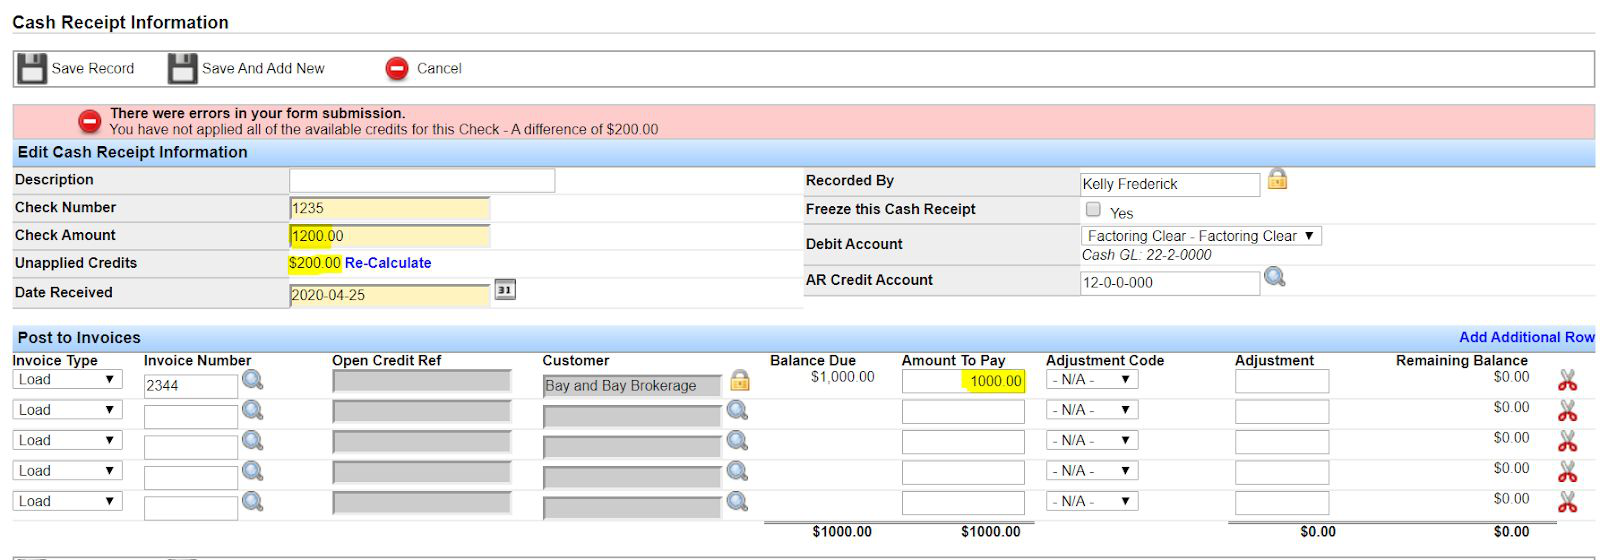
In the example above, the check amount is $1,200 but the load balance is $1,000—an overpayment of $200. Record the $200 as an open credit and apply it later.
Select Open Credit from the Invoice Type dropdown after applying payment to your load(s). The Invoice Number field becomes grayed out. Enter a note in Open Credit Ref, tag the correct customer, and enter the open credit amount (the unapplied credits). The system recalculates the remaining balance. Then save the record.
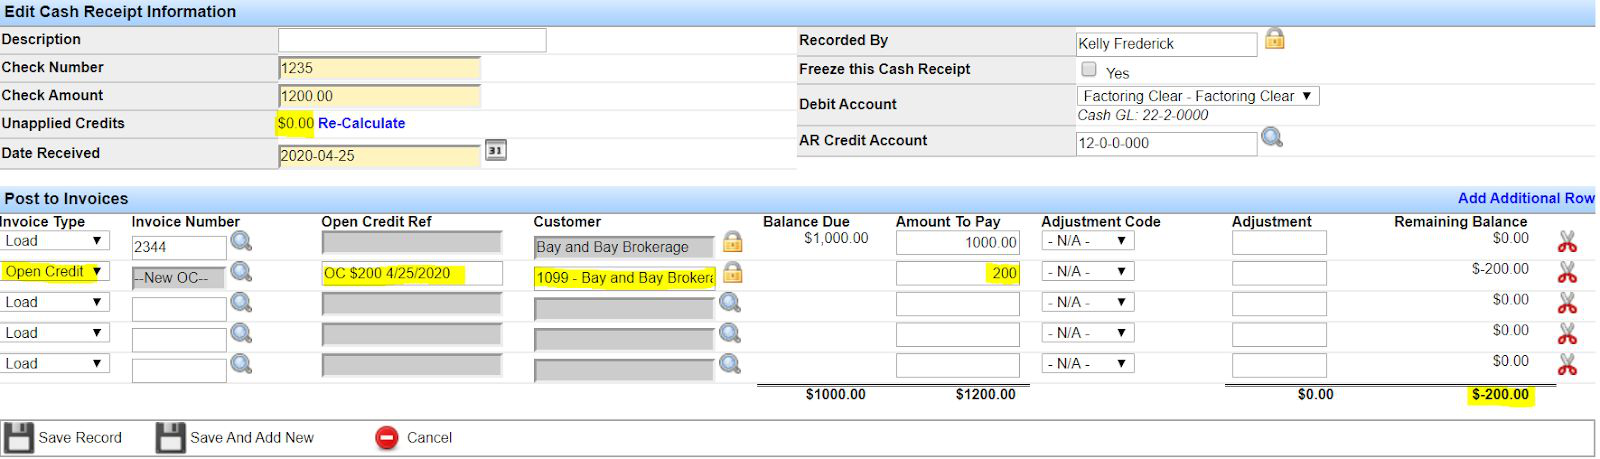
To apply a recorded open credit later, enter a new cash receipt and on a line select Open Credit from Invoice Type. Click the magnifying glass next to Invoice Number to search for open credits, then click the one you want to apply.

If you do not use the full open credit, the system keeps the running open credit balance.
Short Payments
You can record short payments a couple of ways, depending on whether you plan to collect the short paid amount or write it off.
Enter the cash receipt information and apply the check amount against the load(s) as usual. The system calculates the remaining balance as the difference between balance due and amount to pay.
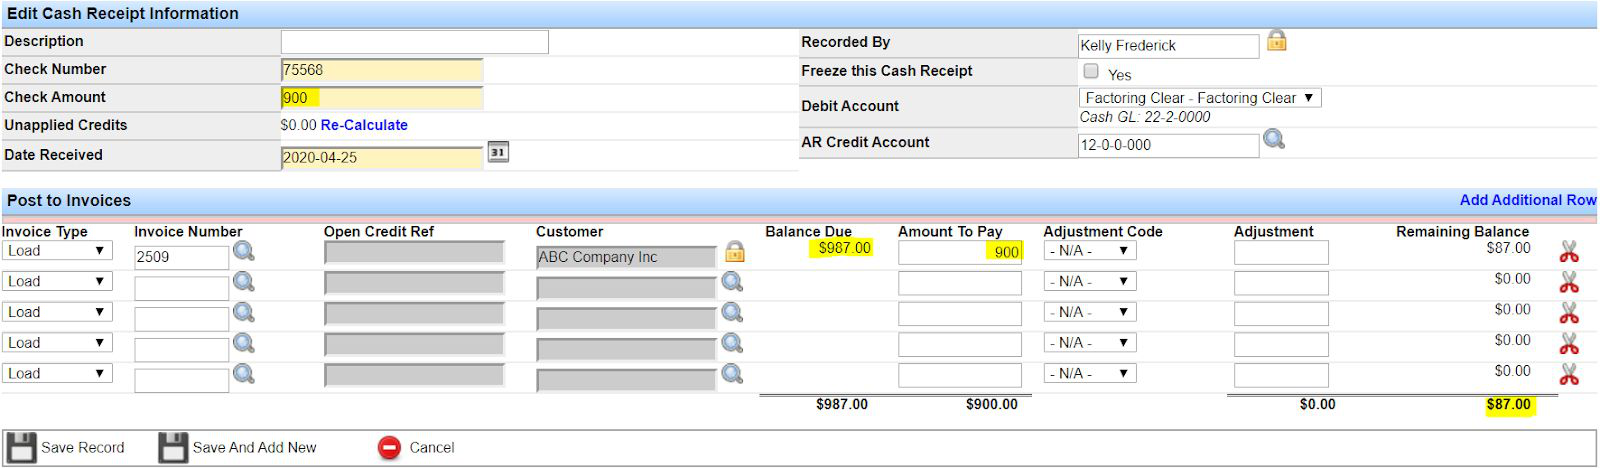
If you will collect this balance from the customer, simply save the cash receipt. The remaining balance appears on the AR aging report for that customer.
If you will not collect the remaining balance and want to write it off, apply an adjustment code.
By default, the only adjustment code in the Adjustment Code dropdown is RTE (rate adjustment). You can add or edit adjustment codes as needed—for example, a code named “SHORT.”
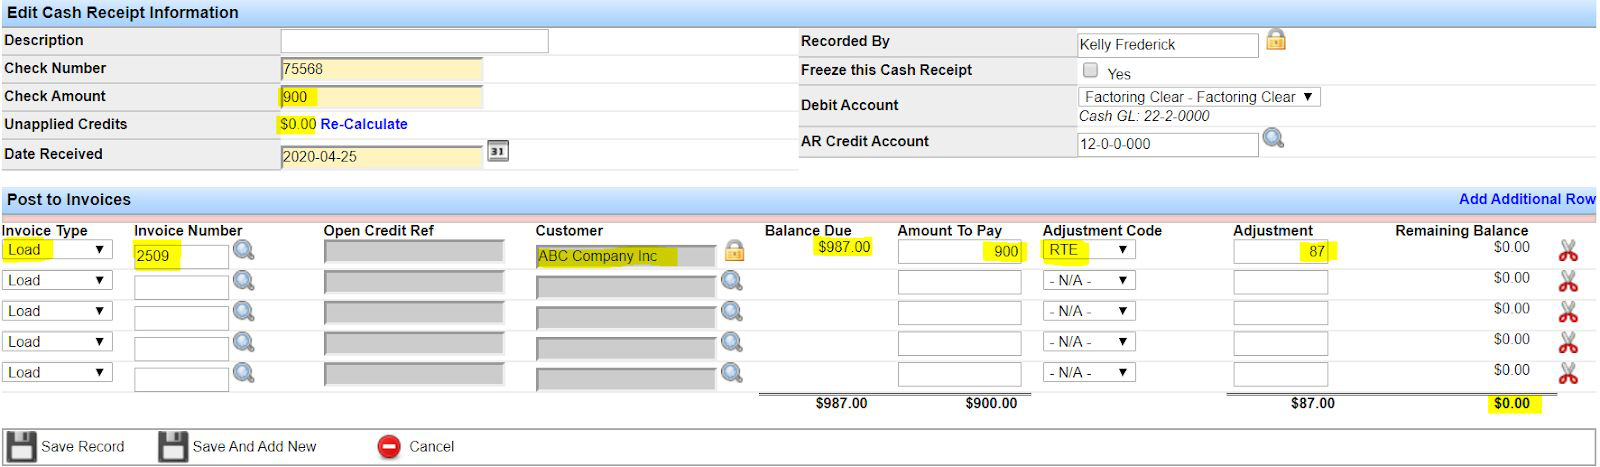
To write off the remaining amount, select the desired adjustment code, enter the amount you are writing off (this updates the remaining balance), and save the record.
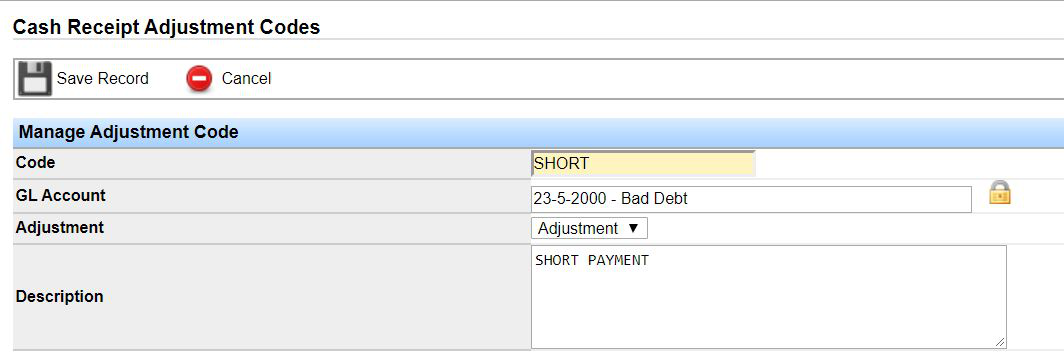
Manage Adjustment Codes
Administrators can add or edit adjustment codes for cash receipts. The most common use is a short payment write-off.
To add or manage adjustment codes, go to Administration > Manage Site Settings > Manage Adjustment Codes > Add Adjustment Code.
Explanation of Fields
- Code: How the code appears in the Adjustment Code dropdown on the cash receipt.
- GL Account: The GL account hit when this code is applied. Consult your accountant if unsure.
- Adjustment: Tag the code as either an “adjustment” or a “refund.”
- Description: Optional internal description.
These codes can also be reported on through the AR module.
Apply a Cash Receipt Against a Misc Invoice
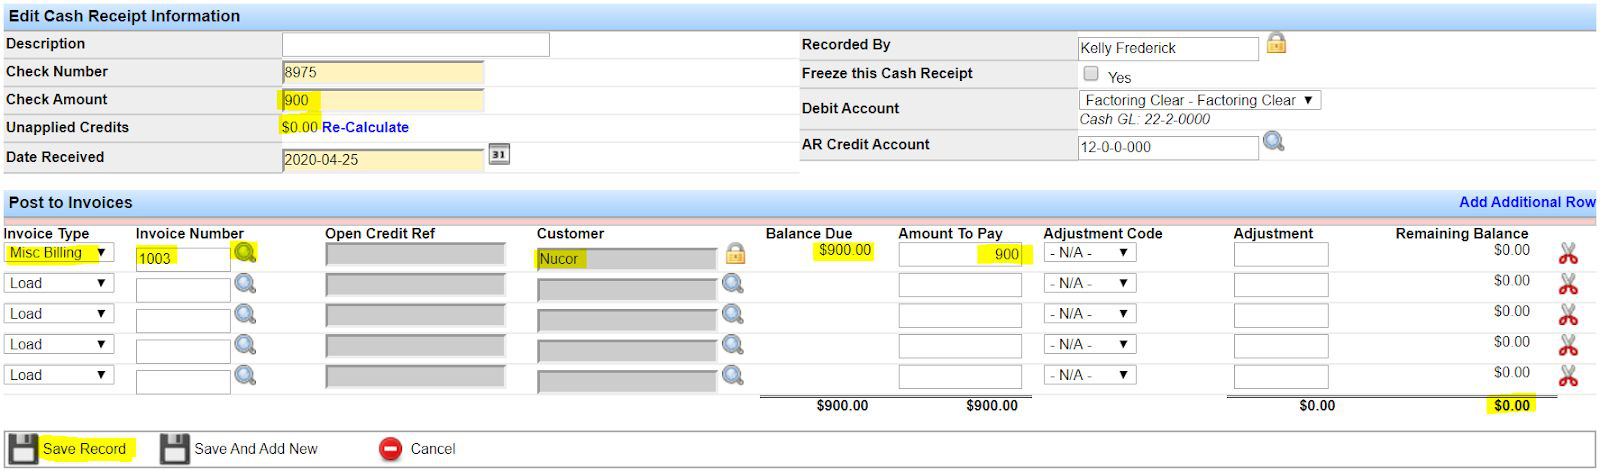
You can also apply payment against miscellaneous invoices with open balances. Create misc invoices under Billing > Miscellaneous Invoicing > Add Misc Invoice (for example, project management). Do not create misc invoices for loads, or in place of applying payment directly against a load.
With the top half of the cash receipt filled out, select Misc Billing from Invoice Type. Use the magnifying glass next to Invoice Number to search open misc invoices and select the one to insert—same process as applying against a load. Then save the record.
Apply a Non-AR Cash Receipt
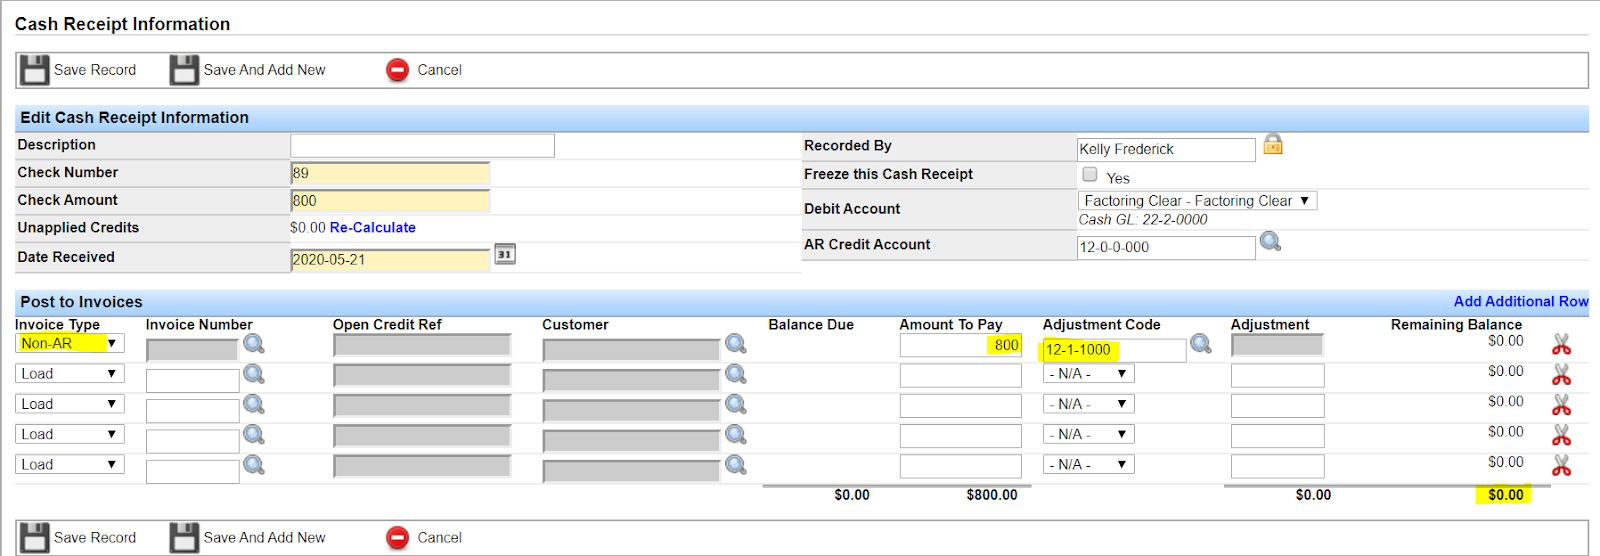
You can apply a cash receipt directly to a GL account when needed—for example, a refund or other non-load-related deposit.
With the top half filled out correctly, select Non-AR from Invoice Type. Fields other than Amount to Pay and Adjustment Code become grayed out. Enter the amount to pay, then select the appropriate GL account in the Adjustment Code field. Consult your accountant if unsure which GL to hit. The balance zeros out; save the record.
Receiving Payment From Your Factoring Company – Accounting for Fees
When you use a factoring company, receiving payment differs from a direct customer payment because you must account for factoring fees.
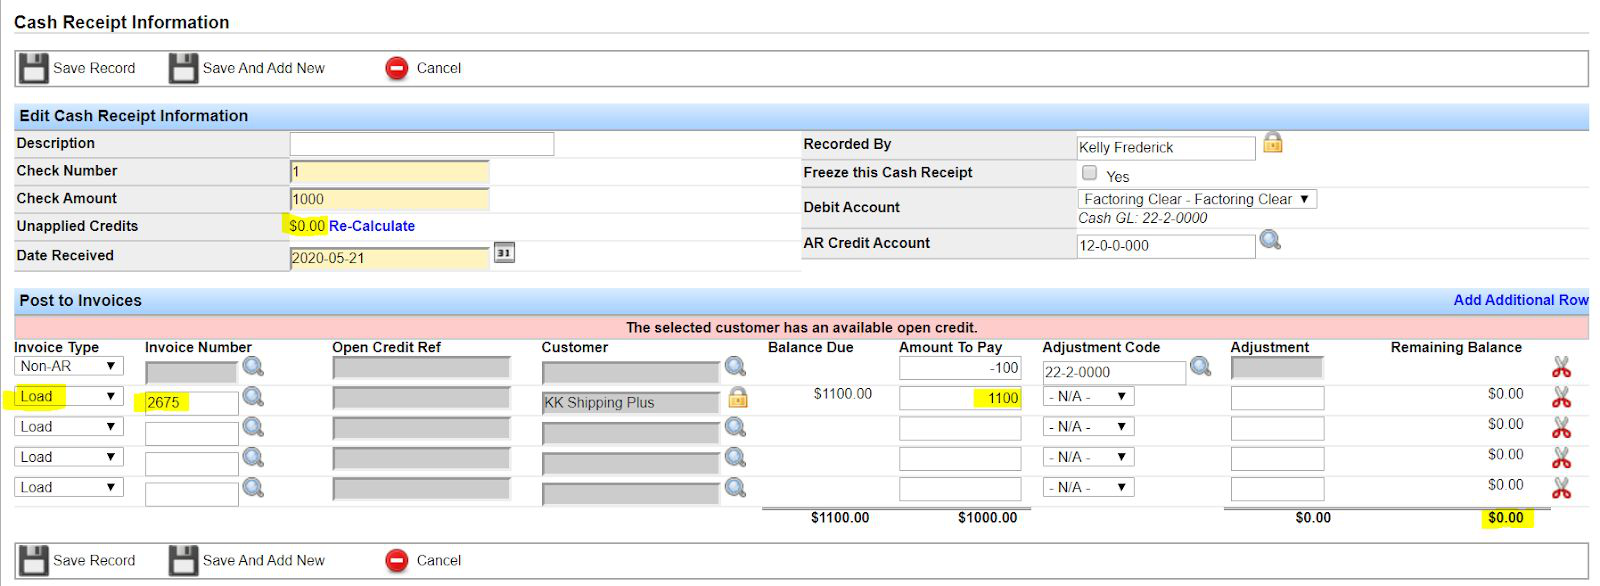
In the top half of the form, enter the check amount as the net deposit. On the first line, select Non-AR. Enter the amount to pay for fees as a negative amount (this increases available credit on the cash receipt to the full gross amount). Enter the correct GL account in Adjustment Code (typically your factoring fees expense account).
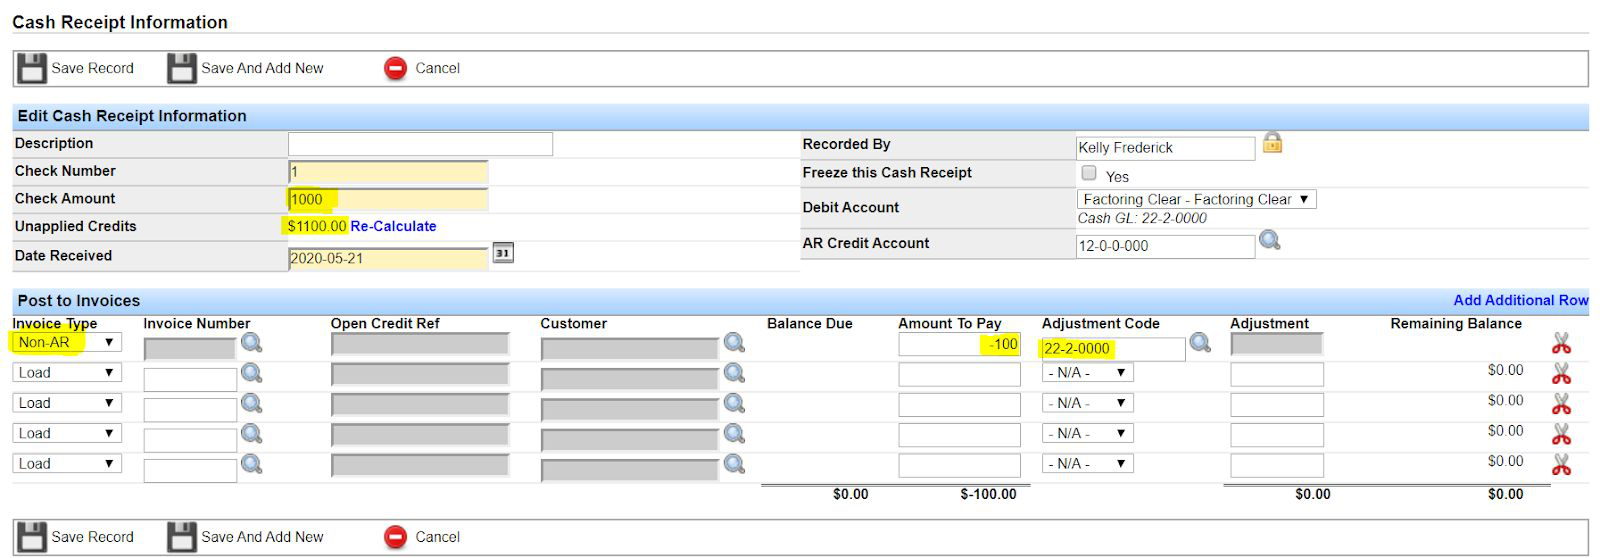
On the following line(s), apply the payment against the load(s). When the remaining balance is $0, save the cash receipt.
Post Cash Receipts
There are two steps to applying cash receipts in Transport Pro: (1) add the cash receipt, and (2) post the cash receipt.
Important: You must post the cash receipt for the system to recognize that payment has been made. Posting updates customers’ open load balances and drives the credit check system.
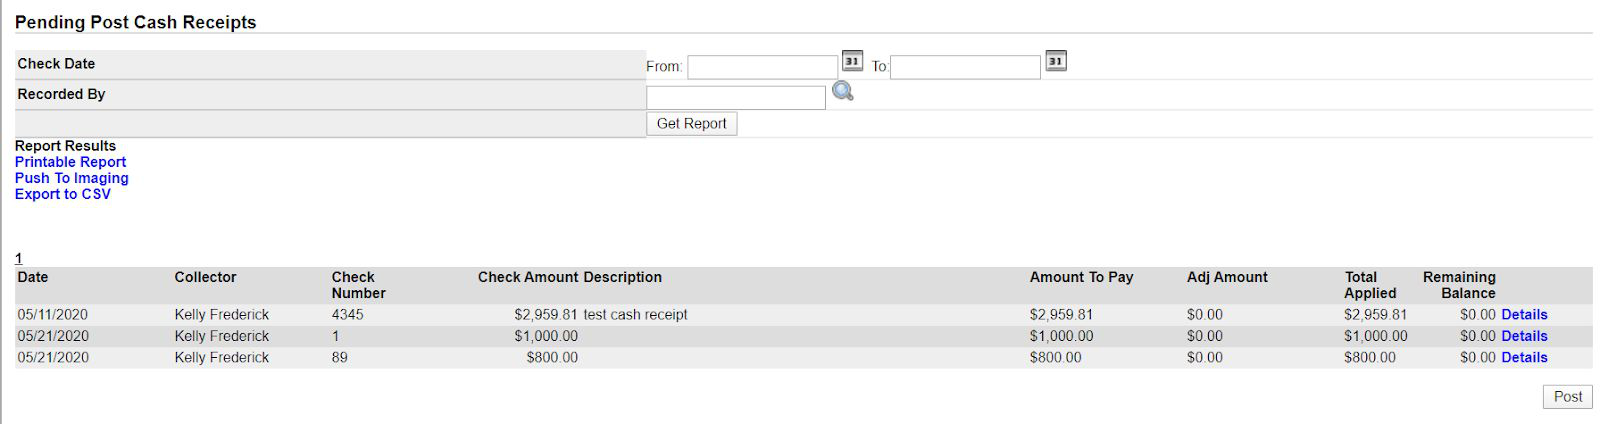
Go to A/R > Cash Receipts > Post Pending Cash Receipts. Pending cash receipts appear in the list. You can filter by check date or by the user who recorded the cash receipt.
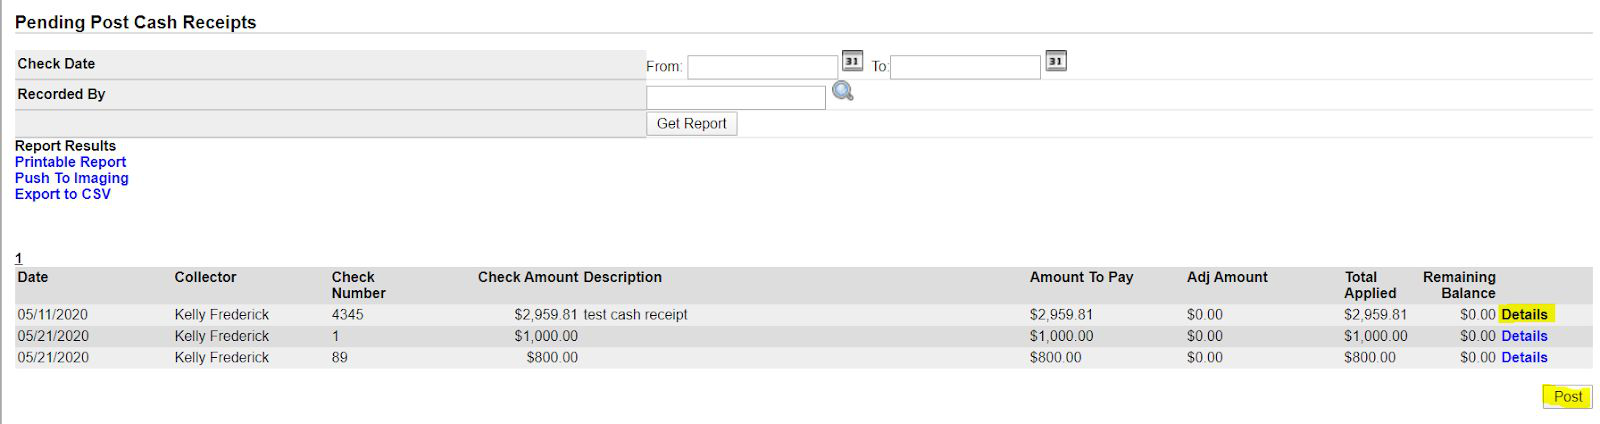
To review details before posting, click the Details link on the right. To post, click Post.
Search Cash Receipts
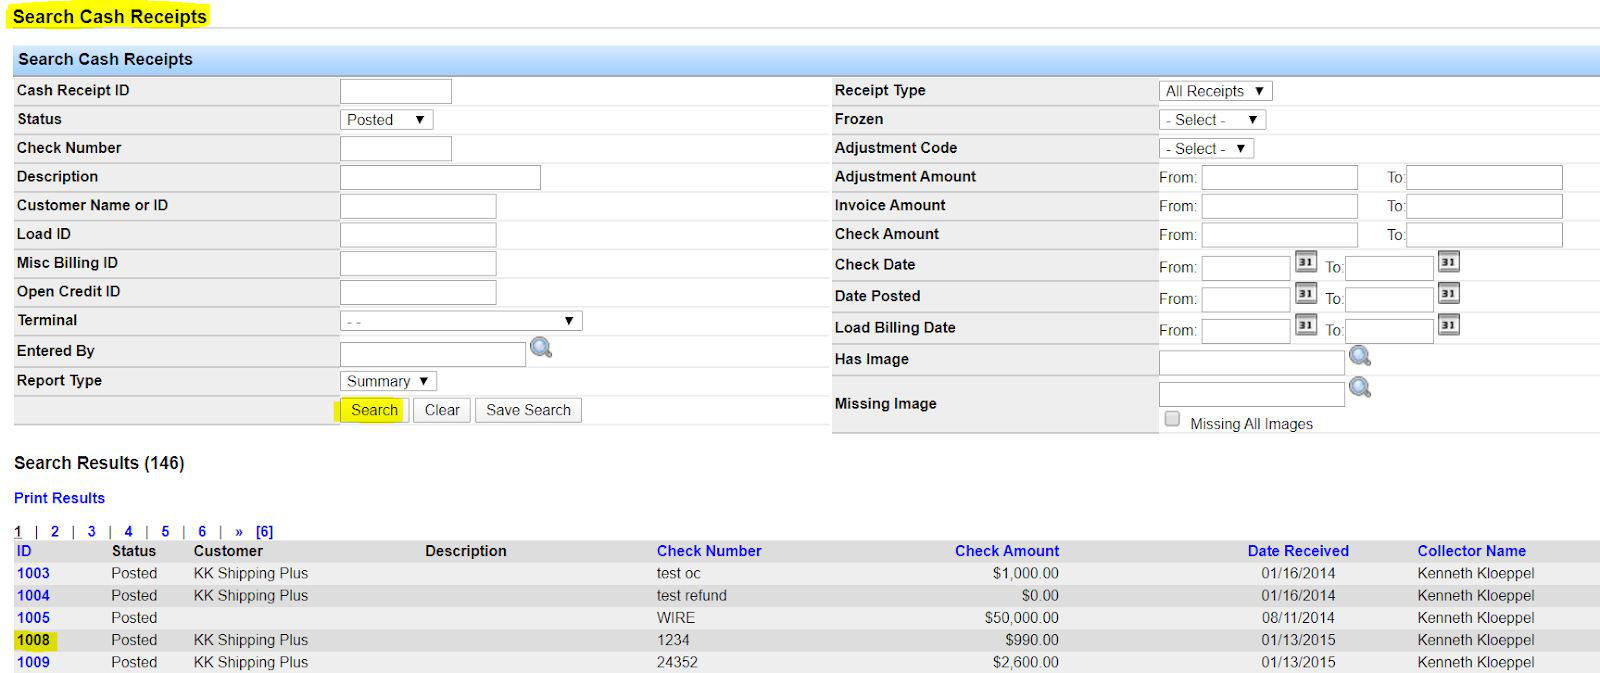
Search cash receipts under A/R > Cash Receipts > Search Cash Receipts. Use the available filters, then click Search. Open a specific cash receipt by clicking its ID.
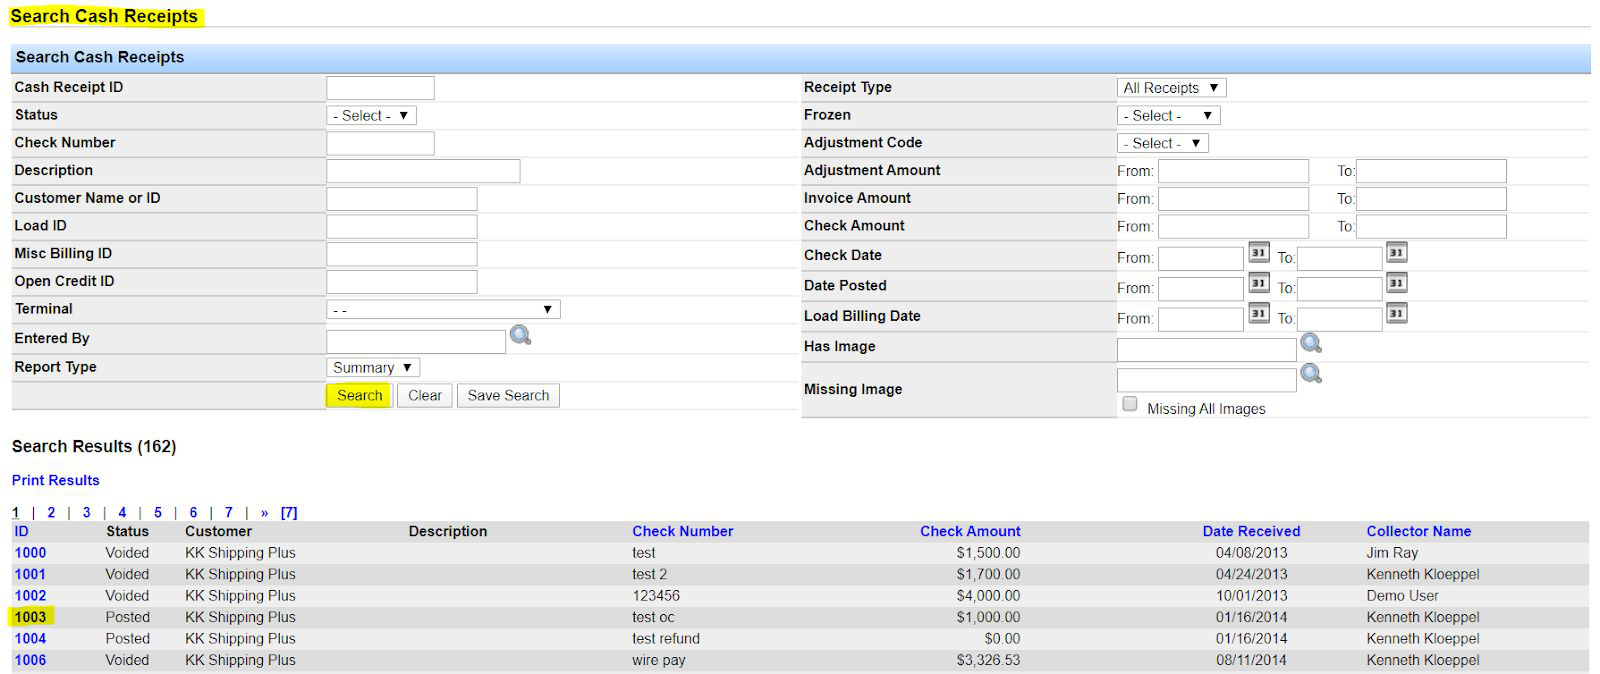
Note: Running search without filters returns all cash receipts in the system.
Void Cash Receipts
To void a posted cash receipt, open it from search so you are on the Cash Receipt Summary screen. Click the cash receipt ID from search results to open the summary.
Note: If you have not yet posted the cash receipt, you can simply edit the record instead of voiding.
On the summary screen, click Void This Cash Receipt. Confirm when prompted.
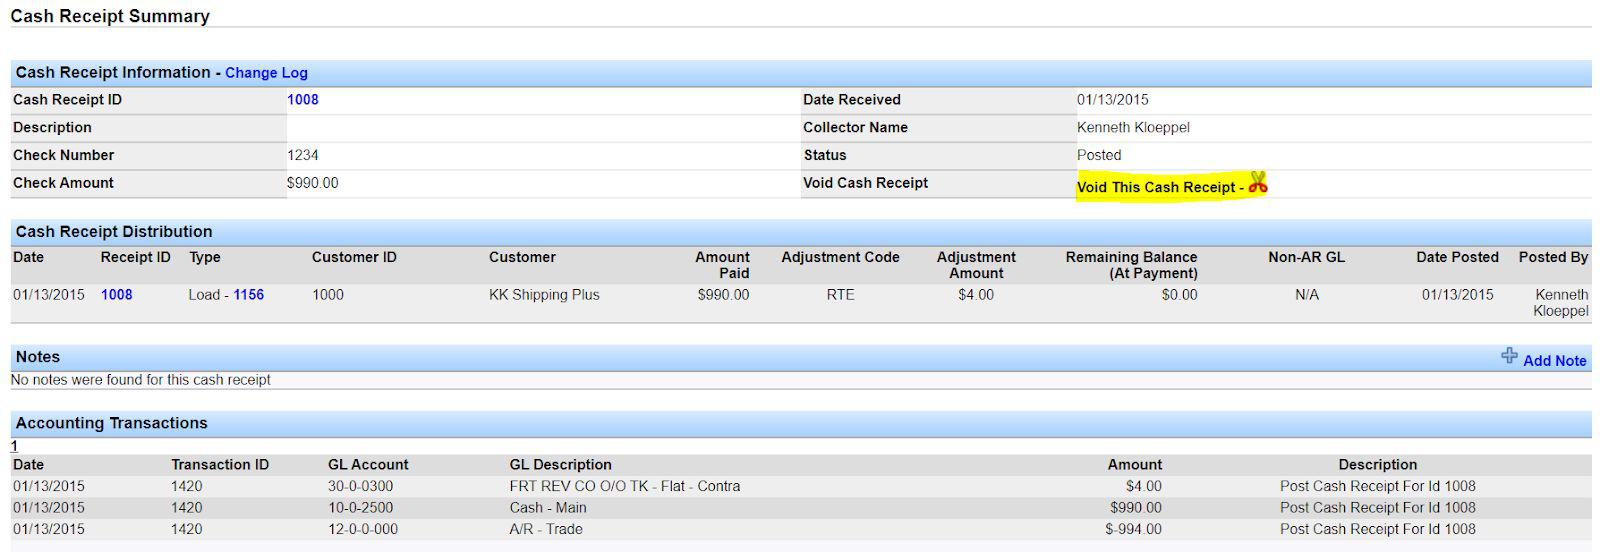
Note: You cannot void a cash receipt if there is an open credit on it.
Questions? Contact support@transportpro.net.