


Add a Vendor
To add a new AP vendor, go to Accounting > Accounts Payable > Vendors > Add Vendor.
Note: AP vendors are for expenses such as rent, water, and electric bills. The AP system is not connected to the settlements system, so this is separate from paying carriers or drivers.
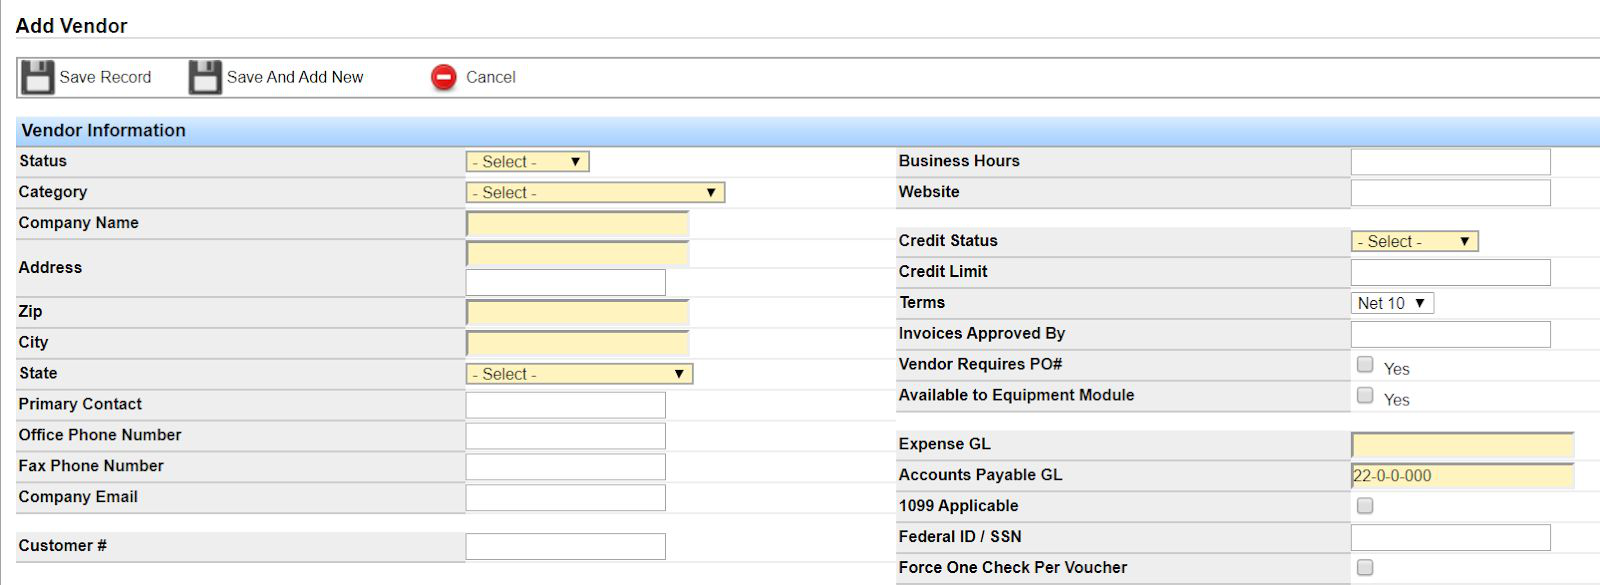
Explanation of Fields
Yellow fields are required.
- Status: Select Active or Inactive. The vendor must be active to pay. You can inactivate a vendor you no longer need; the system keeps history.
- Category: Select the type of vendor (for example, utilities or insurance).
- Company Name: Enter the vendor’s company name (for example, State Farm or Gary’s Garage).
- Address / Zip / City / State: Enter the vendor’s full address. Tip: type the zip code first and the city and state auto-populate.
- Primary Contact: Optional. Enter the contact or rep you work with.
- Office / Fax Number: Enter the applicable phone numbers.
- Company Email: Enter the vendor’s email.
- Customer #: Optional reference if you set up a Transport Pro customer as a vendor. Informational only.
- Business Hours: Optional.
- Website: Optional.
- Credit Status: Select none, pending, or complete. Informational only—choose none if it does not apply.
- Terms: Select payment terms. If you need an option that is not listed, email support@transportpro.net.
- Invoices Approved By: Optional on the vendor, but useful. Enter the name or initials of the person who approves vouchers. That value auto-populates on vouchers and is later required to post.
- Vendor Requires PO#: Check Yes if this vendor requires a PO number. The PO# field becomes required (yellow) on vouchers for this vendor.
- Available to Equipment Module: Check Yes only if you use the equipment maintenance module and need to tag this vendor on repair or work orders. Otherwise leave unchecked.
- Expense & Accounts Payable GL: Enter the expense and AP GL accounts your accountant specifies. By default, Accounts Payable GL is 20-0-000 (A/P - Trade). These values auto-populate on vouchers for this vendor. A value is required even if you use QuickBooks or another accounting package outside Transport Pro.
- 1099 Applicable: Check if you need 1099 information for this vendor.
- Federal ID / SSN: Required only when the 1099 box is checked.
- Force One Check Per Voucher: By default, multiple vouchers for the same vendor print on one check. Check this if the vendor requires a separate check per voucher.
Note: A voucher establishes the expense and liability to pay the vendor. Writing or printing the check later clears that liability via cash. Review the chart of accounts under Accounting > Chart of Accounts > Search Chart of Accounts. If you are unsure which GL accounts to use, consult your accountant.
When all vendor information is entered, click Save Record.
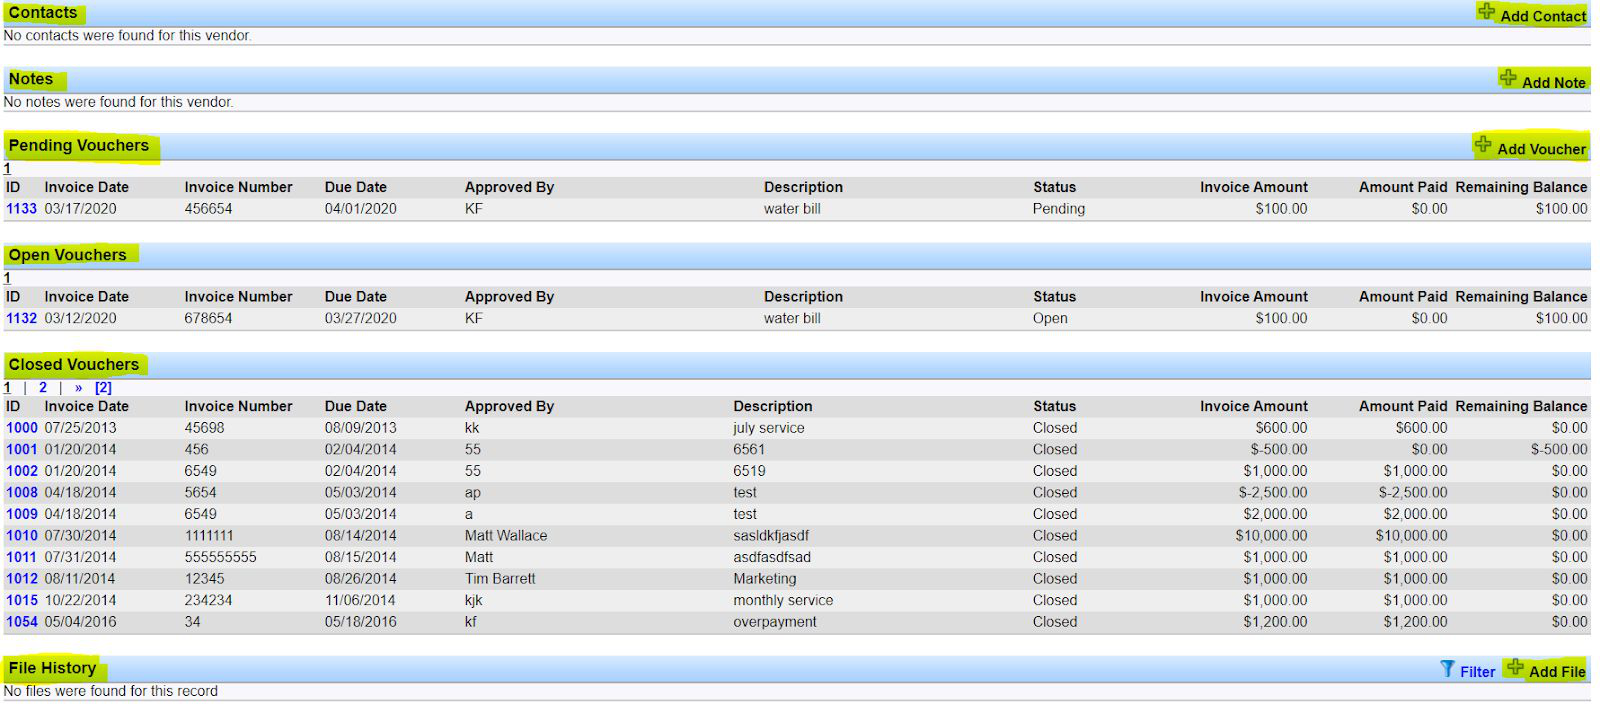
After you save, you are redirected to the Vendor Summary screen. Scroll down to manage contacts, notes, and uploaded documentation. This is also where you add vouchers for the vendor. As you add and post vouchers, pending and completed activity appears here automatically.
Search Vendors
To review or edit a vendor, go to Accounting > Accounts Payable > Vendors > Search Vendors. Use the filters, or click Search to list all vendors.
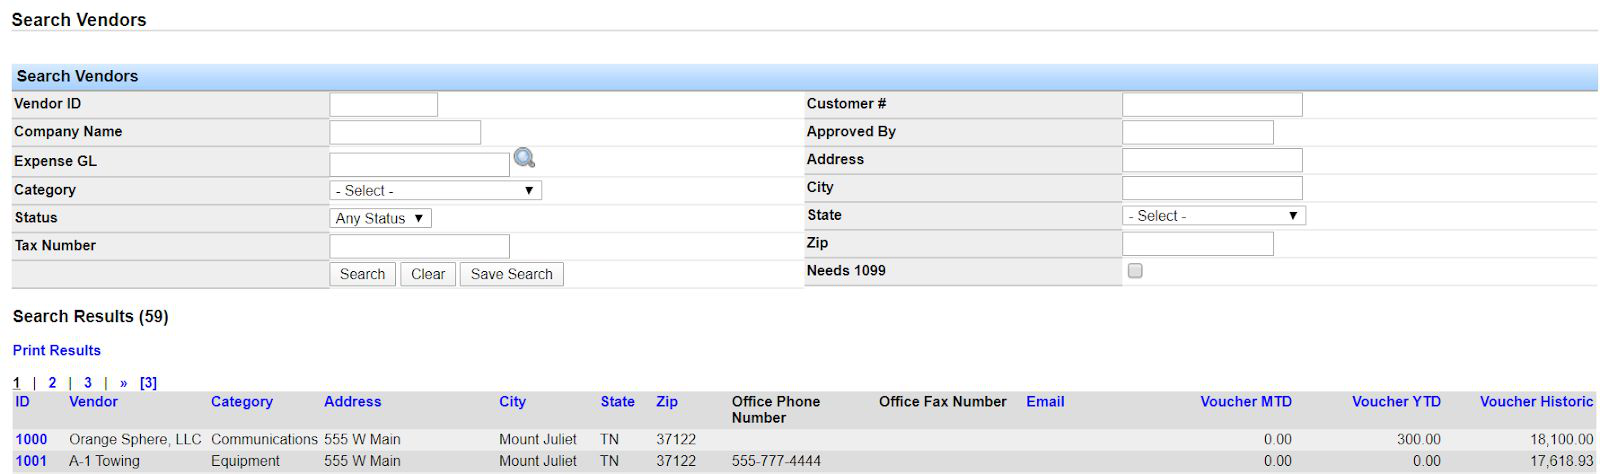
Click the desired ID to open that vendor record.

You are redirected to the Vendor Summary screen. To make changes, click Edit Information in the upper right, then save when finished.

Add a Voucher
To pay an AP vendor, you must first add a voucher. You can use Accounting > Accounts Payable > Vouchers > Add Voucher, but it is easier to add vouchers from the Vendor Summary screen so vendor details carry over automatically. Click + Add Voucher.

The voucher entry screen shows vendor information in the top half. Complete the voucher details in the bottom half.
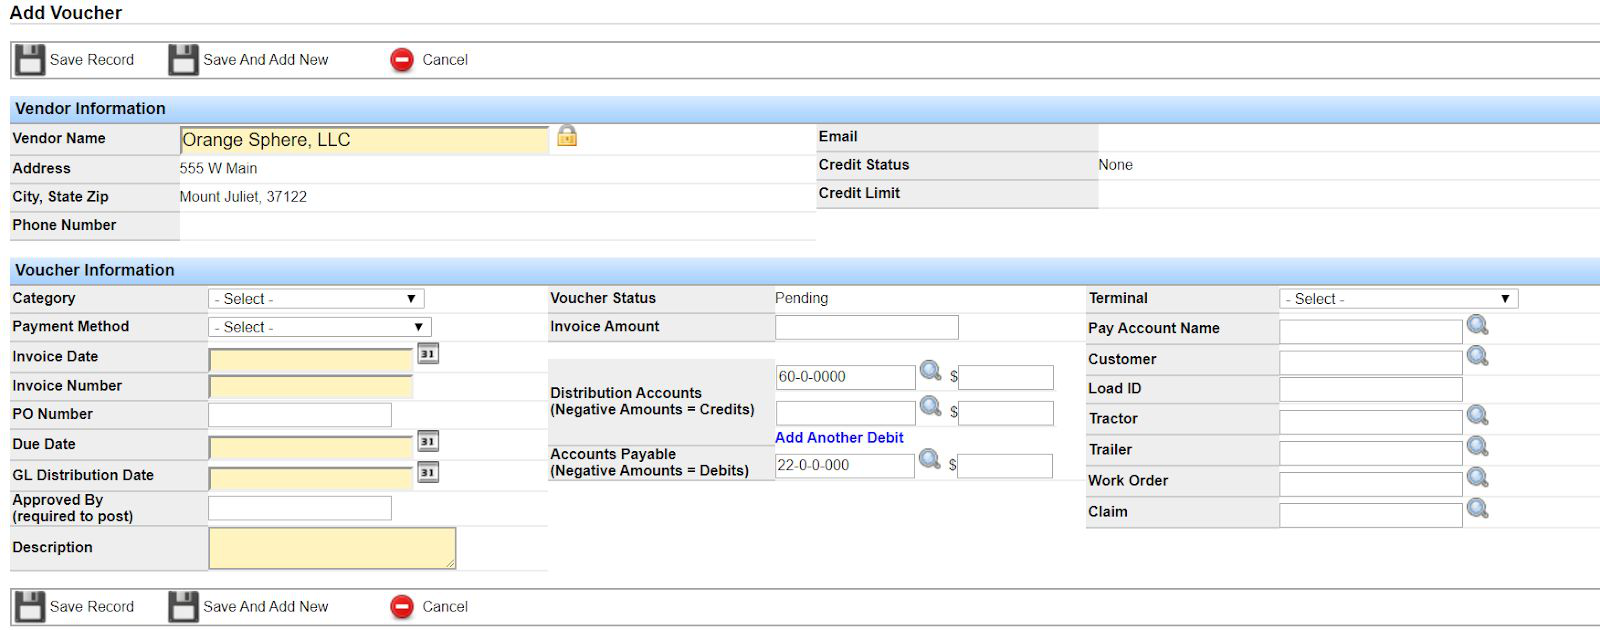
Explanation of Fields
Yellow fields are required.
- Category: Optional. Tag the voucher category (for example, utilities or communication).
- Payment Method: Select which checking account you are paying from. The list comes from checking accounts set up under Accounting > Checking Accounts > Checking Accounts > Add Checking Account.
- Invoice Date: Enter the date the vendor invoiced you. Due date and GL distribution date auto-populate based on the vendor’s terms; you can edit them.
- Invoice Number: Enter the vendor’s invoice number.
- PO Number: Enter a PO number if applicable. Required (yellow) if the vendor is set to require a PO#.
- Due Date: Enter the date payment is due.
- GL Distribution Date: Typically the same as the due date.
- Approved By: Enter the name or initials of the person approving this voucher. Not yellow on the form, but required before you can post. Auto-populates if set on the vendor.
- Description: Enter a description (for example, water bill or renter’s insurance).
- Invoice Amount: Enter what you owe the vendor.
- Distribution & Accounts Payable GL Accounts: Auto-populate from the vendor record. You can change the distribution account for this voucher, and you can add multiple distribution accounts if needed.
Note: Transport Pro does not offer direct bank integration. Payment method is a tag on the record for your reference.
The third column in Voucher Information lets you tag related records such as customer, load ID, tractor, trailer, work order, or claim. Those tags are informational only—the voucher does not update other records or create settlements. The only tag that affects posting is Terminal, which is tagged on the GL transaction.
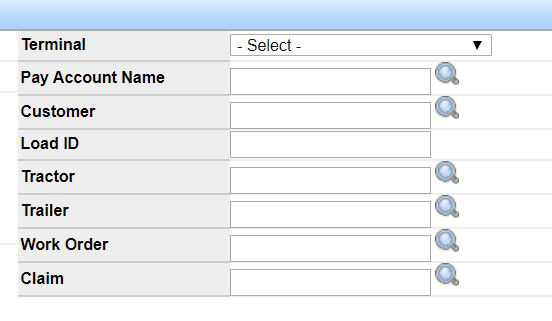
Click Save Record when finished. Remember: the voucher establishes the expense and liability; printing or recording payment later clears the liability via cash.
After you save, the Voucher Summary screen shows vendor and voucher details plus sections for contacts, notes, files, settlement activity (if applicable), and voucher payments. As you pay by check or ACH, payment history appears here automatically.
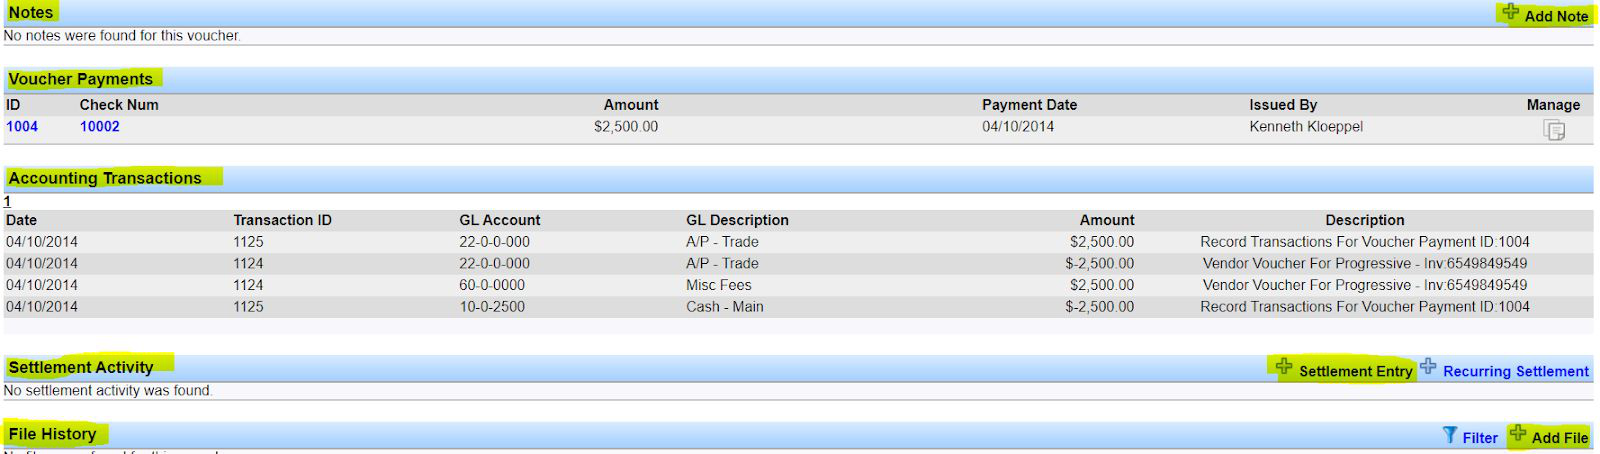
Search Vouchers
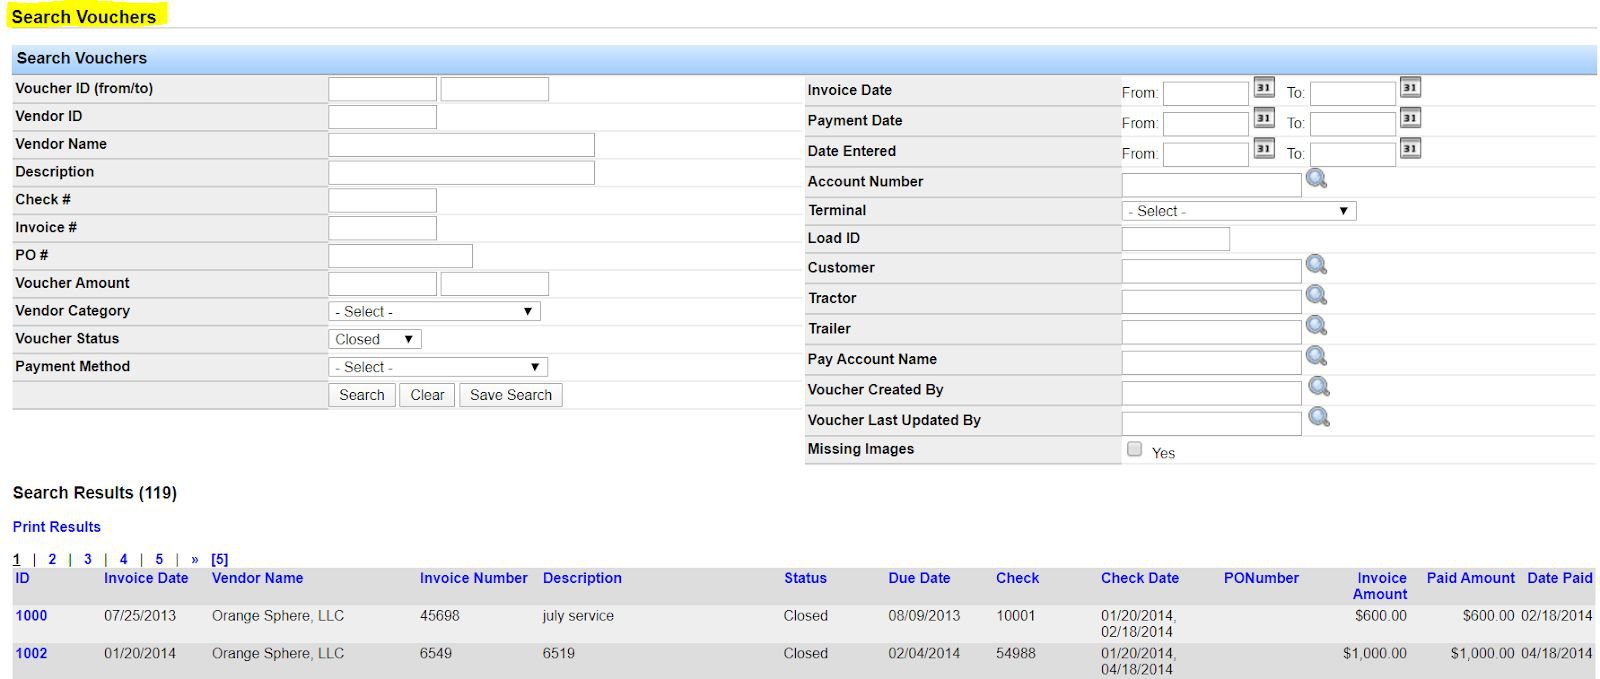
To find vouchers, go to Accounting > Accounts Payable > Vouchers > Search Vouchers. Use filters for specific vouchers, or click Search to list all vouchers. Click an ID to review or edit a voucher.
Post Pending Vouchers
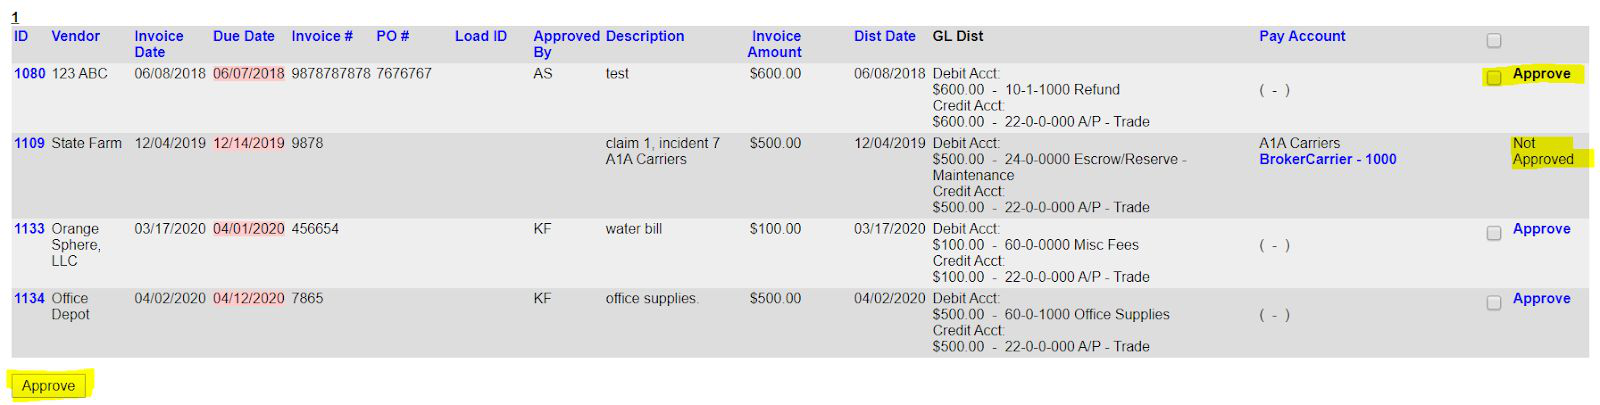
Every voucher you add must be posted. Go to Accounting > Accounts Payable > Vouchers > Post Pending Vouchers. Use filters to find specific vouchers, or review the full list of pending vouchers.
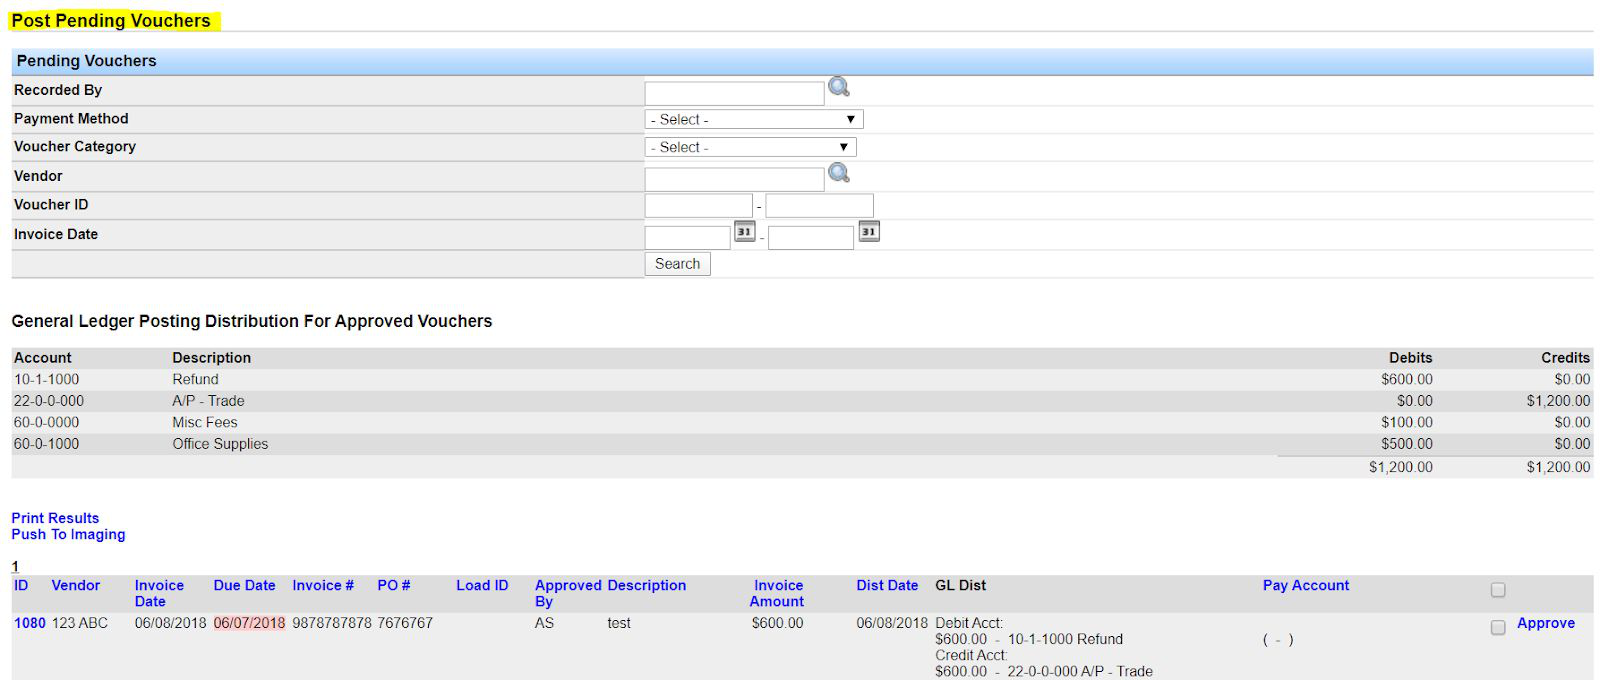
Important: If a voucher has no checkbox to approve, the Approved By field is missing on that voucher. Add a name or initials on the voucher before you can post it.
Check the vouchers you want to post, then click Approve at the bottom of the screen. You will see a message confirming the voucher(s) posted successfully.
Select Posted Vouchers for Check Printing
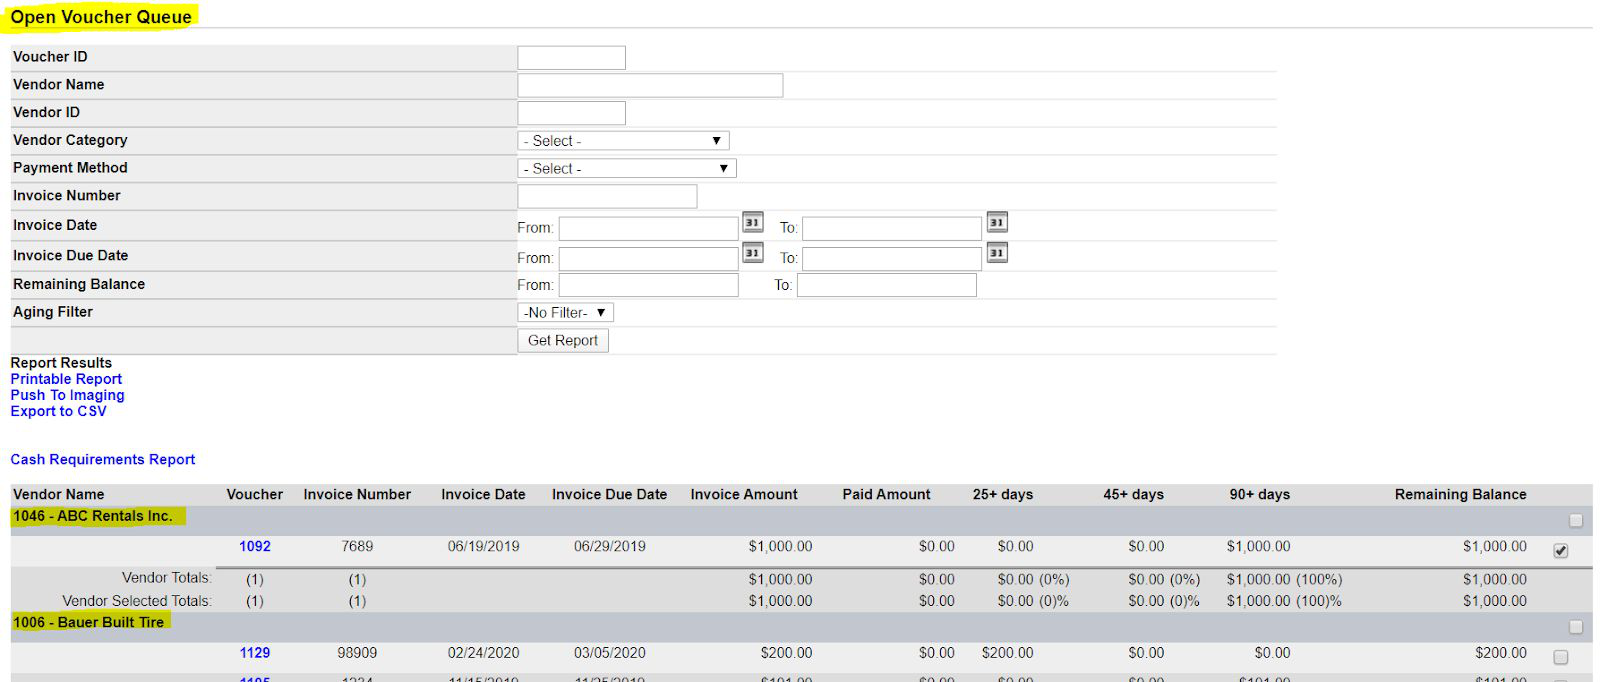
Posted vouchers move to the open voucher queue. Go to Accounting > Accounts Payable > Open Voucher Queue. Posted vouchers are listed and broken out by vendor. Use filters if you only want certain vouchers; otherwise the system shows all posted vouchers.
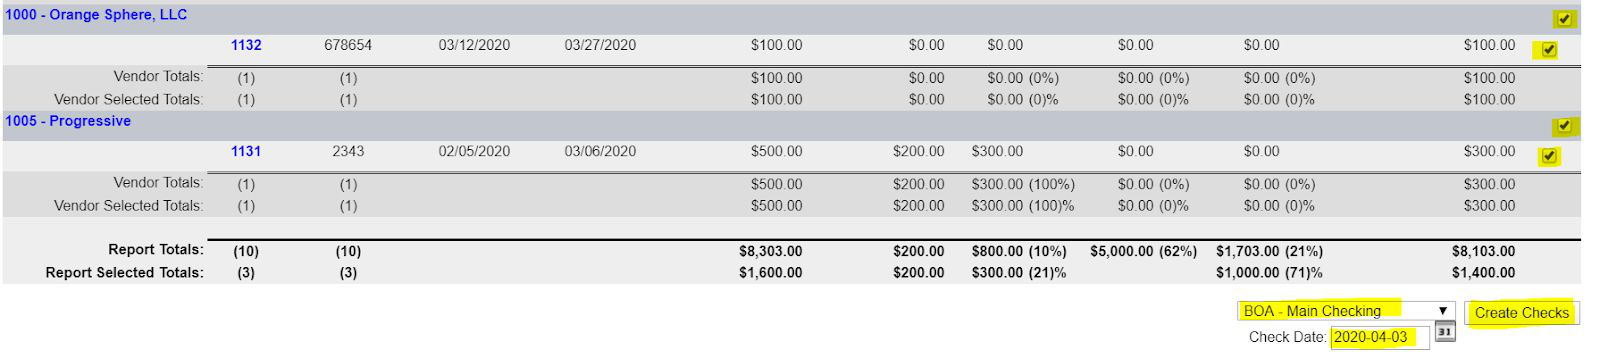
Select the vouchers you want to print checks for. At the bottom of the screen, choose the appropriate AP checking account, confirm the check date (defaults to today), then click Create Checks.
Print AP Checks
After you create checks from the open voucher queue, they appear in the AP Check Print Queue. Go to Accounting > Accounts Payable > AP Check Print Queue. This queue works like the settlements check print queue.
Edit check numbers if needed, select the checks to print, then click Print.

Note: AP check alignment must be tested the same way as settlement checks. AP checks may differ from settlement checks depending on how your checking accounts are set up. Send a VOID AP check to support@transportpro.net so support can help align checks before you print live.
After you click Print, you are redirected to the Check Confirmation screen. If a check did not print correctly (for example, upside down or misaligned), check Requeue / Cancel for that check and click Save Record to return it to the print queue.
Important: If you requeue or cancel a check, that check number is voided and cannot be reused. The system assumes the printed check was destroyed.

If the check(s) printed correctly, click Save Record to confirm. Confirming printed checks is what sends them to the cash reconciliation module.
Record ACH Payments
To record vendor payments as ACH instead of printing a physical check, follow the same workflow except selecting vouchers in the Open Voucher Queue and printing checks:
- Add the voucher.
- Post the voucher.
- Open the Voucher Summary via Accounting > Accounts Payable > Vouchers > Search Vouchers, find the voucher, and click the ID.
- Scroll to Voucher Payments and click + Add Payment.
- On the next screen, check Yes, hand written, enter check number 1, and click Save Record.

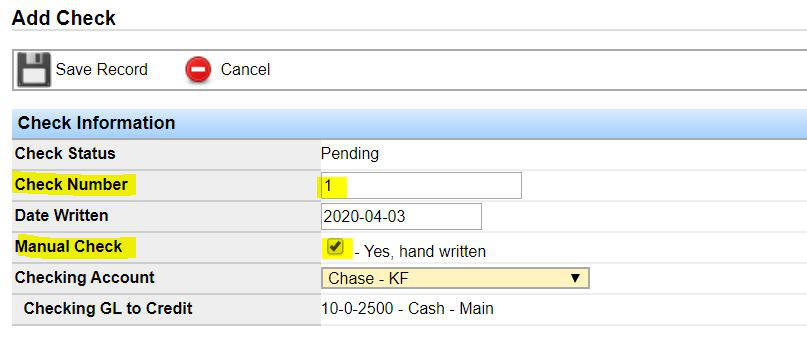
You return to the Voucher Summary with the payment recorded as check number 1. When you review payments in Transport Pro, check number 1 indicates an ACH payment.

If you have questions about the AP module, contact technical support at support@transportpro.net.