Add a Terminal
Introduction A terminal in Transport Pro refers to an outside, 1099 office, agent, or group that needs to bepaid out for commissions.
Please note that this tool is NOTfor internal W-2 employees suchas dispatchers or carrier reps, or in other words, your in-house sales people.
This guide will cover different scenarios.
Terminals can also simply be a great way to group loads or information into “pods” and then you can use the “terminal” filer on several reports throughout the system, depending on what you want to do, or how you might like to review the data foryour business.
Add a Terminal When your Transport Pro installation is created, your company is set up as a terminal.
Youhave to add any additional terminals to the system.To add a new terminal to the system go to Administration > Manage Terminals > Add Terminal.Below is a screenshot of the terminal entry screen as well as an explanation of fields.
Explanation of Fields:*Yellow fields are required.*
- Terminal Code: Enter a code for the terminal.
Thecode can be whatever you want it to be,though we recommend keeping it to five characters or less.
- Terminal Type: Tag the type of terminal this is.
This does not affect, or drive anything.
It simply lives on this record for your internal informational purposes.
- Status: Mark the terminal as either “Active” or “Inactive.” If you want to use this terminal, andsee it in the drop-down menus throughout the system, then it must be “active.” You can in activate the record at any time.
- Title: Give the terminal a name/title.
This is the description that will show for you in thedrop-down menus throughout the system.
- Address/Zip/City/State: Enter the full address forthis terminal.
Note, if you enter the zip first,the city and state will auto populate.
- Office Phone Number: Enter the office phone number for the terminal.
The office phone number will show up on all of the rate and driver confirmations.
If a system user assigned to a terminal has a phone number on their user account in Transport Pro, then this phone number will serve as a backup number.
- Emergency Phone Number: If you enter an emergency phone number (not required) then itwill show up on the driver and rate confirmations as the emergency phone number.
- Email: Enter the email for this terminal.
- Escalation Email: This email ties to the “Escalation Issue” track and trace tool in the system.When an operations user escalates an issue, this email will receive a notification.
Operations users should learn about this escalation tool during dispatch training.
- Date Opened: Enter the date that the terminal opened for business.
- Date Closed: Enter the date that the terminal closed for business if applicable.
You would likely only need to note this if you were in activating the terminal.
- Print 1099: By default this box is checked.
Assuming you will be paying this terminal for commissions, leave it checked.
As you process settlements for this terminal, the data feeds Transport Pro’s 1099 report.
Note, Transport Pro doesn’t actually print the 1099 for you, butthe report provides the data you need to do your 1099s.
- Commission Program: You have two options here: Split Commission and Simple Commission.
While the split commission option is more common, we’ll look at examples forboth options so you can make the correct selection for your business.● Split Commission: If you want to split up the freight bill amount, then you’ll use this option.
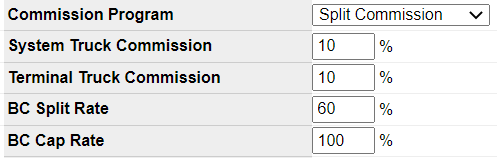
When this option is selected from the drop down menu, four different percentage (%) fields become available: Let’s walk through examples using these four fields.
- System Truck Commission: This field is applicable to asset-based companies.
If this terminal dispatches a truck that is assigned to another terminal, then the agent would receive their commission for the load based on this “system truck commission.”
- Terminal Truck Commission: This field is applicable to asset-based companies.
If this terminal dispatches a truck that is assigned to their terminal, then the agent would receive their commission for the load based on this “terminal truck commission.”
Note: The reason behind having the option for both system and terminal commissions is because you might like to say, “If an agent brings on a truck of their own, or brings new business to the table, then we will pay them a higher percentage than if he were to use a company truck.” It’s up to you based on how your business operates.
- BC Split Rate: This field is for brokerage companies.When calculating this percentage, the formula is: How much you billed versus how much you paid out.Let’s say you wish to give this agent 60% of the profit on loads.
You would enter “60” in this field.
So, for example, if you have a load making a profit of $500, then the system would paythe agent $300 for the load based on this 60% split rate.
- BC Cap Rate: This field is for brokerage companies.
You can put any cap amount on anagent.
For example, let’s say you wish to give the agent the ability to break even on loads.Then, you would enter “100” in this field.Or, you may wish to penalize the agent for paying over a certain amount.
Let’s say you have aload being billed at $1,000 and the agent has a cap rate entered as 85%.
That means that the agent can pay up to 85% for the load ($850) before penalty kicks in.
So, if this agent decides to pay a carrier 90% ($900) for the load, then the system will automatically charge that 5% of$1,000 back to the agent, and that deduction would show up on the terminal’s settlement.
- Simple Commission: This type of commission serves as a house commission.
Inother words, this is the percentage that the house makes regardless of cost.
For example, let’s say you enter “10%” in this field.
If you bill a load for $1,000 then the house will make $100 no matter what before paying commission to the terminal.
- BC Minimum Amount: This is the minimum gross profit that the house will make, and it should be entered as a dollar amount.
Any losses will be charged to the agent.
You may ormay not use this option depending on how you run your business.
- Calculate Commission?: If you want the system to calculate commissions for this terminal,check this box.
- Use Owner Operator Contractual Rate: This option ishere for asset companies.
If you want this agent’s commission to be based on the owner’s contractual rate, then check this box.
For example, let’s say this agent dispatches an owner who has a contractual rate set at 75%, butthe agent decides to dispatch the owner on a load at 78% instead.
Checking this box would calculate this terminal’s commission based on the contractual 75%, not 78%.
- Parent Terminal: You will see any terminals that have been added to the system in this drop-down menu.
The system allows you to set up parent-child relationships between terminals, if applicable.
This option is often used in the case that a user needs to be assigned or have access to information for more than one terminal.Let’s say I set up two terminals in the system and call them “Terminal A” and “Terminal B.” Iopen up the profile for Terminal B and select “Terminal A” as the parent terminal.
This means that any system user that I assign to “Terminal A” will have access to information for Terminal A and B.
If I assign a user to “Terminal B” (the child terminal) then the user will only see Terminal B’s information.
Locking down this visibility is also dependent on enforcing restrictions on the user account, which will be shown in the next section.
Looking at the below screenshot, you can see, for example, that terminal “RFT” is under terminal “ADT.” So ADT is the parent terminal of RFT.
As you set up these terminal relationships, you will see that the child terminals are indented with a dash under the parent terminal.
Of course you can make changes at any time as needed.
- Preferred Settlement Day: You may wish to select a preferred settlement day for this terminal if you run daily settlements.
Say, for example, you run settlements for this terminal every Thursday.
If you run weekly settlements at your company, there’s probably not a needto tag this.
- Share Driver Info With Other Terminals: By default this option is set to “no.” You can change it to “yes” if you want.
If you say “yes” here, then when an agent logs into Transport Pro, they’ll be able to see other drivers’ information (drivers assigned to other terminals), suchas their phone numbers, on the main freight operations dashboard.
This is something that will also depend on enforcing data restrictions, which will be covered in the next section of this guide.
- Pay Gross Reduction: This option is here in the case that you wish to take an amount off thetop before calculating commissions for this terminal.
You can enter this amount as a flat rateor percentage.
Let’s say for example that you have a $1,000 load and you enter “2%” here.The system will calculate the commission for this terminal after taking 2% off the top, or inother words, will calculate the commission based on $980 in this example.
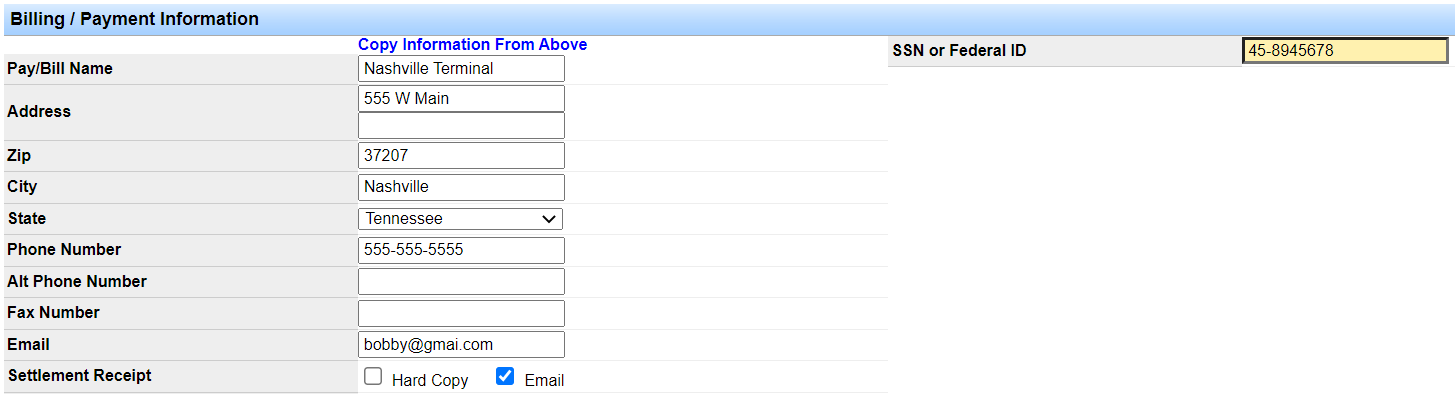
Now, let’s take a look at the bottom half of the form, which is the billing/payment information for the terminal.
Below is a screenshot as well as an explanation of fields.
Explanation of Fields*Yellow fields are required* The first thing you will see in this section is a link to “copy information from above.” If you click this link, the name, address, phone number, and email will carry over from the top half of theform.
- Pay/Bill Name: This is the name for the terminal that will show up in the settlements system when you go to pay this terminal.
- Address/City/State/Zip: Enter the full address forthis terminal.
Note, if you enter the zip first,the city and state will auto populate.
- Phone Number: Enter the phone number for this terminal.
- Alt Phone Number: Enter an alternate or secondary number for this terminal if applicable.
- Email: This is the settlements email for this terminal.In other words, when you process settlements for this terminal, if you want the system to email the statement to the agent, thenyou must make sure you have a valid email entered here.
- Settlement Receipt: If you want the system to automatically email out the settlement statements to this terminal when you process settlements, then you must check the “Email” option here AND make sure you have a valid email entered in the email field above..
Set and Enforce Terminal Data Restrictions for System Users
- SSN or Federal ID: Enter the social security number or federal ID for this terminal.
This is required.
Once all of the information has been entered for the terminal, click “Save Record.” Set and Enforce Terminal Data Restrictions for System Users Once you have set up all of the terminals in the system, you can assign system users to the appropriate terminals and enforce data restrictions if needed.To do this, navigate to the user’s profile by going to Administration > Manage System Users > Search System Users.
Open the user’s profile.
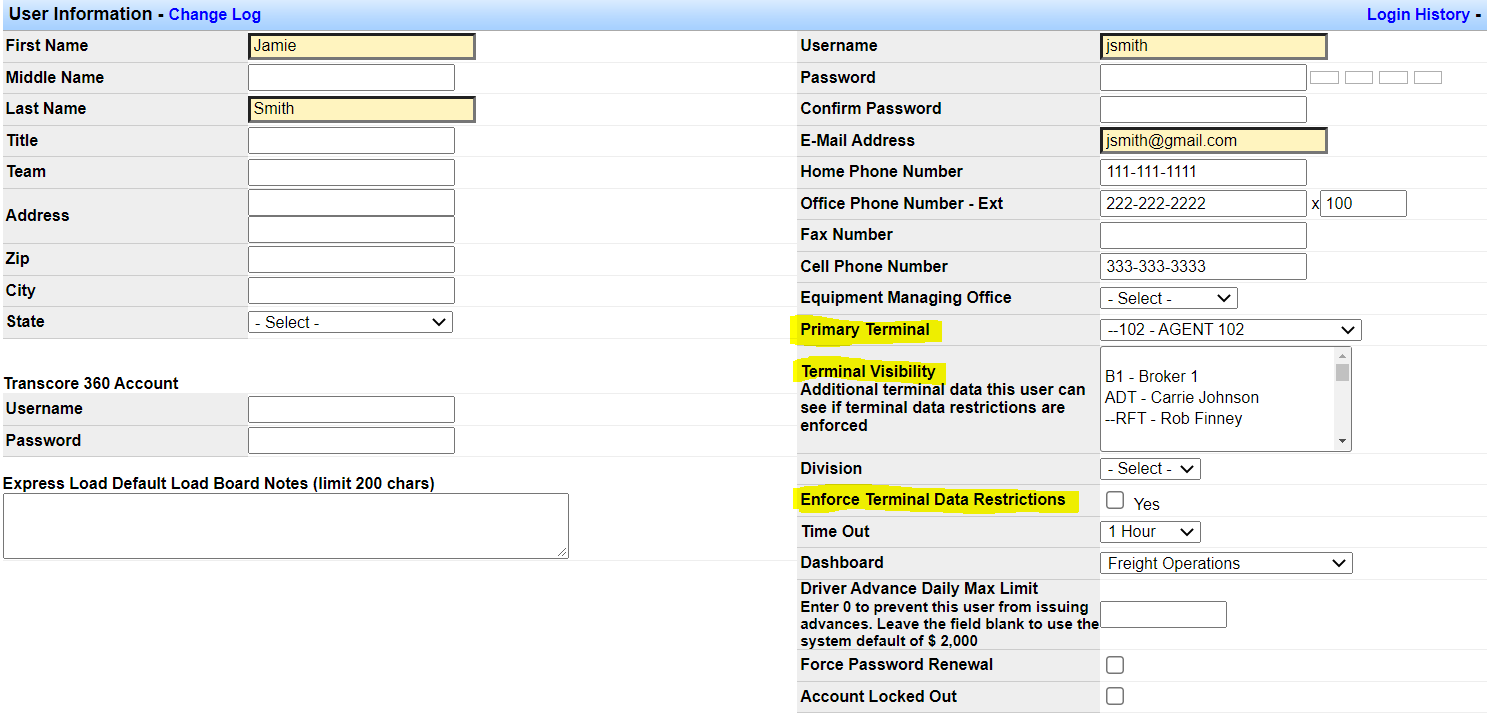
There are three fields here applicable to terminal permissions: “Primary Terminal,” “Terminal Visibility” and “Enforce Terminal Data Restrictions.” See screenshot and explanations of each field below: Explanation of Fields:
- Primary Terminal: You can assign this user to a primary terminal if you want.
This would bethe user’s main/primary terminal.
When this user adds a load to the system, the terminal onthe load will default to the primary terminal.
Be aware that the “primary terminal” will also be defaulted in the “terminal” filter on several reports for this user.
Search/Edit Terminals
- Terminal Visibility: This option is here in the case that this user needs to be able to see information assigned to other specific terminals.
You can select multiple terminals by holding down the “Ctrl” key on your keyboard and clicking the desired terminals.
- Enforce Terminal Data Restrictions: If you only wantthe user to see and access the information in the system assigned to their primary terminal as well as any other terminals youmay have granted visibility for, then check this box.
Otherwise, if you leave this box unchecked, then the user will be able to see everything assigned to all terminals, or in other words not be tied down to any data restrictions.
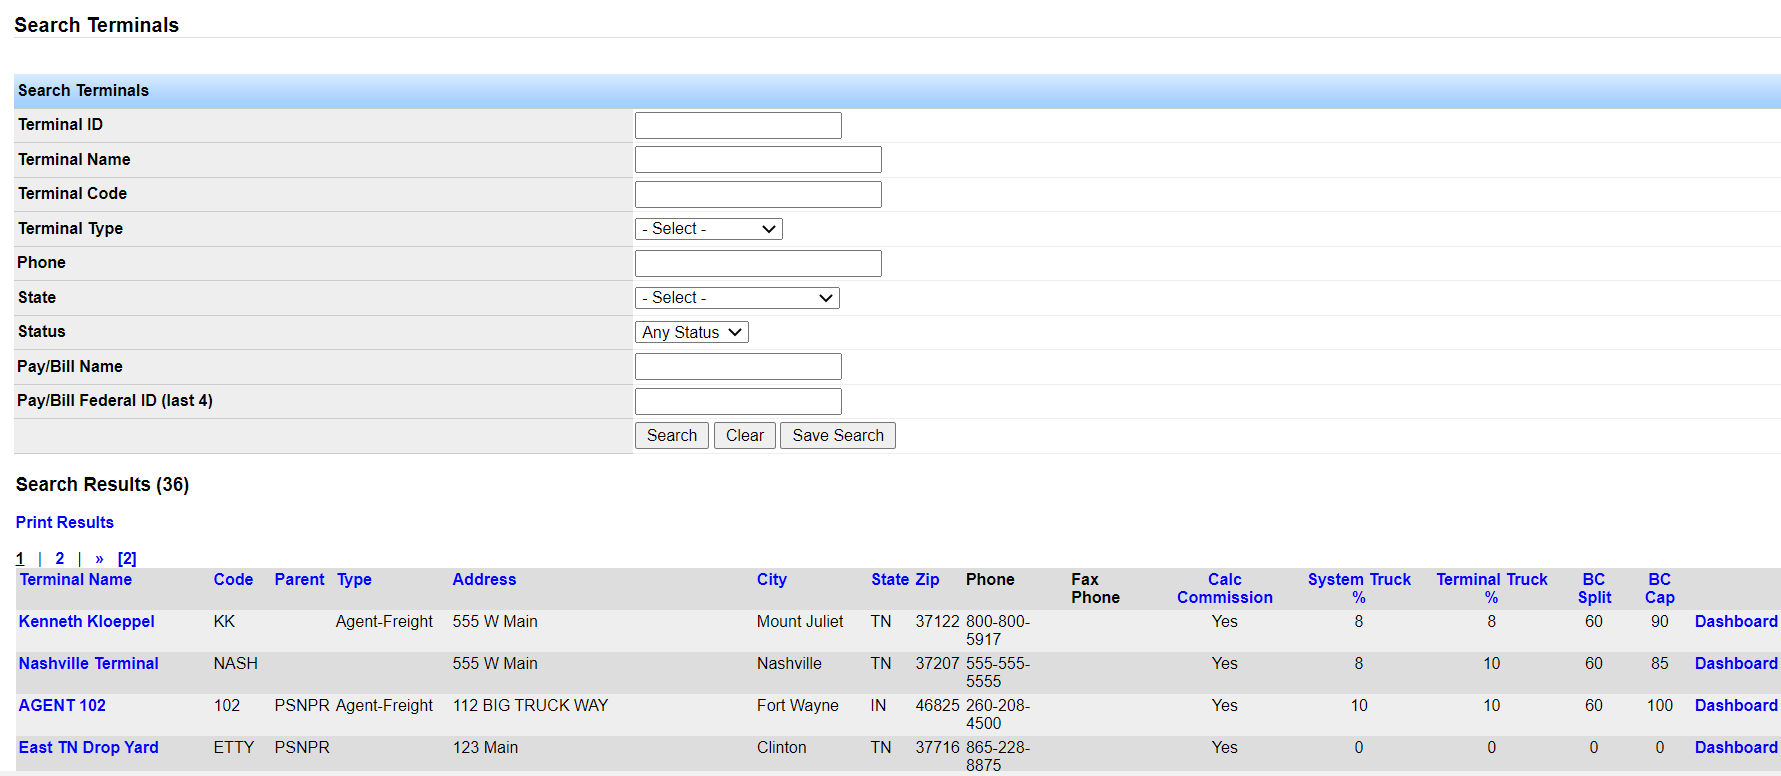
Search/Edit Terminals Once you have added all of your terminals to Transport Pro, you can easily run a search foryour terminals, and make any edits as needed.To search for terminals, go to Administration > Manage Terminals > Search Terminals.
Use anyof the search filters as desired, or just click “search” to bring up a list of all terminals in the system.
The search results will look like this: From here, you can click on the terminal name to pull up the profile for that specific terminal.You can simply review the information, or make any edits as needed.
If you have any questions about adding or managing terminals in Transport Pro, please contact our support team at support@transportpro.net.