Add a Company Driver Profile
Introduction This guide shows you how to add a company driver profile to the system as well as how toedit the profile as needed.
It is important to note that unlike an owner operator, when it comes time to pay the company driver, the system will bypass the owner of the truck and pay the driver directly.
It is also important to note that when the settlements get created for company drivers, the system calculates the gross amount, and does not calculate payroll taxes.
Transport Pro isnot an HR type of solution, and does not calculate payroll taxes for company drivers, or W-2employees.
However, there are detailed reports youcan easily pull in the system for company drivers, and send them to your payroll provider.
If you have any questions about adding or managing company driver profiles in Transport Pro,please contact our support team at support@transportpro.net.
Add a Company Driver Profile To add a company driver to Transport Pro go to Drivers/Equip > Drivers > Add Driver.
You need to make sure the “Company Driver” flag is flipped to “Yes.” When you set this flag, a“Payment Information” section becomes available.
So,you will then notice that this form issplit out into two sections: Driver Information and Payment Information.
Below is a screenshot of the driver information form followed by an explanation of fields.
Explanation of Fields*Yellow fields are required.*
- Status: In order to dispatch this driver the status MUSTbe “Active.” You can update the status at any time.
- Company Driver: “Yes” should be selected here fora company driver.
- Salutation: Enter the salutation if desired.
- Name (first, middle, last): Enter the driver’s full name.
The first and last names are required.
- Zip/City/State: Enter the driver’s full address.
If you enter the zip code first, the city/state will auto-populate.
- Home/Cell/Fax Phone Numbers: Enter all applicable phone numbers for the driver.
- CB Handle: Enter the driver’s CB handle.
- Email: Enter the driver’s email.
- EOBR Type: If this driver is using a supported EO BR service, select the EOBR type here.You will need to work with the technical support teamto ensure the integration with a supported ELD is set up correctly.
To set up this integration, please contact support@transportpro.net.
- EOBR ID: Depending on which ELD service you are using,this value will vary.
First, make sure that the integration with a supported ELD service is set up correctly by contacting tech support at support@transportpro.net.
The tech support team will tell you what ID to enter here.
- Medical: Check any medical issues this driver has.This information does not drive anything and simply lives on this record for your informational purposes.
This section has several medical issues you can select by default.
Note: If you would like to add additional options here, you can do so by going to Administration > Manage Site Settings > Manage Drop down Values.
These options are managed under the “Driver Medical” table.
- Home Terminal: Select the driver’s home terminal.If you’re not running multiple terminals,simply select your company name here.
- Driver Group: This is an optional tag for internal organizational purposes.
For example, if youput your drivers into groups (i.e.
Group A, Group B, etc) you can tag that information and runa search for drivers in the system by group.
If you would like options added to this drop down,please contact support@transportpro.netand let usknow what you need added here.
- Dispatch Group: Similar to the “driver group” tagthis is an option you can use for internal organizational purposes, and you can run a search for drivers in the system using thistag/filter.
Perhaps you split your dispatchers into groups and those groups are assigned to certain drivers.
If you would like options added tothis drop down, please contact support@transportpro.netand let us know what youneed added here.
- Dispatcher: If a specific dispatcher is assigned tothis driver, you can tag that user here.
This does not automate or drive anything at the time of dispatch.
This is simply a tag on the driver record for your informational purposes.
You can also run a search for drivers in the system by “dispatcher.”
- Recruiter: You can tag the system user who recruited the driver here if you wish.
This is simply a tag on the driver record for your informational purposes.
You can also run a search for drivers in the system by “recruiter.”
- Recruiting Source: Tag the recruiting source hereif you wish.
If you need options added tothis drop down, please contact support@transportpro.netand let us know what you need here.
- Hiring Eligibility: Tag the hiring eligibility hereif you wish.
If you need options added to this drop down, please contact support@transportpro.netand let us know what you need here.
- Birthdate: Enter the driver’s birthdate.
This is required.
- SSN: Enter the driver’s social security number.
Thisis required.
- Sex: Tag the sex of the driver if desired.
- Race: Tag the race of the driver if desired.
- Trailer Qualifications: You can check the trailer types that this driver is qualified to haul, if desired.
This is not required.
Checking trailer qualifications here will drive a notification at thetime of dispatch if the system detects an issue.
For example, let’s say this driver is qualified tohaul a van and reefer and those two options are checked here on his profile.
If a dispatcher tries to dispatch this driver on a different trailer type, such as a step deck, then the dispatcher will receive a notification that says “This driver is not qualified to haul this type of trailer.” Note,this is not a hard stop, and the system will still allow the dispatch, but it will bring the issue tothe dispatcher’s attention.
- Hire Date: Enter the driver’s hire date.
- Review Date: Enter the driver’s review date.
- MVR Date: Enter the driver’s motor vehicle record(MVR) date.
- Physical Due Date: Enter the driver’s physical duedate.
- Physical Submitted Date: Enter the date that the driver’s physical was submitted.
- CDL Matches Physical: Does the driver’s CDL information match the driver’s physical?
If so,check “yes.”
- CDL Number: Enter the driver’s CDL number.
- CDL State: Enter the driver’s CDL state.
- CDL Expiration Date: Enter the driver’s CDL expiration date.
- Resident Expiration Date: Enter the driver’s resident expiration date, if applicable.
- TWIC Expiration Date: Enter the driver’s transportation worker identification credential(TWIC) expiration date, if applicable.
- Passport #: Enter the driver’s passport number.
- Passport Expiration Date: Enter the driver’s passport expiration date.
- Occ Acc Insurance Carrier: If this driver has occupational accident insurance, enter thename of the insurance carrier here.
- Occ Acc Insurance Start Date: Enter the start of coverage date for the occ acc insurance, if applicable.
- Occ Acc Insurance Exp Date: Enter the expiration dateof the occ acc insurance, if applicable.
- Trip Advance Settings: This section can only be used IFyou have a real-time integration with Comdata or EFS.
This realtime integration allows users to issue advances to fuel cardsat the time of dispatch, and you can set parameters for those advances here on the driver profile.
If you have the realtime service with either Comdata or EFS, and you would like to getthat integrated with Transport Pro, please email ourtech support team at support@transportpro.netfor further guidance.
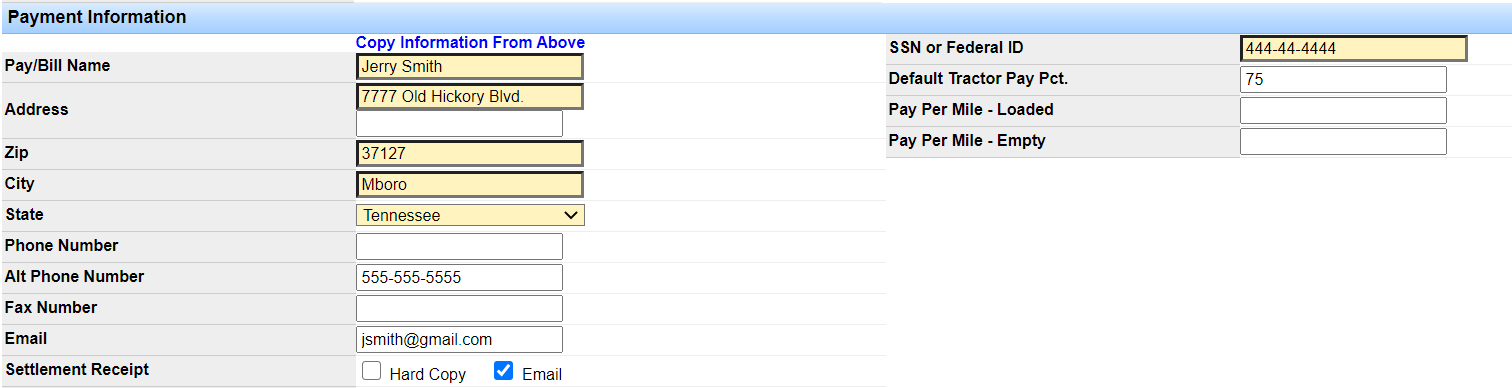
Now, let’s take a look at the bottom half of the company driver profile, which is the “Payment Information.” Below is a screenshot of this form followed by an explanation of fields.
This section MUSTbe filled out.
- Explanation of Fields: The first thing you will see in this section is ablue hyperlink that says “Copy Information From Above.” If you click this link, the system will copythe name, address, phone numbers, and email from above to this section, saving you some data entry.
- Pay/Bill Name: The “Pay/Bill Name” reflects the account name that the settlements show upunder in the settlements section of the system.
- Zip/City/State: Enter the zip code, city and state associated with this driver’s settlement account information.
- Phone Number: Enter the primary phone number for the driver.
If you have “copied from above” the “main phone number” will be inserted here.
- Alt Phone Number: Enter an alternate or secondary phone number for this driver.
If you have“copied from above” the “cell phone number” will be inserted here.
- Fax Phone Number: Enter the driver’s fax phone number.
If you have “copied from above” the “fax phone number” will be inserted here.
- Email: Enter the email address you would like to usefor this driver’s settlements.
This is the email that the system will send the settlement summaries to when you process settlements for this driver.
If you have “copied from above” the email from above will be inserted.
- Settlement Receipt: Select how this driver prefers to receive his/her settlement summaries.
If you would like for the system to automatically sendout the settlement summaries to this driver at the time of processing settlements, you MUST check the “Email” option here ANDmake sure you have a valid email in the “Email” field above.
- SSN or Federal ID: This field is required.
You must enter either the driver’s social security number or federal ID.
- Default Tractor Pay Pct: If this driver gets paida percentage of line haul, enter that percentage here.
For example, if this driver is paid 45% of line haul, you would enter “45” here.
Do not enter the percentage sign (%).
Search/Edit Company Driver Profiles
- Pay Per Mile - Loaded: If this driver is paid on a per mile basis, enter the per mile rate for loaded miles here.
- Pay Per Mile - Empty: If this driver is paid on aper mile basis, enter the per mile rate for empty miles here.
Note: You MUST fill out the driver’s default rateof pay, whether it is percentage or per mile.When you go to dispatch this driver, the system will look at this profile and auto-calculate thepay based on the default pay you have set here.
Once all of the information has been entered, click“Save Record.” You have now successfully added a company driver tothe system.
You also want to be sure that the driver and tractor profiles are linked.
This needs to be done before you can start dispatching.
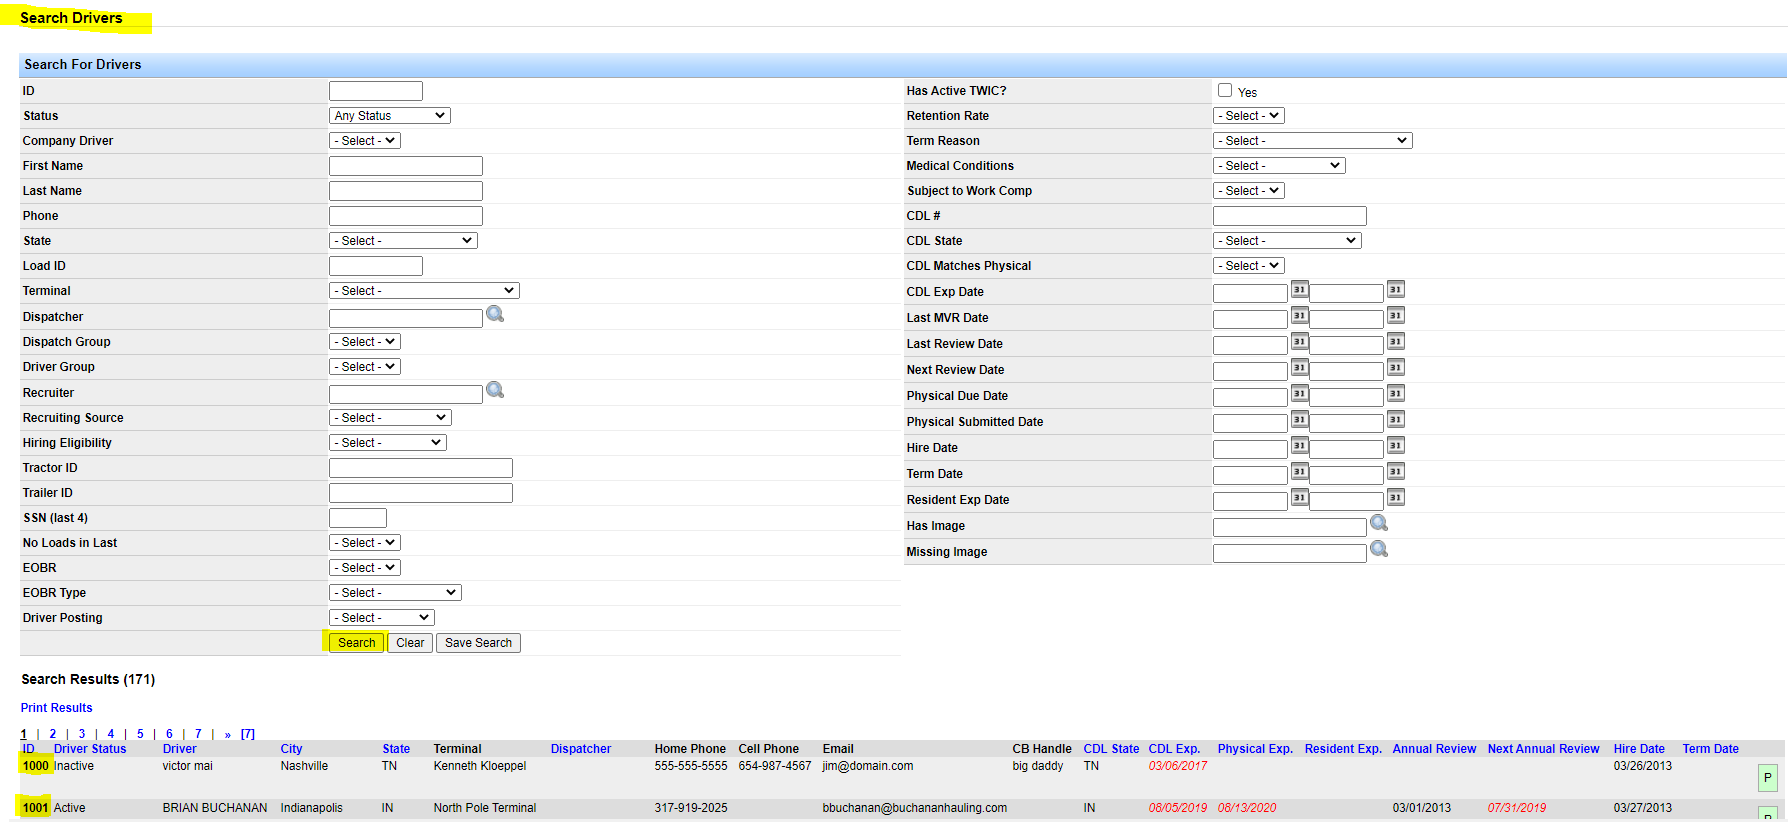
Search/Edit Company Driver Profiles If you need to make an edit to the company driver’s profile go to Drivers/Equip > Drivers > Search Drivers.
You can useany desired filter options, or you can just click “Search” to bring up a list of all drivers inthe system.
If you need to review a profile in more detail, oryou need to edit the record, click on the “ID.”
Adding and linking equipment is shown in a separate guide.
If you have any questions about how to set up company driver profiles in Transport Pro, please contact us at support@transportpro.net.